
- Cucumber Testing | A Concise Tutorial for Beginners
- Ranorex Tutorial – A Powerful Test Automation you Need to Know
- SOAPUI Tutorial for Beginners | Testing SOAP Services
- Manual Testing Tutorial: Definition Concepts, Types & Tool | Guide to Learn [BEST & NEW]
- Manual Testing Tutorial: Definition Concepts, Types & Tool | Guide to Learn [BEST & NEW]
- Tricentis Tosca | Tosca Automation Testing Tool Online Tutorial
- JMeter Tutorial
- Tools Support For Testing CTFL Tutorial

JMeter Tutorial
Last updated on 13th Oct 2020, Blog, Software Testing, Tutorials
What Is JMeter?
JMeter is a powerful automated testing tool with enormous testing capabilities. It is a Java desktop application and the GUI uses the Swing graphical API. It was developed by Stefano Mazzocchi of the Apache Software Foundation. It was initially developed to do web application testing, later it extended its abilities to other areas of testing.
Subscribe For Free Demo
Error: Contact form not found.
Why Do We Use JMeter?
While JMeter has gained immense popularity in Load testing, it is also a great tool to test other application areas like APIs, FTP servers, database performance, etc. It helps to measure and analyze the performance of web applications and other variety of services.
Let’s say that your organization recently launched a commercial web application that will be accessed across the globe. Your organization is expecting that it will have hundreds and thousands of concurrent users accessing the website. So, the web servers must be able to handle the user action efficiently.
Your organization is keen to know how the web servers will perform in such situations.
As a tester, you need to provide results in such a scenario. It is not feasible for any organization to arrange that many testers to manually check the performance.
In such situations, a tool that can simulate real-time user’s behavior is required and thankfully, JMeter is such a tool that can help you do such testing. JMeter has proved to be the best tool for load testing so far.
JMeter Features
Following are some of the features of JMeter −
- Being an open source software, it is freely available.
- It has a simple and intuitive GUI.
- JMeter can conduct load and performance test for many different server types − Web – HTTP, HTTPS, SOAP, Database via JDBC, LDAP, JMS, Mail – POP3, etc.
- It is a platform-independent tool. On Linux/Unix, JMeter can be invoked by clicking on JMeter shell script. On Windows, it can be invoked by starting the jmeter.bat file.
- It has full Swing and lightweight component support (precompiled JAR uses packages javax.swing.* ).
- JMeter store its test plans in XML format. This means you can generate a test plan using a text editor.
- Its full multi-threading framework allows concurrent sampling by many threads and simultaneous sampling of different functions by separate thread groups.
- It is highly extensible.
- It can also be used to perform automated and functional testing of the applications.
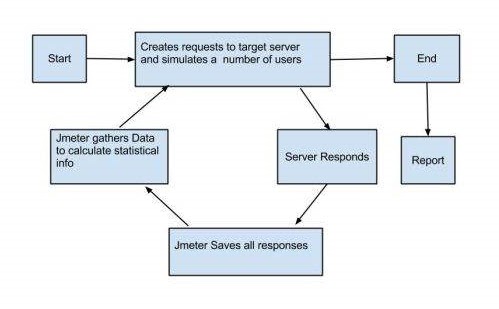
How JMeter Works?
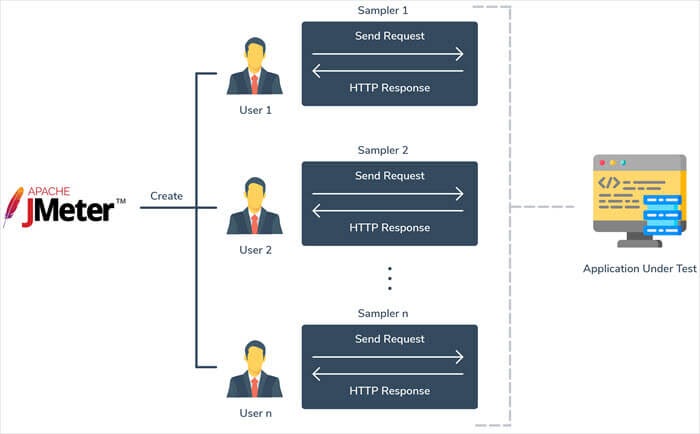
JMeter simulates a group of users sending requests to a target server, and returns statistics that show the performance/functionality of the target server/application via tables, graphs, etc.
Take a look at the following figure that depicts how JMeter works −
Advantages Of JMeter
The advantages of JMeter are as follows:
- 1. Free tool: It is a free tool. Any developer/tester can use it without spending a penny to buy the license.
- 2. Multiple platform support: JMeter is completely based on Java. This makes the tool completely independent of the platform so that the developers can use it on a platform of their choice.
- 3. Open Source: It is an open-source tool so it helps developers to easily customize the source code based on their requirements.
- 4. Record and Playback feature: By using the Record and Playback option in JMeter, the tester performs its steps for testing, which is recorded by JMeter. The tester can play the recorded steps repeatedly for their testing.
- 5. Large Resources: It is a popular load testing tool. This tool is used by a good percentage of testing professionals across the globe. You will find plenty of free tutorials and free plugins online that will help you with additional functionalities.
- 6. Though the core functionality of JMeter is to perform load testing, it can also be aggressively used for functionality testing. Also, other areas like FTP performance, database performance, etc. can be tested using JMeter.
- 7. JMeter can be used for testing of both static and dynamic resources in the website.
- 8. Different types of reports (both in numbers and in graphs) are available to monitor application performance.
- 9. Non-GUI mode of JMeter is available when a higher level of load needs to be applied on servers while testing performance.
Advantage Of JMeter Over LoadRunner
LoadRunner is a major competition for JMeter. However, there are major drawbacks in LoadRunner that make JMeter more powerful and competitive.
Here are some of the reasons:
- 1. LoadRunner does not provide a free license and is expensive. The available trial versions are also not very easy to download and use.
- 2. LoadRunner has limited load generation capacity however, JMeter has unlimited load generation capacity.
- 3. JMeter provides a record and playback option, so even a black box tester (who does not know writing code) can use JMeter for testing. On the other hand, LoadRunner needs some scripting knowledge to work with it.
How JMeter Works?
JMeter simulates a heavy load on the server or group of servers to test its strength and to analyze the performance of the server when different types of loads are applied to it. To do this, JMeter creates a virtual load of different sizes and apply them on the server and measure the response times with various loads.
With the increase in load, the different components in the web application provide different response times.
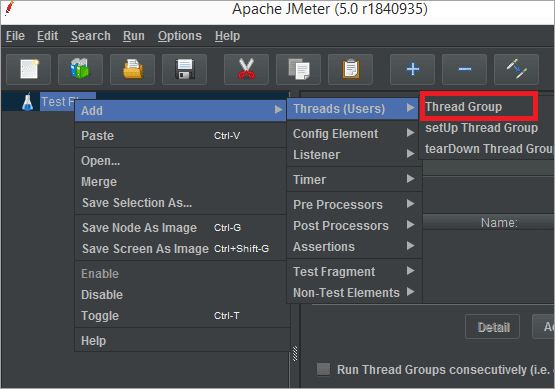
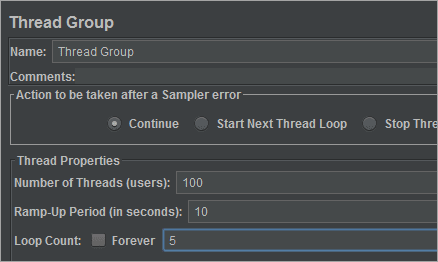
1) Add Thread Group:
Based on the expected number of users, the tester can define the threads (each thread represents a user), loop count (means how many times the test must repeat), and Ramp Up Period (means how much delay must be applied before starting the next user).
For Example, if the expected number of users accessing the website is 100 then tester sets the thread to 100 and sets a ramp-up period of 10 sec, there will be a delay before starting users would be 10 seconds (100/10).
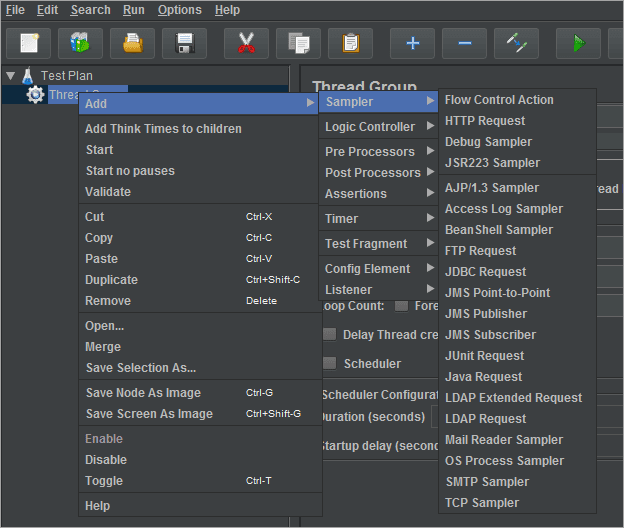
2) Add JMeter elements:
Elements are added through Samplers (as shown in the below image). Elements tell JMeter about which type of request is sent to which server and with what parameters. HTTP Request, FTP Request, JDBC Requests are a few of the commonly used elements.

Best In-Depth Practical Oriented JMeter Training By Experts Trainers
- Instructor-led Sessions
- Real-life Case Studies
- Assignments
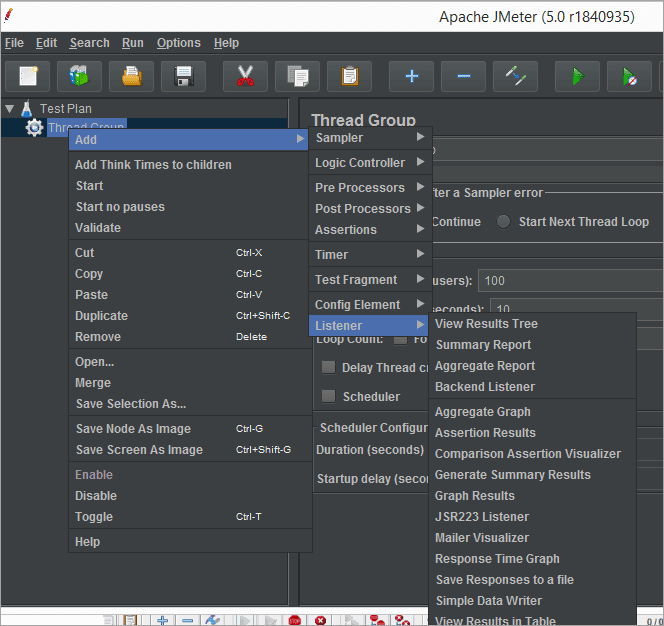
3) Add Graph Result:
The Listener lists various reports that provide the tester with a variety of graphical analyses of performance reports. The tester can set different reports to measure the performance.
4) Execute Test:
Once the required settings are done, click on the “Start” icon to begin the test. Once the test is complete, the tester can view the results using Sampler as explained in the above step.

Note: The load that JMeter could generate without distorting results can be increased in two ways:
- Run the tests in nonGUI mode (using console – find more)
- Distribute the load generation to multiple JMeter servers.
JMeter Installation
We assume that you have already installed ‘jdk 1.6’ or above on your machine and successfully configured the environment variables required to run and compile java programs.
However, to verify whether you have Java installed on your system. Open your console and execute the following java commands as per the operating system you are working on.
| Operating System | Task | Command |
|---|---|---|
| Windows | Open Command Console | c:\> java -version |
| Linux | Open Command Terminal | $ java -version |
| Mac | Open Terminal | machine: ~ javaTpoint$ java -version |
There are two versions of JMeter available. Download according to the operating system you are working on.
| File | Description |
|---|---|
| apache-jmeter-4.0.tgz | JMeter for Linux/Unix. |
| apache-jmeter-4.0.zip | JMeter for Windows |
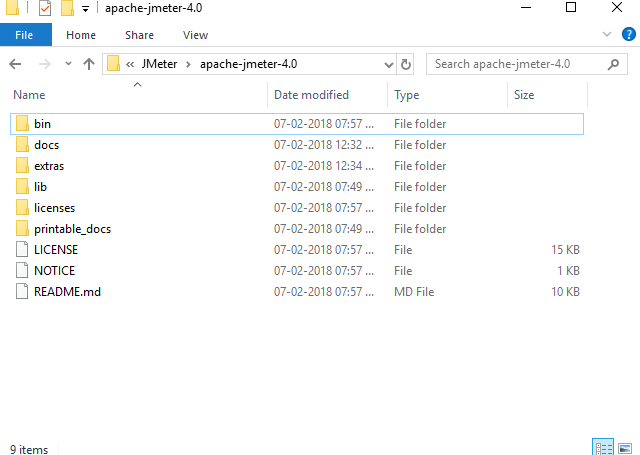
- After downloading JMeter, you need to extract the files at a convenient directory.
- The following image shows the structure of the directories and files –
- To launch JMeter in GUI mode – go to the bin directory and double click on the respective executable file as per the operating system you are working on. For example:
| Operating System | Task |
|---|---|
| Windows | Click on ApacheJMeter.jar |
| Linux | Click on ApacheJMeter.sh |
| Mac | Click on ApacheJMeter.sh |
The following image shows the defaultApache JMeter interface –
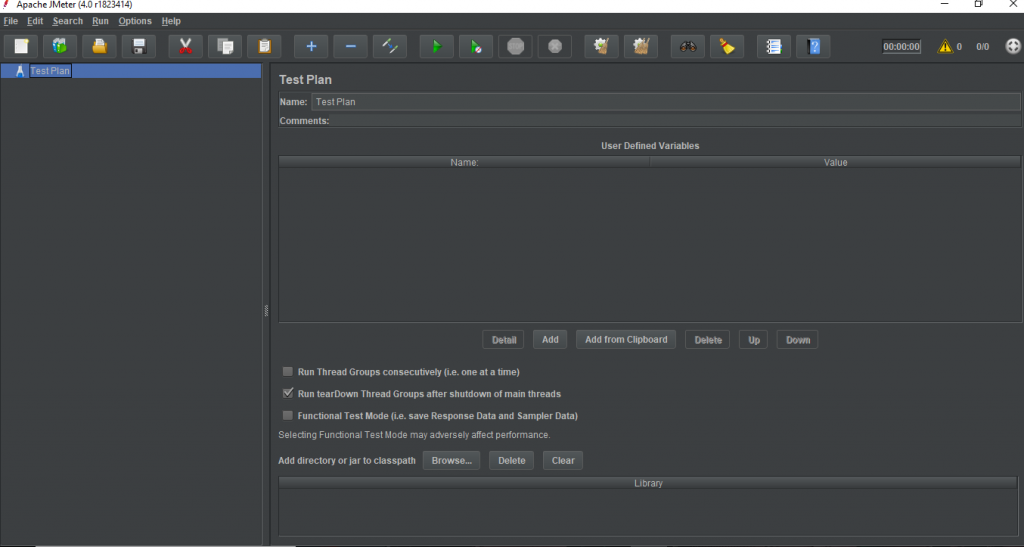
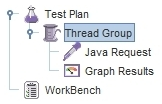
The following is our first JMeter test plan:
Note: When you specify the number of thread groups/threads running in a test plan, you need to be careful about the capability of the machine running JMeter. The more load you put on the machine, the less accurate timing information you might get. Using non-GUI mode with results written to files can help. You even can consider running your test in multiple machines (remote testing) for a test with a heavy load
Running a test plan
Once you are done on defining a test plan, you can run it. To run a test plan, you can do that through the Run menu or the toolbar. When a test plan is running, you can check the current status from the upper-right corner:
The green square icon indicates a test plan is running. The yellow triangle icon with a number is the error/fatal counter. By default, JMeter log file jmeter.log is located under the bin directory (or using -j option to specify it). To see the logging screen from the GUI, you can toggle it on and off by clicking on the yellow triangle icon or choose the Options menu -> Log Viewer. 5/5 indicates that the total number of threads is five and five threads are running.
To clear results in the whole test plan, you can choose Clear All from the Run menu. Or, you can choose Clear to clear results in a selected element.
You can stop or shutdown a running test through the Run menu or the toolbar. The difference between stop and shutdown is that threads stop immediately for stop and threads stop gracefully at the end of current work for the shutdown. For the non-GUI mode, you can use shutdown.cmd (or shutdown.sh) or stoptest.cmd (or stoptest.sh).
Saving a test plan
To save a test plan, you can do that through the File menu or the toolbar. A test plan is saved with extension name jmx. You can save a partial test plan by using Save Selection As from the File menu or the popup menu.
Debugging a test plan
Enabling debug logging can be helpful in creating a test plan. Most test element support debug logging. To enable debug logging on a test element, select a test element and choose the Help menu -> Enable debug. You can disable it by choosing Disable to debug. To view debug logging, open jmeter.log under the bin directory or enable Log Viewer before you run it.
Remote testing
You can use JMeter to do remote (or distributed) testing. Using remote testing can save you trouble in copying the test plan to each machine and also allow you to simulate a larger load with more users. In remote testing, one JMeter client is used as the master to control other JMeter instances (serving as slaves) running as remote servers. Data will be collected by the client. You can start a JMeter server by running JMeter-server.bat (for Windows) or JMeter-server (for Unix/Linux).
All JMeter instances should use the same version of JMeter. In the JMeter client, you add remote servers into the property remote_hosts in the jmeter.properties. Then, you can start the JMeter client and load the test plan. To start remote servers, select the Run menu -> Remote Start or Remote Start All. If you are using a non-GUI client, you can run:
Test Plan Elements
A JMeter test plan is constructed by test elements as a tree structure (there are few nontest elements you can add in the WorkBench). JMeter provides a rich set of test elements. Those are what make JMeter such a powerful tool. Most of the test elements are processed in the order they appear in the test tree. Basically, you use samplers to test against a server and use logic controllers to control the flow of a test run and use listeners to gather or view testing results from the server.
Types of Jmeter Test Plan Elements
Samplers
There are two types of controllers. Samplers are one of them. Samplers generate requests (or samples) and perform actual testing jobs in JMeter. Mostly, samplers are used to send requests to a server and wait for responses.
JMeter has samplers that support the following protocols: HTTP (the HTTP Request sampler), FTP (the FTP Request sampler), TCP (the TCP sampler), SMTP (the SMTP sampler), POP3 (the Mail Reader sampler) and IMAP (the Mail Reader sampler). You even can execute commands on the local machine (the OS Process sampler) or send an SQL query to a database (the JDBC Request sampler). To use your own Java classes, you can use the Java Request sampler or JUnit Request sampler (for JUnit test classes). To use a scripting language, you can use the JSR223 sampler (scripting for the Java platform) or BSF sampler (Apache Bean Scripting Framework).
There is a special sampler called Test Action Sampler. It does not send any request to the server. Instead, it can pause or stop a target thread or all threads. The Test Action sampler is used with a conditional controller.
Logic controllers
Logic controllers are controllers too. Logical controllers can break up the flow of execution and allow you to control the order that samples are processed.
For looping, you can use the Loop Controller, While Controller or ForEach Controller. For decision making, you can use If Controller. For executing a group of elements, you can use the Simple Controller or Random Order Controller. The difference is that the Simple Controller executes elements inside it in order and the Random Order Controller executes them in random order. To execute one of the elements per iteration, you can use the Interleave Controller (alternating among elements for each iteration) or Random Controller (picking one in random for each iteration). You also can use the Once Only Controller to tell JMeter to process elements inside it only once per thread.
To structure your tests better, you can break them into fragments (or modules). To include a Test Fragment (created through the Test Fragment element), you can use the Include Controller to include it through an external jmx file. Or, you can use the Module Controller to include test fragments located in any Thread Group or in the WorkBench. You can include any fragment under a logic controller even it is disabled.
Conclusion
While the choice of automation tool mainly depends on the requirement, cost-effectiveness, etc. We think JMeter is only going to gain more popularity among organizations, especially small to medium ones who cannot afford license costs, as it is license-free.