
- HTML Comments Tutorial | Convert Comments into HTML Codes
- Data Structure and Algorithms Tutorial | Ultimate Guide to Learn
- Gradle Tutorial | For Beginners [ STEP-IN ]
- Encapsulation In Java | Complete Tutorial With Examples
- What is Release Management? | A Comprehensive Tutorial for Beginners
- OOPs Concepts in Java | Learn from Basics with Examples
- The Top Basic Tools of Quality Tutorial | The Ultimate Guide
- Set Environment for C# – Learn How to Setup through this Tutorial
- C# Vs Java Tutorial | Overview and Key Difference
- List of IDEs to run C# Programs | Tutorial for Learning Path
- C Sharp Variables and Constants | The Ultimate Guide
- Unsafe Code in C-Sharp Tutorial | Everything You Need to Know
- Type Conversion Method in C# | A Complete Tutorial
- What Is Synchronization in c# Tutorial | The BEST Step-By-Step Guide
- Understanding Structures in C# | Learn in 1 Day FREE Tutorial
- Strings – C# Tutorial | A Definitive Programming Guide
- Static Keyword in C# Tutorial | Learn with Examples
- Stack Collection in C# Tutorial | A Definitive Guide for Beginners
- C# Sorted List Tutorial with Examples | Learn in 1 Day FREE
- C# Serialization Tutorial | Ultimate Guide to Learn [BEST & NEW]
- Regular Expression in C# Tutorial | Everything You Need to Know
- What is Reflection in C#? | Learn Now Tutorial
- Queue Collection in C# Tutorial | A Definitive Guide
- Properties in C# | The complete Tutorial
- C# Preprocessor Directives Tutorial | Learn in 1 Day FREE
- Polymorphism C# Tutorial | The Ultimate Guide
- C# Operators Tutorial | Learn Arithmetic, Comparison, Logical Concepts
- Namespaces – The complete C# Tutorial
- Multithreading in C# Tutorial | Learn With Examples and Advantages
- Methods – C# Tutorial | A Complete Programming Guide
- Linked List Implementation in C# Tutorial | Ultimate Guide to Learn [UPDATED]
- Introduction to C# Tutorial | Guide for Beginners
- What is Interface in C# | A Defined Free Tutorial
- C# Inheritance Tutorial | A Complete Free Tutorial
- Indexers in C# Tutorial | A Complete Programming Guide
- HashSet Collection in C# Tutorial | Complete Guide Tutorial For Free
- Generics in C# Tutorial | Learn Generic Classes and Methods
- Creating Your First C# Program Tutorial | Learn in 1 Day
- Basics of File Handling in C# Tutorial | The Ultimate Guide
- C# Exception Handling Tutorial | Learn with Best Practices
- Events – C# Tutorial | A Complete Programming Guide
- C# Enumerations Type Tutorial | Learn Everything about Enum
- Dictionary Collection in C# | Ultimate Guide to Learn [NEW & UPDATED]
- Delegates – C# Programming Guide | The Ultimate Guide for Beginners
- Understanding Decision Making Statements in C# | Learn Now Tutorial
- Classes and Objects – C# Fundamentals Tutorial
- C# BitArray Collection Tutorial | Learn in 1 Day FREE
- Attributes in C# Tutorial | Learn to work with attributes in C#
- C# Array Tutorial | Create, Declare, Initialize
- ArrayList Collection on in C# | A Complete tutorial For Beginners
- Anonymous Methods and Lambdas – C# Tutorial | A Complete Guide
- Abstraction in C# Tutorial – Learn the Abstract class and Interface
- Game Development using Unity 3D Tutorial | Ultimate Guide to Learn [UPDATED]
- C++ Reference Tutorial | A Comprehensive Guide for Beginners
- PHP vs Python | Which Is Better For Web Development
- C++ Constructors Tutorial: Types and Copy Constructors
- JavaScript Arrays Tutorial | Complete Beginner’s Guide
- What Is Maven | Maven Tutorial For Beginners
- Spring Tutorial | Perfect Guide for Beginners
- React Hooks Tutorial for Beginners | Ultimate Guide to Learn
- Python for Data Science Tutorial | Quickstart : A Complete Guide
- What is Golang? : A tutorial for beginners | Get started
- Hibernate Validator Tutorial | Learn in 1 Day FREE
- Postman Tutorial for Beginners: API Testing using Postman | A Complete Guide
- Akka Tutorial
- J2EE | Web Development Tutorial for Beginners
- Scala Exception Handling Tutorial | Learn in 1 Day [ STEP-IN ]
- Web development Tutorial
- Visual Studio Tutorial
- PyGame Tutorial
- Python Anaconda Tutorial
- Python Scikit-Learn Cheat Sheet Tutorial
- Mean Stack Tutorial
- Python Requests Tutorial
- Advanced Java Tutorial
- Spring Boot Microservices Tutorial
- Java Servlets Tutorial
- How to Install Pycharm
- Pycharm Tutorial
- Python Version Tutorial
- Python strings
- How to Download Python
- C Data Types Tutorial
- arrays in python
- Python While Loop Tutorial
- JAVA Tutorial
- Loops In C Tutorial
- Java File I/O Tutorial
- Variables in Python Tutorial
- Python Tutorial
- Python Pandas Cheat Sheet Tutorial
- Data Structures Cheat Sheet with Python Tutorial
- Python Tuples Tutorial
- Python If Else Statements Tutorial
- Python Functions Tutorial
Visual Studio Tutorial
Last updated on 13th Oct 2020, Blog, Software Engineering, Tutorials
Visual Studio is the Integrated Development Environment (IDE) provided by Microsoft in which developers can write and execute their program to develop various types of applications such as Windows, Web-based, console-based, Windows forms, and mobile application easily. It has a rich collection of tools that are used to write and modify the programs and also help to detect and correct the errors in your programs. It is not a language-specific IDE, it means Visual Studio is not only for VB.NET language, but you can use this to write code in C#, visual basic, C++, Python, JavaScript and many more languages supported by Visual Studio. It supports 36 different languages that are used to develop an application. It has a built-in compiler to run the application, and it is also available for Windows and Mac OS.
Subscribe For Free Demo
Error: Contact form not found.
Versions of Visual Studio
- Visual Studio launched First version 5.0 in 1997 and gave it name Visual Studio 97.
- Visual Studio version number 6.0 was launched in 1998 which pronounce as Visual Studio 6.0
- Visual Studio.NET was released in 2002 with version number 7.0.
- Visual Studio.NET was released in 2003 with version number 7.1.
- Visual Studio 2005 was released in 2005 with version number 8.0.
- Visual Studio 2008 was released in 2007 with version number 9.0.
- Visual Studio 2010 was released in 2010 with version number 10.0.
- Visual Studio 2012 was released in 2012 with version number 11.0.
- Visual Studio 2013 was released in 2013 with version number 12.0.
- Visual Studio 2015 was released in 2015 with version number 14.0.
- Visual Studio 2017 was released in 2017 with version number 15.0.
- Visual Studio 2019 was released in 2019 with version number 16.0.
Visual Studio is an Advanced Integrated Development Enterprise exclusively developed by Microsoft Corporation in the year 2000. It is actively used to develop Computer programs, Websites, Desktop Applications, Mobile Applications, Games and much more.
Visual Studio is capable enough to support more than 36+ Programming Languages that allows the code editor and compiler to execute nearly any programming language. Some popular languages that are supported by Visual Studio are Visual Basics, C-Programming Language, C++ Programming Language, C# Programming Language, Python, JavaScript.
Here are 3 editions of Microsoft Visual Studio as follows:
1. Community:
It is a free version which was announced in 2014. All other editions are paid. This contains the features similar to Professional edition. Using this edition, any individual developer can develop their own free or paid apps like .Net applications, Web applications and many more. In an enterprise organization, this edition has some limitations. For example, if your organization has more than 250 PCs and has annual revenue greater than $1 Million(US Dollars) then you are not permitted to use this edition. In a non-enterprise organization, up to five users can use this edition. Its main purpose is to provide the Ecosystem(Access to thousands of extensions) and Languages(You can code in C#, VB, F#, C++, HTML, JavaScript, Python, etc.) support.
2. Professional:
It is the commercial edition of Visual Studio. It comes in Visual Studio 2010 and later versions. It provides the support for XML and XSLT editing and includes tools like Server Explorer and integration with Microsoft SQL Server. Microsoft provides a free trial of this edition and after the trial period, the user has to pay to continue using it. Its main purpose is to provide Flexibility(Professional developer tools for building any application type), Productivity(Powerful features such as CodeLens improve your team’s productivity), Collaboration(Agile project planning tools, charts, etc.) and Subscriber benefits like Microsoft software, plus Azure, Pluralsight, etc.
3. Enterprise:
It is an integrated, end to end solution for teams of any size with the demanding quality and scale needs. Microsoft provides a 90-days free trial of this edition and after the trial period, the user has to pay to continue using it. The main benefit of this edition is that it is highly scalable and delivers high-quality software.
Designer
Visual Studio includes a host of visual designers to aid in the development of applications. These tools include:
Windows Forms Designer
The Windows Forms designer is used to build GUI applications using Windows Forms. Layout can be controlled by housing the controls inside other containers or locking them to the side of the form. Controls that display data (like textbox, list box and grid view) can be bound to data sources like databases or queries. Data-bound controls can be created by dragging items from the Data Sources window onto a design surface. The UI is linked with code using an event-driven programming model. The designer generates either C# or VB.NET code for the application.
WPF Designer
The WPF designer, codenamed Cider, was introduced with Visual Studio 2008. Like the Windows Forms designer it supports the drag and drop metaphor. It is used to author user interfaces targeting Windows Presentation Foundation. It supports all WPF functionality including data binding and automatic layout management. It generates XAML code for the UI. The generated XAML file is compatible with Microsoft Expression Design, the designer-oriented product. The XAML code is linked with code using a code-behind model.
Web designer/development
Visual Studio also includes a web-site editor and designer that allows web pages to be authored by dragging and dropping widgets. It is used for developing ASP.NET applications and supports HTML, CSS and JavaScript. It uses a code-behind model to link with ASP.NET code. From Visual Studio 2008 onwards, the layout engine used by the web designer is shared with Microsoft Expression Web. There is also ASP.NET MVC support for MVC technology as a separate download and ASP.NET Dynamic Data project available from Microsoft.
Class designer
The Class Designer is used to author and edit the classes (including its members and their access) using UML modeling. The Class Designer can generate C# and VB.NET code outlines for the classes and methods. It can also generate class diagrams from hand-written classes.
Data designer
The data designer can be used to graphically edit database schemas, including typed tables, primary and foreign keys and constraints. It can also be used to design queries from the graphical view.
Mapping designer
From Visual Studio 2008 onwards, the mapping designer is used by LINQ to SQL to design the mapping between database schemas and the classes that encapsulate the data. The new solution from ORM approach, ADO.NET Entity Framework, replaces and improves the old technology.
Other tools
Open Tabs Browser
The open tabs browser is used to list all open tabs and to switch between them. It is invoked using CTRL+TAB.
Properties Editor
The Properties Editor tool is used to edit properties in a GUI pane inside Visual Studio. It lists all available properties (both read-only and those which can be set) for all objects including classes, forms, web pages and other items.
Object Browser
The Object Browser is a namespace and class library browser for Microsoft .NET. It can be used to browse the namespaces (which are arranged hierarchically) in managed assemblies. The hierarchy may or may not reflect the organization in the file system.
Solution Explorer
In Visual Studio parlance, a solution is a set of code files and other resources that are used to build an application. The files in a solution are arranged hierarchically, which might or might not reflect the organization in the file system. The Solution Explorer is used to manage and browse the files in a solution.
Team Explorer
Team Explorer is used to integrate the capabilities of Azure DevOps (either Azure DevOps Services or Azure DevOps Server) into the IDE . In addition to version control integration it provides the ability to view and manage individual work items (including user stories, bugs, tasks and other documents). It is included as part of a Visual Studio installation and is also available as a standalone download.
Data Explorer
Data Explorer is used to manage databases on Microsoft SQL Server instances. It allows creation and alteration of database tables (either by issuing T-SQL commands or by using the Data designer). It can also be used to create queries and stored procedures, with the latter in either T-SQL or in managed code via SQL CLR. Debugging and IntelliSense support is available as well.
Server Explorer
The Server Explorer tool is used to manage database connections on an accessible computer. It is also used to browse running Windows Services, performance counters, Windows Event Log and message queues and use them as a datasource.
Dotfuscator Community Edition
Visual Studio includes a free ‘light’ version of Dotfuscator.
Text Generation Framework
Visual Studio includes a full text generation framework called T4 which enables Visual Studio to generate text files from templates either in the IDE or via code.
ASP.NET Web Site Administration Tool
The ASP.NET Web Site Administration Tool allows for the configuration of ASP.NET websites.
Visual Studio Tools for Office
Visual Studio Tools for Office is a SDK and an add-in for Visual Studio that includes tools for developing for the Microsoft Office suite. Previously (for Visual Studio .NET 2003 and Visual Studio 2005) it was a separate SKU that supported only Visual C# and Visual Basic languages or was included in the Team Suite. With Visual Studio 2008, it is no longer a separate SKU but is included with Professional and higher editions. A separate runtime is required when deploying VSTO solutions.
Why should you choose Visual Studio?
The main reason why Visual Studio became so popular is that it has everything which any programmer expects from any code editor with some additional and useful features. It’s lightweight, fast, open-source and cross-platform nature along with other cool features gives it an extra edge over any other editor
Features of Visual Studio
Visual Studio provides the most advanced features that the latest developers are looking for. Few of the most important features are described as follows.
- Code Editor
The Visual Studio has the best in class Code editor which supports multiple functionalities. It enables bookmarks in code to incorporate Quick Navigation. In addition to the normal text, VS also provides Incremental Search, Regex Search, Multi-item Clipboard, and Task-list.
The Editor is also capable to support Code refactoring, Parameter Reordering, Variable and Method Renaming, Interface Extraction and many more user-friendly functionalities.
- Debugger
The remarkable Debugger of the MS Visual Studio can work both as a Machine Level Debugger as well as a Source Level Debugger. It is capable of debugging Mapped Code as well as Native Code. It is capable of compiling any programming language that supports VS.
It is capable of attaching itself to the currently running process to conduct monitoring and debugging procedures on the code, provided if the source code is available. VS can incorporate Memory Dumps and Multi-threading as well.
- Designer
Visual Studio includes a number of visual designers to help within the development of applications. Some of the tools are listed below.

Learn Advanced Visual Studio Training & Certification Course
Weekday / Weekend BatchesSee Batch DetailsFiles
When you build your program, certain files are created. It may seem excessive, but they are actually just simple files and instructions for your program and the Visual Studio IDE. Navigate to C:\users\<yourname>\ Documents\Visual Studio\Syntax (or the saved file location). Find the file called Syntax.sln and a folder called Syntax. If you open the Syntax.sln (sln is a Visual Studio Solution file) with notepad, you will see it has some global settings; we advise you not edit anything!
In the Syntax folder there will be 3 folders: obj, My Project and bin. There will also be two files: Module1.vb and Syntax.vbproj. The Module1.vb is our source code for our program. Next, open up Syntax.vbproj, which is a Visual Basic Project File. This is actually an XML file which stores information about other file locations; do NOT edit it.
Now open up the bin folder; inside is another folder called debug which is where your program will output. If you double click Syntax.exe the program will run. Go back and open up the My Project folder, and focus on the file called AssemblyInfo.vb. This stores information about the program such as author, copyright, trademark, etc.
Visual Basic Variables
Variables allow us to store and retrieve data. Variables are storage locations and the data is held in the computer’s memory (RAM). In Visual Basic, variables start with the Dim keyword.
Data Type
Integer
Whole Numbers
Floating Point
Numbers with decimals e.g. 5.2
Boolean
True Or False
Double Floating
Point numbers but more accurate
Char
Single characters
Variables can start with uppercase or lowercase characters.
Arrays
An array is a series of elements of the same type placed in contiguous memory locations that can be individually referenced by adding an index to a unique identifier.
That means that, for example, five values of type int can be declared as an array without having to declare 5 different variables (each with its own identifier). Instead, using an array, the five int values are stored in contiguous memory locations, and all five can be accessed using the same identifier, with the proper index.
Initializing arrays
By default, regular arrays of local scope (for example, those declared within a function) are left uninitialized. This means that none of its elements are set to any particular value; their contents are undetermined at the point the array is declared.
Character sequences
The string class has been briefly introduced in an earlier chapter. It is a very powerful class to handle and manipulate strings of characters. However, because strings are, in fact, sequences of characters, we can represent them also as plain arrays of elements of a character type.
Strings and null-terminated character sequences
Plain arrays with null-terminated sequences of characters are the typical types used in the C language to represent strings (that is why they are also known as C-strings). In C++, even though the standard library defines a specific type for strings (class string), still, plain arrays with null-terminated sequences of characters (C-strings) are a natural way of representing strings in the language; in fact, string literals still always produce null-terminated character sequences, and not string objects.
Pointers
In earlier chapters, variables have been explained as locations in the computer’s memory which can be accessed by their identifier (their name). This way, the program does not need to care about the physical address of the data in memory; it simply uses the identifier whenever it needs to refer to the variable.
For a C++ program, the memory of a computer is like a succession of memory cells, each one byte in size, and each with a unique address. These single-byte memory cells are ordered in a way that allows data representations larger than one byte to occupy memory cells that have consecutive addresses.
This way, each cell can be easily located in the memory by means of its unique address. For example, the memory cell with the address 1776 always follows immediately after the cell with address 1775 and precedes the one with 1777, and is exactly one thousand cells after 776 and exactly one thousand cells before 2776.
When a variable is declared, the memory needed to store its value is assigned a specific location in memory (its memory address). Generally, C++ programs do not actively decide the exact memory addresses where its variables are stored. Fortunately, that task is left to the environment where the program is run – generally, an operating system that decides the particular memory locations on runtime. However, it may be useful for a program to be able to obtain the address of a variable during runtime in order to access data cells that are at a certain position relative to it.
Dynamic memory
In the programs seen in previous chapters, all memory needs were determined before program execution by defining the variables needed. But there may be cases where the memory needs of a program can only be determined during runtime. For example, when the memory needed depends on user input. In these cases, programs need to dynamically allocate memory, for which the C++ language integrates the operators new and delete.
Data structures
A data structure is a group of data elements grouped together under one name. These data elements, known as members, can have different types and different lengths.
Other data types
Type aliases (typedef / using)
A type alias is a different name by which a type can be identified. In C++, any valid type can be aliased so that it can be referred to with a different identifier.
Unions
Unions allow one portion of memory to be accessed as different data types. Its declaration and use is similar to the one of structures, but its functionality is totally different:
Anonymous unions
When unions are members of a class (or structure), they can be declared with no name. In this case, they become anonymous unions, and its members are directly accessible from objects by their member names. For example, see the differences between these two structure declarations:
Enumerated types (enum)
Enumerated types are types that are defined with a set of custom identifiers, known as enumerators, as possible values. Objects of these enumerated types can take any of these enumerators as value
Visual Basic Managing Errors
There are always problems with every program that is released (known as “bugs”), and they can occur at any time. We can solve these problems easily by using a try catch block to “catch” the exception. There are different types of exceptions which can occur, such as an overflowException or a formatException. Create a new VB Console Application and name it ManagingErrors.
How to Download and Install Visual Studio for VB.NET?
Now we will follow the procedure to download Visual Studio IDE, so we can simply develop program in VB.NET.
Step 1. For downloading the Visual Studio IDE, go through the link given below:
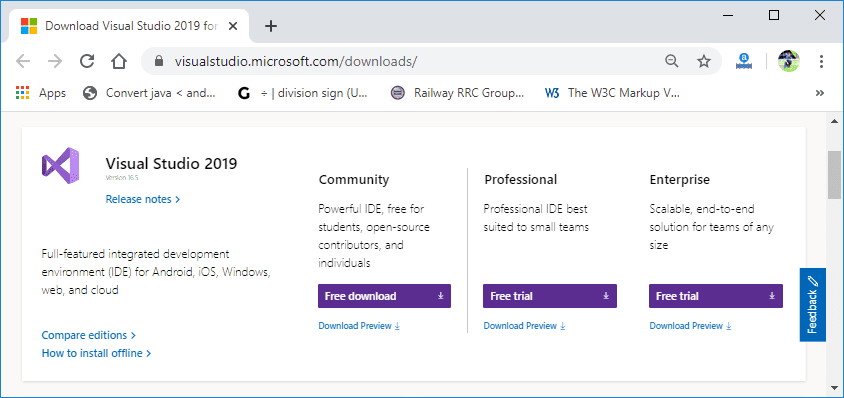
Select one to download IDE
- Visual Studio 2019 Community Edition
- Visual Studio 2019 Professional Edition (90 Day Free Trial)
- And Visual Studio 2019 Enterprise Edition (90 Day Free Trial)
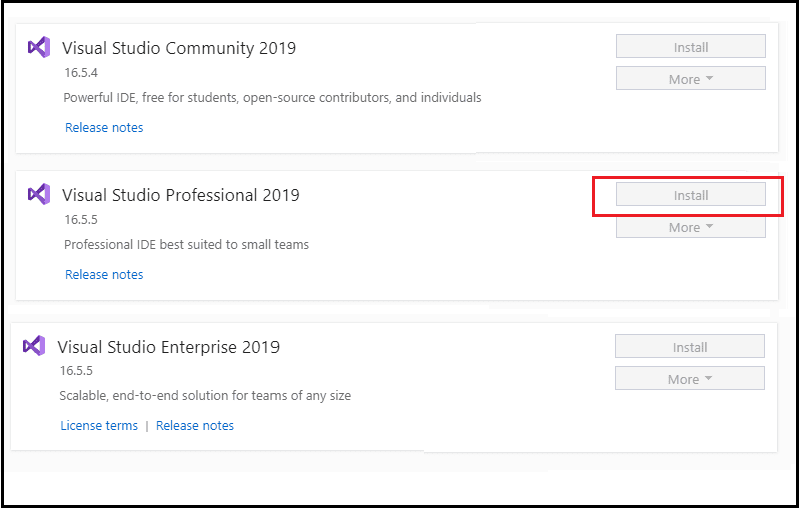
In this tutorial, we will use Visual Studio 2019 Professional Edition
Step 2. As clicked on download link, it starts downloading an .exe file, as shown in the image below.
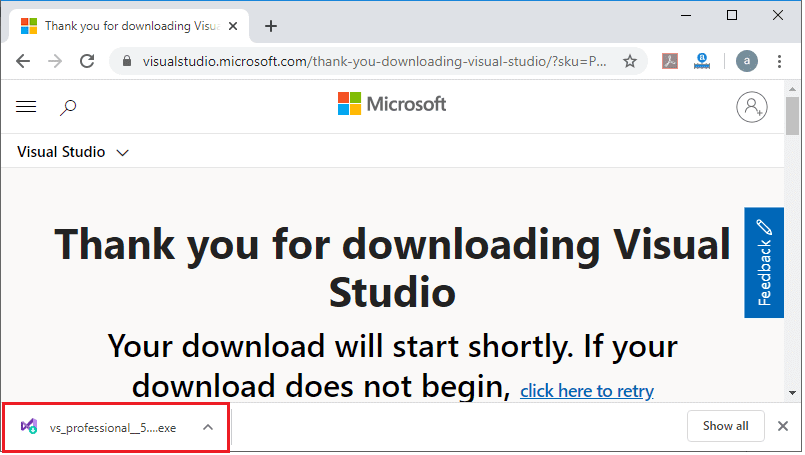
Step 3. Click on the .exe file and then, it shows a pop-up window.
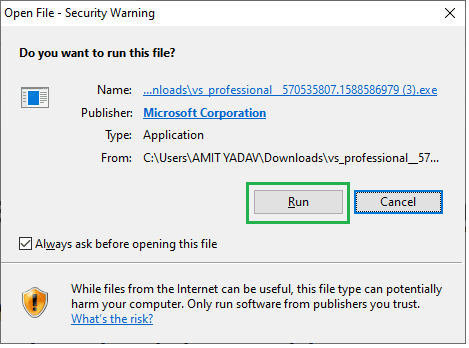
Step 4. Click on the Run button, and then it shows the below image.
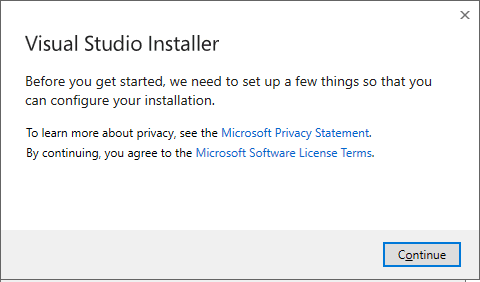
Step 5. Click on the Continue Button
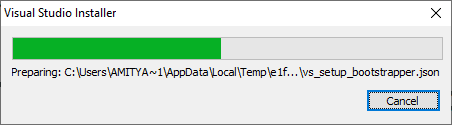
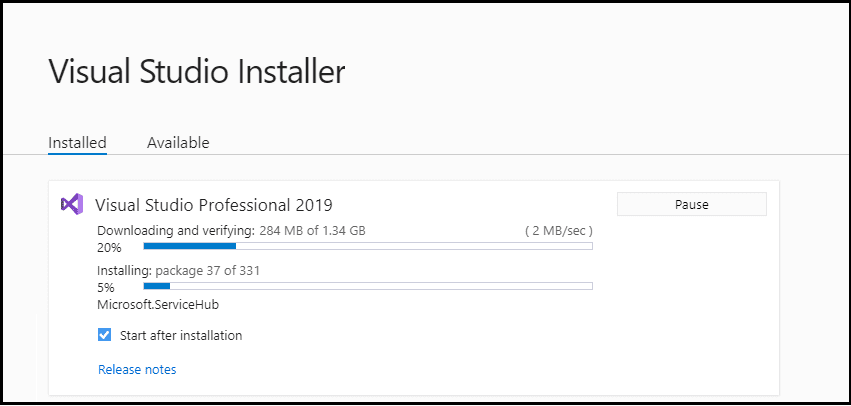
Step 6. After clicking on Continue, Visual Studio will start downloading its initial files as shown in the image below.

Step 7. It shows the screen below, in which you have to click on the install button as shown.
Step 8. After clicking on install button, your Visual Studio IDE will start downloading and then it displays the screen, as we have shown below.
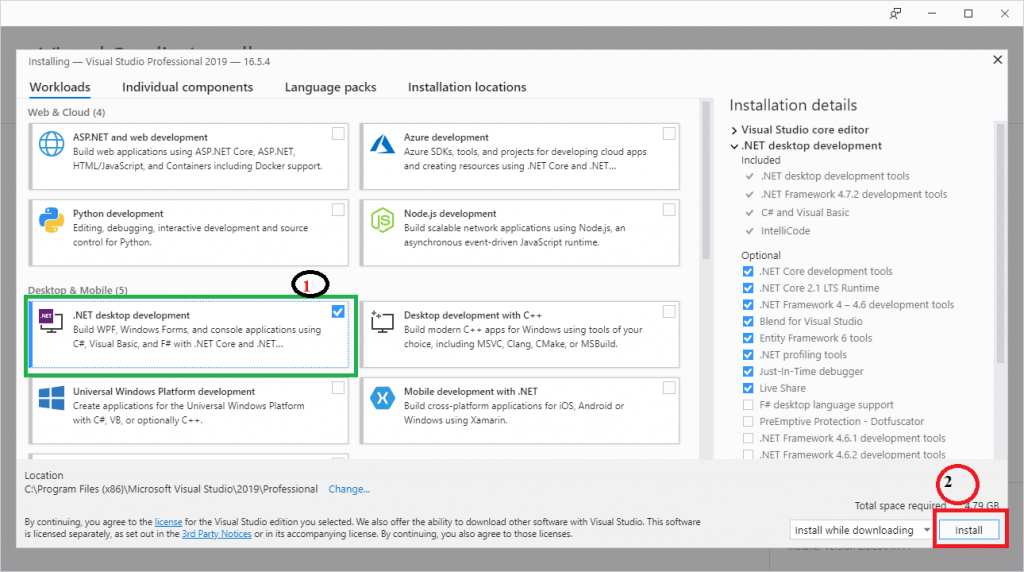
Step 9. From the above image, select .NET desktop development and click on install open which may take some time to download the Visual Studio in your system, as shown in below image.
Step 10. After successfully downloading and installing the Visual Studio’ supportive file, it shows the below screen in your system.
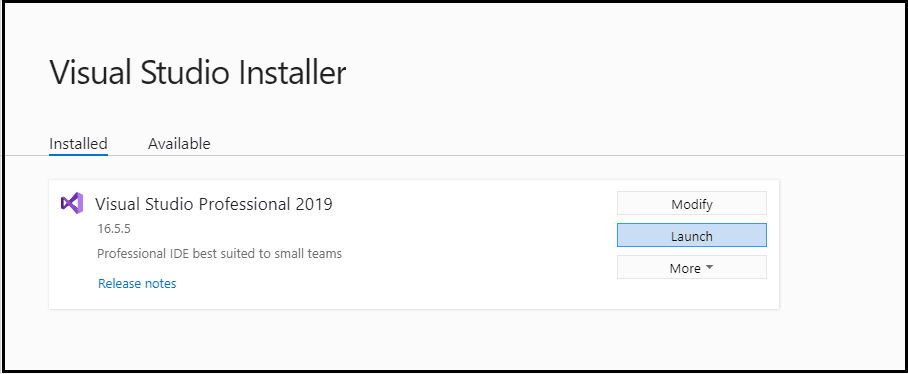
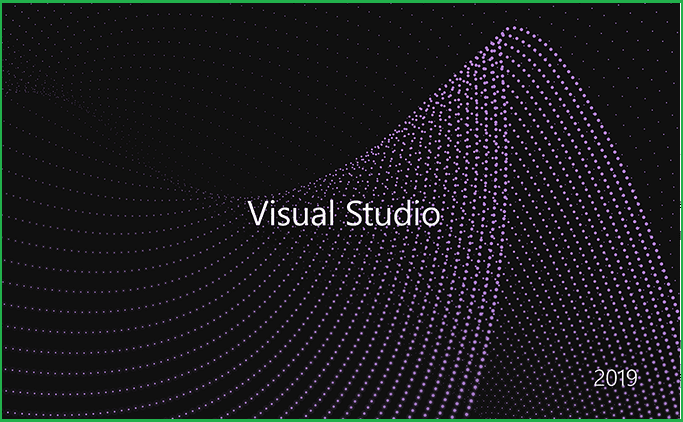
Step 11. Click on Launch button, and then it shows the below image in your screen that represents Visual Studio has been successfully launched in your machine.
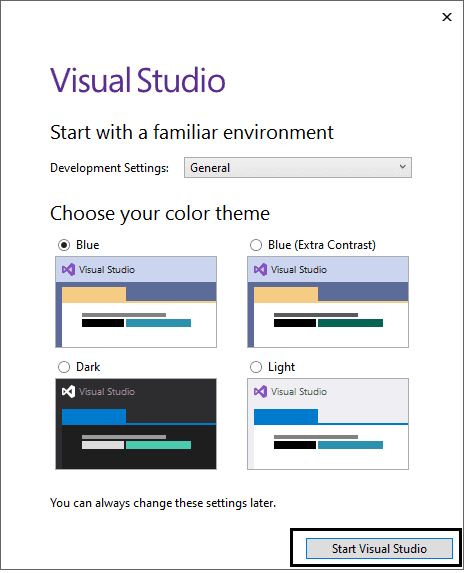
And then it shows a below screen to select the Visual Studio theme. By default, it takes Blue theme, and if you want to change, you can easily change the Visual Studio theme by clicking on other themes.
Step 12. After selecting the Theme, click on Start Visual Studio and then it shows a below image in your system screen for creating a new project.
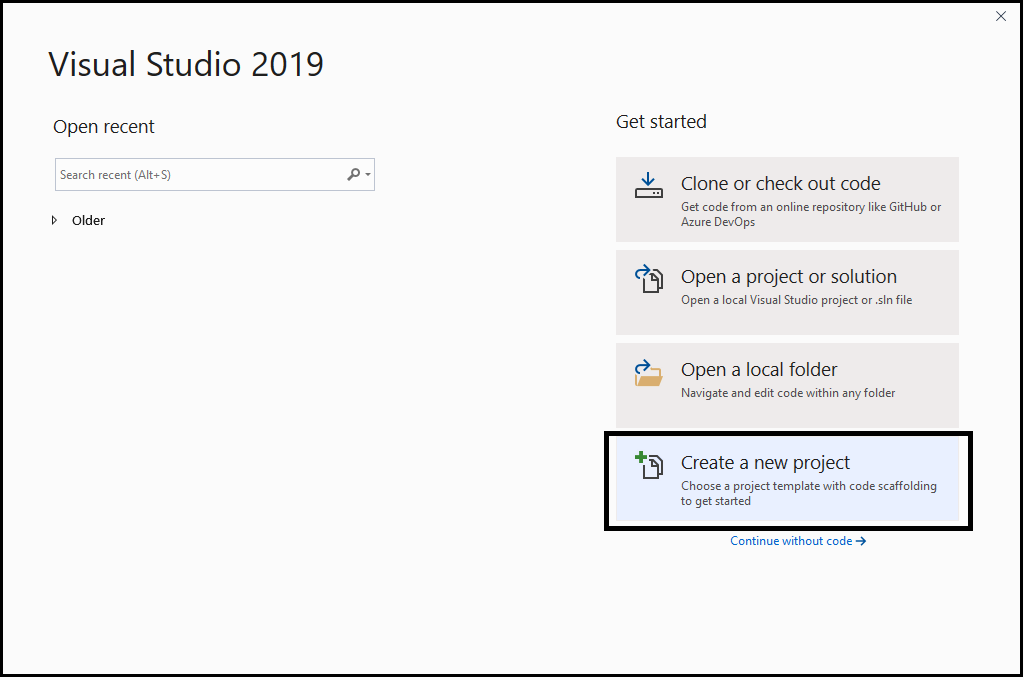
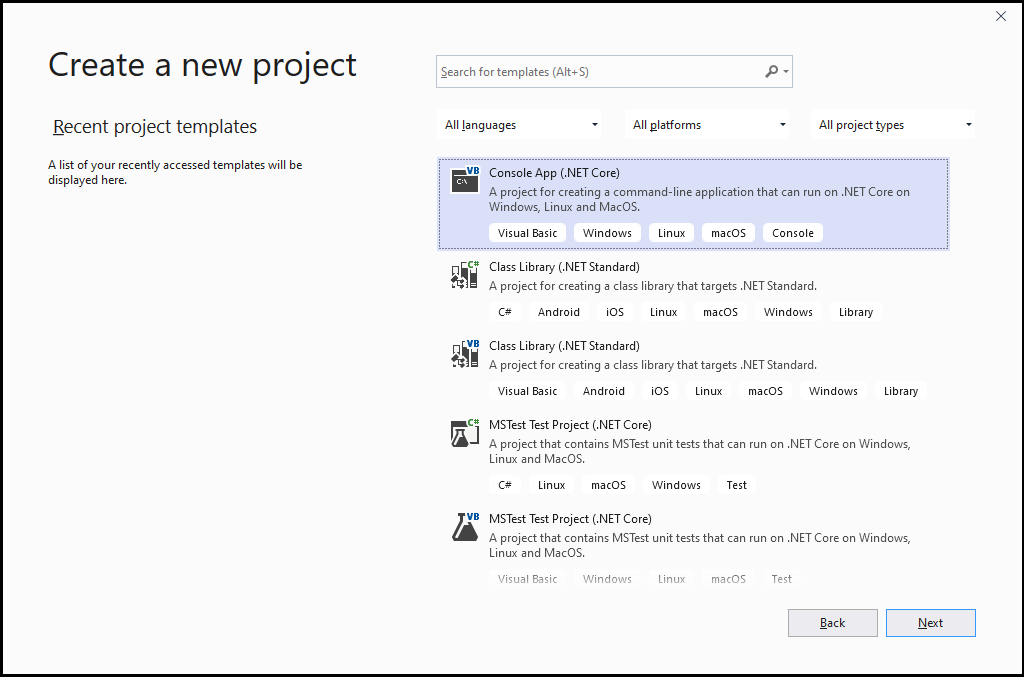
Step 13. After click on Create a new project, it shows the below screen to choose what type of application you are going to build in Visual studio. In this you can select the Console based application or Window Form Based application, as shown in below image. Here we chose the Console based application, and then click on the Next button.
Step 14. When you click the Next button, it shows the below image to define the project name, and also reminds if you want to place the solution and project in the same directory.
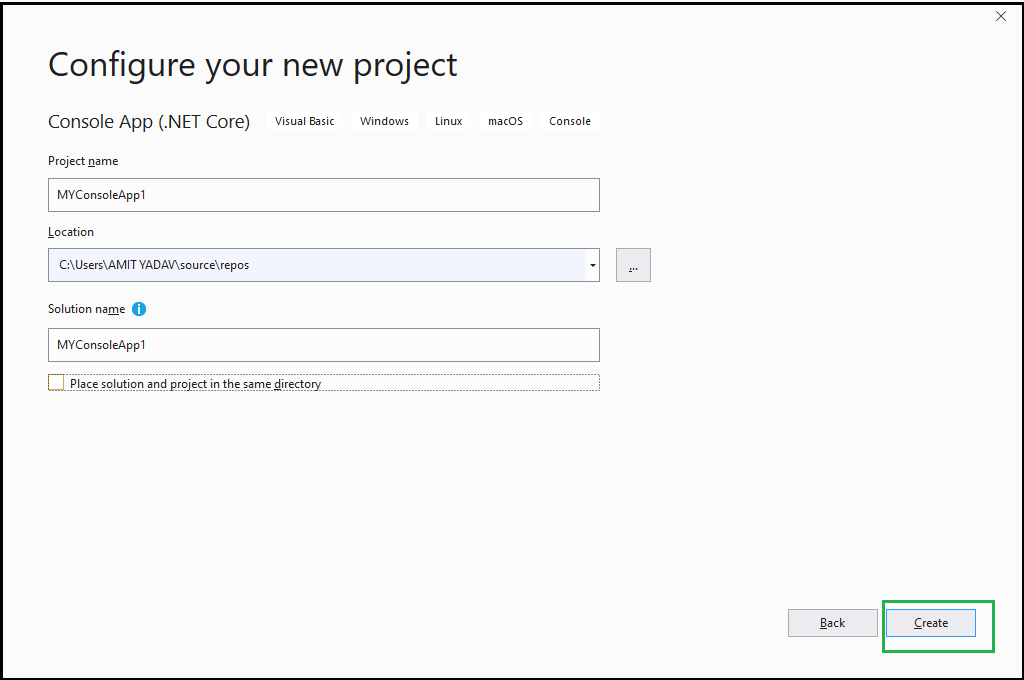
Step 15. And finally, your new project will be successfully created.
Example:
//List
using System;
using System.Collections.Generic;
public class Edureka
{
public static void Main(string[] args)
{
var names = new List<string>();
names.Add(“Sandhya”);
names.Add(“Arun”);
names.Add(“Prashanth”);
names.Add(“Kiran”);
foreach (var name in names)
{
Console.WriteLine(name);
}
}
}
Output:
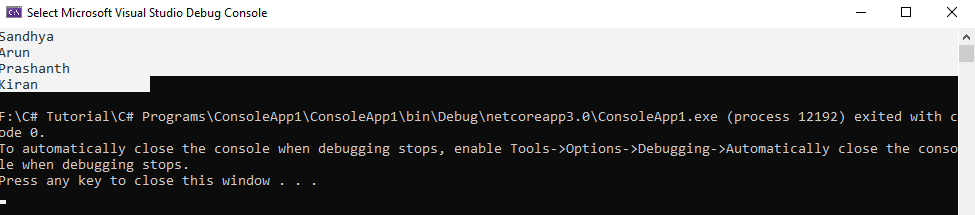
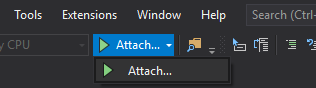
Select the save icon and then run your code. The run option will be on the toolbar as shown below.
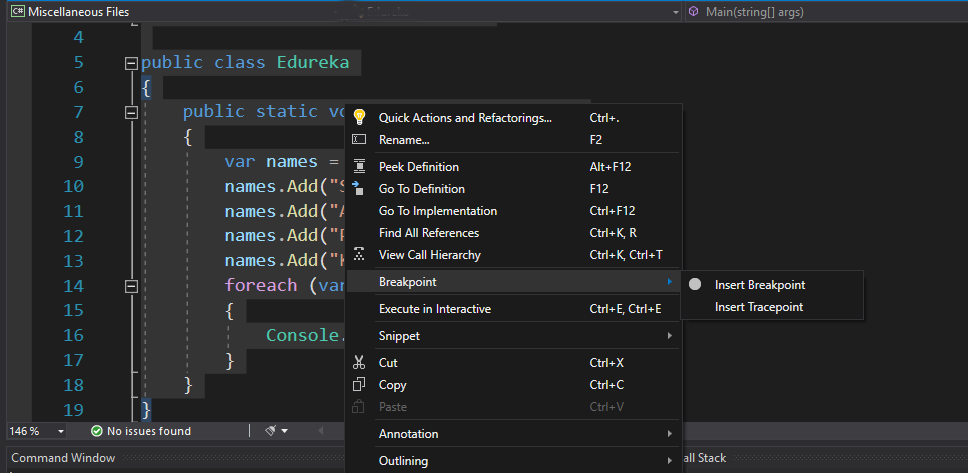
While you run your program, you can even set breakpoints in your code and even apply code reformatting by right-clicking on the text editor.
Further, let us move ahead and learn about Command Line Palette.
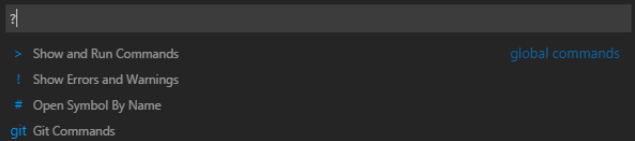
Command Line Palette
Microsoft Visual Studio Code is equally accessible from the keyboard. the foremost necessary key combination to grasp is Ctrl+Shift+P that brings up the Command Palette. From here you’ve got access to all or any of the functionality of VS Code, together with keyboard shortcuts for the foremost common operations.

The Command Palette UI provides access to several commands. you’ll execute editor commands, open files, rummage around for symbols, see a fast define of a file all exploitation an equivalent interactive window. Few tips are mentioned below.
Now, let us understand about File Encoding in Visual Studio.
File Encoding Support

We can set the file encoding either globally or based on your workspace by using the files.encoding setting in User Settings or Workspace Settings.

You can view the file encoding in the status bar.

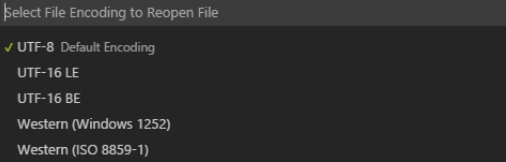
Click on the encoding in the status bar to reopen or save the active file with a different encoding.
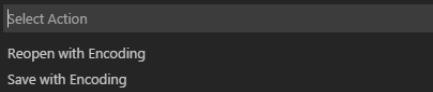
Then choose an encoding.
Let us learn about Additional Command-Line Arguments.
Additional Command Line Arguments
Few of the additional command-line arguments are written below.
| Argument | Description |
|---|---|
| –goto | When used with file:line:column?, opens a file at a specific line and optional column position. This argument is provided since some operating systems permit |
| –new | Opens a new session of VS Code instead of restoring the previous session. |
| -r | Forces opening a file or folder in the last active window. |
| file | Name of a file to open. If the file doesn’t exist, it will be created as dirty. You can specify multiple files. |
| file:line:column? | Name of a file to open at the specified line and optional column position. You can specify multiple files in this manner, but you must use the ‐g argument (once) before using the file:line:column? specifier. |
| folder | Name of a folder to open. You can specify multiple folders |
For each file and folders, you’ll be able to use absolute or relative ways. Relative ways square measure relative to the current directory of the electronic communication wherever you run code. If you specify quite one file or folder at the instruction, VS Code can open solely one instance.
| Command | Shortcut |
|---|---|
| Show Action List | Alt+Enter |
| Paste from Clipboard | Ctrl+Shift+V |
| Code Reformat | Ctrl+Atl+Enter |
| Code Completion | Ctrl+Space |
| Smart Code Completion | Ctrl+Alt+Space |
| Force Completion | Ctrl+Enter |
| Complete Statement | Ctrl+Shift+Enter |
| Goto Next/Previous Signature | Ctrl+Shift+Space/ Ctrl+Shift+Alt+Space |
| Toggle Parameter | Ctrl+Shift+Alt+5 |
| Quick Documentation | Ctrl+Shift+F1 |
| Insert Live Template | Ctrl+E,L |
| Surround with Template | Ctril+E,U |
| Create File from Template | Ctrl+Alt+Insert |
| Generate Code | Alt+Insert |
| Move Code up/down/left/right | Ctrl+Shift+Alt+Up/Down/Left/Right |
| Extend Selection | Ctrl+W |
| Shrink Selection | Ctrl+Shift+W |
| Select Contain Declaration | Ctrl+Shift+[ |
| Duplicate Current Line | Ctrl+D |
| Join Lines | Ctrl+Shift+J |
| Line Comment | Ctrl+/ |
| Block Comment | Ctrl+Shift+/ |
| Run Config | Ctrl+Shift+Alt+R |
| Run Build | Ctrl+Shift+F5 |
| Debug | Alt+F5 |
Calculator Application using C#
Code
using System;
using System.Collections.Generic;
using System.Linq;
using System.Text;
using System.Threading.Tasks;
namespace Edureka
{
class Program
{
static void Main(string[] args)
{
Console.WriteLine(“Calculator Application using C#”);
Console.WriteLine(“Select 1 to Add”);
Console.WriteLine(“Select 2 to Substract”);
Console.WriteLine(“Select 3 to Multiply”);
Console.WriteLine(“Select 4 to Divide”);
Console.Write(“Please enter your Choice:”);
int ch = Int32.Parse(Console.ReadLine());
int a, b, c;
switch (ch)
{
case 1:
Console.Write(“Enter your first value:”);
a = Convert.ToInt32(Console.ReadLine());
Console.Write(“Enter your second:”);
b = Convert.ToInt32(Console.ReadLine());
c = a + b;
Console.WriteLine(“Sum = {0}”, c);
break;
case 2:
Console.Write(“Enter your first value:”);
a = Convert.ToInt32(Console.ReadLine());
Console.Write(“Enter your second:”);
b = Convert.ToInt32(Console.ReadLine());
c = a – b;
Console.WriteLine(“Difference = {0}”, c);
break;
case 3:
Console.Write(“Enter your first value:”);
a = Convert.ToInt32(Console.ReadLine());
Console.Write(“Enter your second value:”);
b = Convert.ToInt32(Console.ReadLine());
c = a * b;
Console.WriteLine(“Product = {0}”, c);
break;
case 4:
Console.Write(“Enter your first value:”);
a = Convert.ToInt32(Console.ReadLine());
Console.Write(“Enter your second value:”);
b = Convert.ToInt32(Console.ReadLine());
c = a / b;
Console.WriteLine(“Quotient = {0}”, c);
break;
default:
Console.WriteLine(“You have selected an Invalid Choice”);
break;
}
Console.ReadKey();
}
}
}
Output:

With this, we come to an end of this article. I hope you have understood the Visual Studio Tutorial, its importance and its implementation through some real-time examples.