
- HTML Comments Tutorial | Convert Comments into HTML Codes
- Data Structure and Algorithms Tutorial | Ultimate Guide to Learn
- Gradle Tutorial | For Beginners [ STEP-IN ]
- Encapsulation In Java | Complete Tutorial With Examples
- What is Release Management? | A Comprehensive Tutorial for Beginners
- OOPs Concepts in Java | Learn from Basics with Examples
- The Top Basic Tools of Quality Tutorial | The Ultimate Guide
- Set Environment for C# – Learn How to Setup through this Tutorial
- C# Vs Java Tutorial | Overview and Key Difference
- List of IDEs to run C# Programs | Tutorial for Learning Path
- C Sharp Variables and Constants | The Ultimate Guide
- Unsafe Code in C-Sharp Tutorial | Everything You Need to Know
- Type Conversion Method in C# | A Complete Tutorial
- What Is Synchronization in c# Tutorial | The BEST Step-By-Step Guide
- Understanding Structures in C# | Learn in 1 Day FREE Tutorial
- Strings – C# Tutorial | A Definitive Programming Guide
- Static Keyword in C# Tutorial | Learn with Examples
- Stack Collection in C# Tutorial | A Definitive Guide for Beginners
- C# Sorted List Tutorial with Examples | Learn in 1 Day FREE
- C# Serialization Tutorial | Ultimate Guide to Learn [BEST & NEW]
- Regular Expression in C# Tutorial | Everything You Need to Know
- What is Reflection in C#? | Learn Now Tutorial
- Queue Collection in C# Tutorial | A Definitive Guide
- Properties in C# | The complete Tutorial
- C# Preprocessor Directives Tutorial | Learn in 1 Day FREE
- Polymorphism C# Tutorial | The Ultimate Guide
- C# Operators Tutorial | Learn Arithmetic, Comparison, Logical Concepts
- Namespaces – The complete C# Tutorial
- Multithreading in C# Tutorial | Learn With Examples and Advantages
- Methods – C# Tutorial | A Complete Programming Guide
- Linked List Implementation in C# Tutorial | Ultimate Guide to Learn [UPDATED]
- Introduction to C# Tutorial | Guide for Beginners
- What is Interface in C# | A Defined Free Tutorial
- C# Inheritance Tutorial | A Complete Free Tutorial
- Indexers in C# Tutorial | A Complete Programming Guide
- HashSet Collection in C# Tutorial | Complete Guide Tutorial For Free
- Generics in C# Tutorial | Learn Generic Classes and Methods
- Creating Your First C# Program Tutorial | Learn in 1 Day
- Basics of File Handling in C# Tutorial | The Ultimate Guide
- C# Exception Handling Tutorial | Learn with Best Practices
- Events – C# Tutorial | A Complete Programming Guide
- C# Enumerations Type Tutorial | Learn Everything about Enum
- Dictionary Collection in C# | Ultimate Guide to Learn [NEW & UPDATED]
- Delegates – C# Programming Guide | The Ultimate Guide for Beginners
- Understanding Decision Making Statements in C# | Learn Now Tutorial
- Classes and Objects – C# Fundamentals Tutorial
- C# BitArray Collection Tutorial | Learn in 1 Day FREE
- Attributes in C# Tutorial | Learn to work with attributes in C#
- C# Array Tutorial | Create, Declare, Initialize
- ArrayList Collection on in C# | A Complete tutorial For Beginners
- Anonymous Methods and Lambdas – C# Tutorial | A Complete Guide
- Abstraction in C# Tutorial – Learn the Abstract class and Interface
- Game Development using Unity 3D Tutorial | Ultimate Guide to Learn [UPDATED]
- C++ Reference Tutorial | A Comprehensive Guide for Beginners
- PHP vs Python | Which Is Better For Web Development
- C++ Constructors Tutorial: Types and Copy Constructors
- JavaScript Arrays Tutorial | Complete Beginner’s Guide
- What Is Maven | Maven Tutorial For Beginners
- Spring Tutorial | Perfect Guide for Beginners
- React Hooks Tutorial for Beginners | Ultimate Guide to Learn
- Python for Data Science Tutorial | Quickstart : A Complete Guide
- What is Golang? : A tutorial for beginners | Get started
- Hibernate Validator Tutorial | Learn in 1 Day FREE
- Postman Tutorial for Beginners: API Testing using Postman | A Complete Guide
- Akka Tutorial
- J2EE | Web Development Tutorial for Beginners
- Scala Exception Handling Tutorial | Learn in 1 Day [ STEP-IN ]
- Web development Tutorial
- Visual Studio Tutorial
- PyGame Tutorial
- Python Anaconda Tutorial
- Python Scikit-Learn Cheat Sheet Tutorial
- Mean Stack Tutorial
- Python Requests Tutorial
- Advanced Java Tutorial
- Spring Boot Microservices Tutorial
- Java Servlets Tutorial
- How to Install Pycharm
- Pycharm Tutorial
- Python Version Tutorial
- Python strings
- How to Download Python
- C Data Types Tutorial
- arrays in python
- Python While Loop Tutorial
- JAVA Tutorial
- Loops In C Tutorial
- Java File I/O Tutorial
- Variables in Python Tutorial
- Python Tutorial
- Python Pandas Cheat Sheet Tutorial
- Data Structures Cheat Sheet with Python Tutorial
- Python Tuples Tutorial
- Python If Else Statements Tutorial
- Python Functions Tutorial
Python Anaconda Tutorial
Last updated on 13th Oct 2020, Blog, Software Engineering, Tutorials
Anaconda is the world’s most popular Data Science platform for Data Scientists and IT professionals.Anaconda is a distribution of Python (and R). It is free and open-source and makes package management and deployment simpler. It is one of the several python distributions. Python on its own is not going to be useful unless an IDE is installed. This is where Anaconda comes to picture. Python distributions provide the python interpreter, together with a list of python editors, tools and packages.
Anaconda enables developers and data scientists to access cutting-edge technology and use their preferred tools and packages without sacrificing security through.
- Policy management and enforcement
- Role-based access control and usage controls.
- Comprehensive audit trails.
Benefits of Using Python Anaconda
Why should you use Anaconda for your project? Well, it does have the following benefits:
- It is free and open-source
- It has more than 1500 Python/R data science packages
- Anaconda simplifies package management and deployment
- It has tools to easily collect data from sources using machine learning and AI
- It creates an environment that is easily manageable for deploying any project
- Anaconda is the industry standard for developing, testing and training on a single machine
- It has good community support- you can ask your questions there.
What you get
- Download more than 1500 Python/R data science packages
- Manage libraries, dependencies, and environments with conda
- Build and train ML and deep learning models with scikit-learn, TensorFlow and Theano
- Use Dask, NumPy, Pandas and Numpy to analyze data scalably and fast
- Perform visualization with Matplotlib, Bokeh, Datashader, and Holoviews
Subscribe For Free Demo
Error: Contact form not found.
Installation And Setup
To install Anaconda, you can go here.
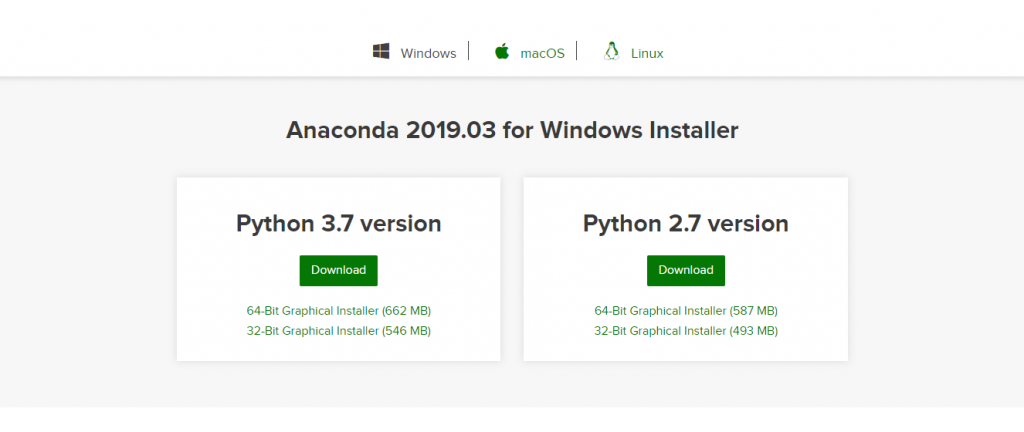
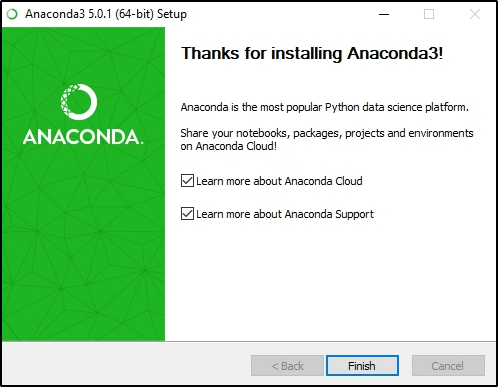
Choose a version suitable for you and click on download. Once you complete the download, open the setup.
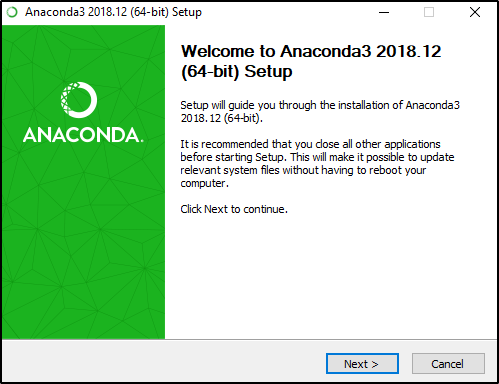
Follow the instructions in the setup. Don’t forget to click on add Anaconda to your path environment variable. After the installation is complete, you will get a window like the one shown in the image below.
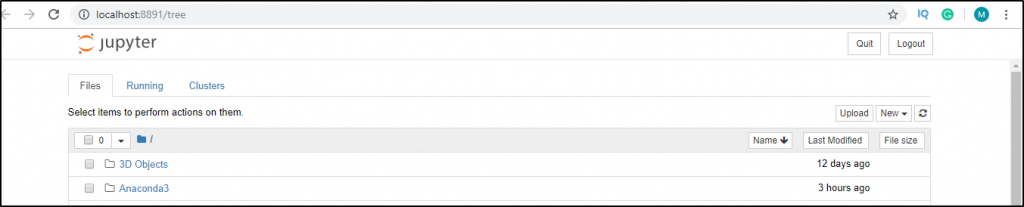
After finishing the installation, open the Anaconda prompt and type jupyter notebook.
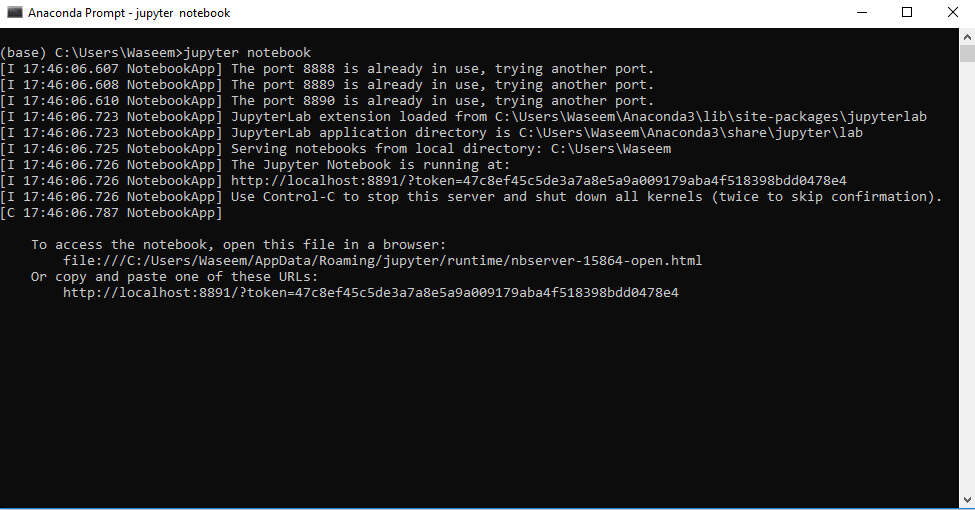
You will see a window like shown in the image below.
Now that we know how to use anaconda for python lets take a look at how we can install various libraries in anaconda for any project.
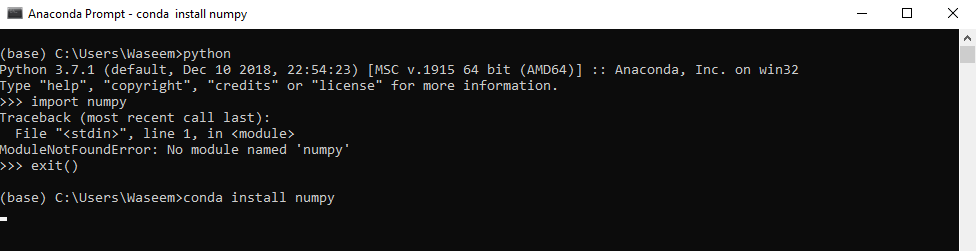
Install Python Libraries in Anaconda
Open the Anaconda prompt and check if the library is already installed or not.

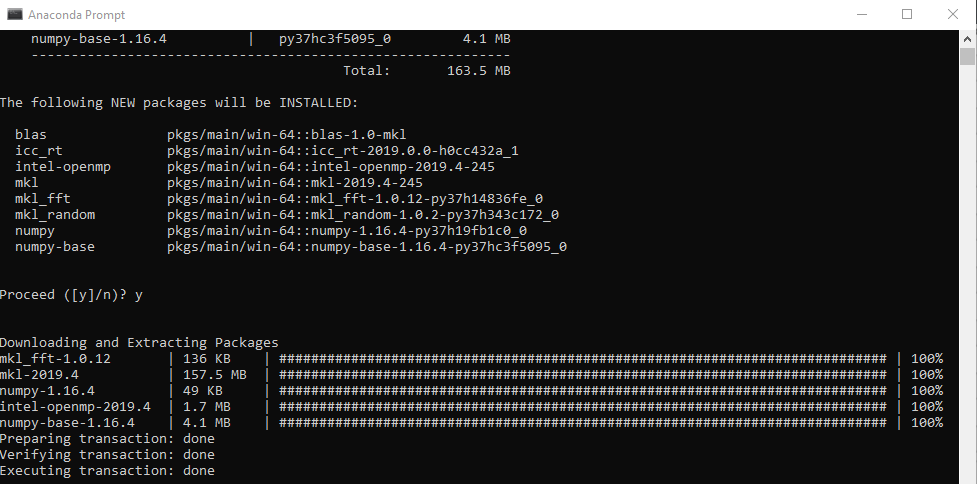
Since there is no module named numpy present, we will run the following command to install numpy.
You will get the window shown in the image once you complete the installation.
Once you have installed a library, just try to import the module again for assurance.
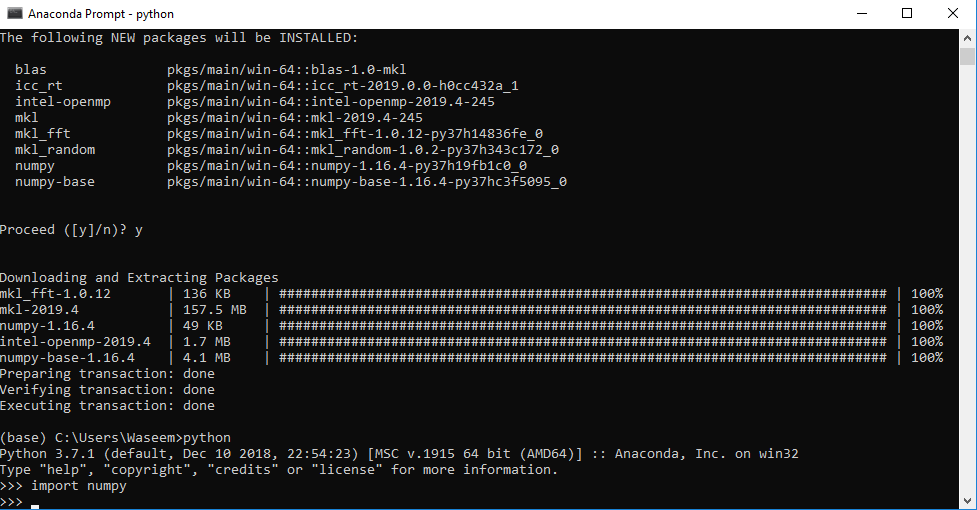
As you can see, there is no error that we got in the beginning, so this is how we can install various libraries in Anaconda.
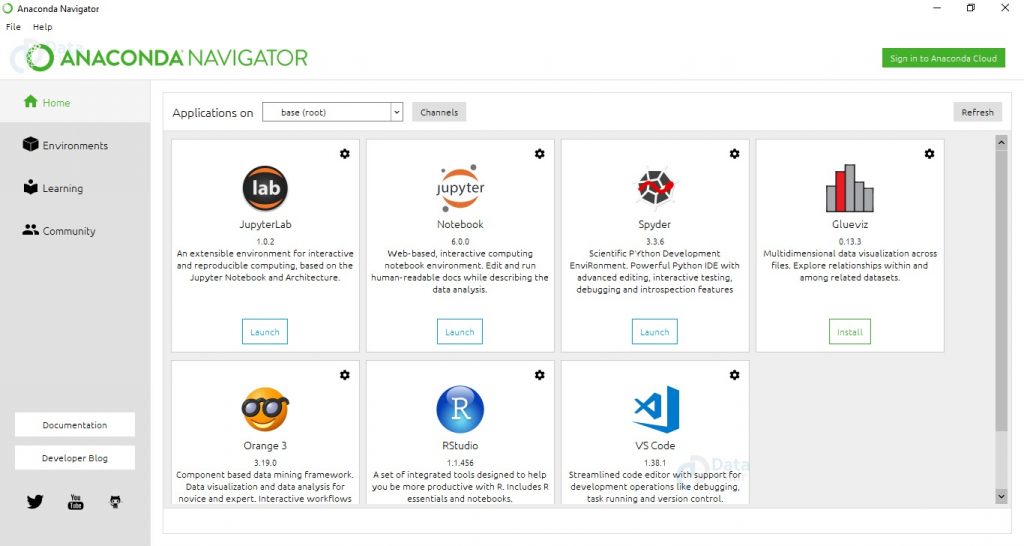
Anaconda Navigator
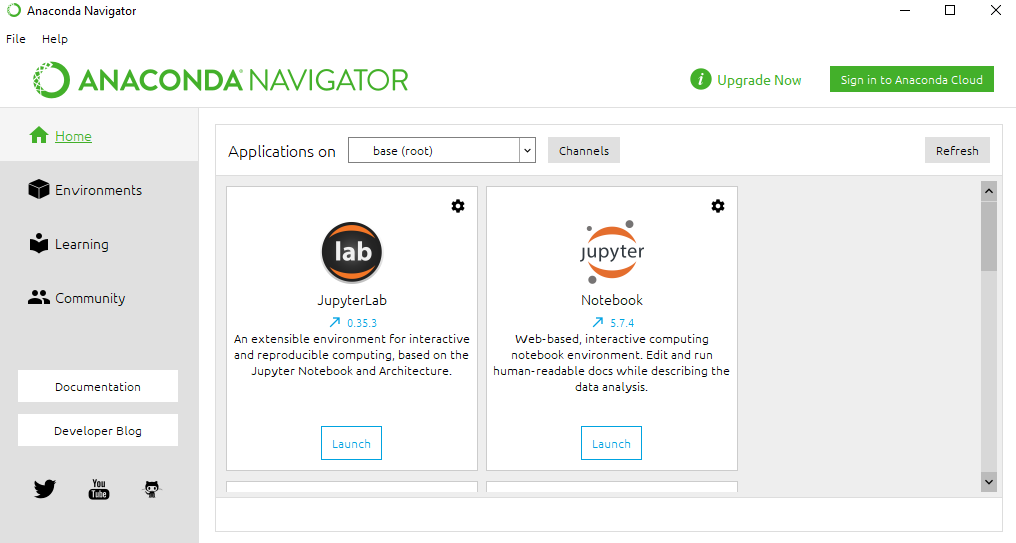
Anaconda Navigator is a desktop GUI that comes with the Anaconda distribution. It allows us to launch applications and manage conda packages and environments without using the command-line.
With Navigator, you can access:
- JupyterLab
- Jupyter Notebook
- QTConsole
- Spyder
- VSCode
- Glueviz
- Orange 3 App
- Rodeo
- RStudio
What Companies are Using Anaconda?
Anaconda is trusted by these leading companies around the world:
- BMW
- Cisco
- Citi Bank
- HSBC
- GlaxoSmithKline
- GE Power
- Samsung
- Zurich
- Brookhaven
- City of Boston
- Columbia University
- CloudQuant
- IQT
- Lloyds Banking Group
- Otto Group
- Machinalis
- Marshall Wace
- Mayo Clinic
- Micron
- Molex
- National Grid
- PIMCO
- US Army Corps of Engineers
- West Health
- US Securities and Exchange Commission
- SunTrust
- Banco Pichincha
- ComEd
- RENNER
- elo
- But even other than these, Anaconda has more than 15 million users worldwide.

UPGRADE Your Career with Python Training By Highly Experienced Faculty
- Instructor-led Sessions
- Real-life Case Studies
- Assignments
Anaconda Navigator
Anaconda Navigator is a desktop GUI that ships with Anaconda and lets you launch applications and manage conda packages, environments, and channels without having to use a command-line interface. It can search for packages in a local Anaconda repository or on Anaconda Cloud. With Navigator, you don’t need to type commands in a terminal, it lets you work with packages and environments with just a click.
With Navigator, you can access:
- JupyterLab
- Jupyter Notebook
- QTConsole
- Spyder
- VSCode
- Glueviz
- Orange 3 App
- Rodeo
- RStudio
At the time of writing, the latest version of Anaconda is 1.9.7.
Installing Anaconda on MacOS
This section details the installation of the Anaconda Distribution of Python on MacOS. Most versions of MacOS come pre-installed with legacy Python (Version 2.7). You can confirm the legacy version of Python is installed on MacOS by opening and running a command at the MacOS terminal. To open the MacOS terminal use [command]+[Space Bar] and type terminal in the Spotlight Search bar.
In the MacOS Terminal type (note: the dollar sign $ is used to indicate the terminal prompt. The dollar sign $ does not need to be typed):
$ python
You will most likely see Python version 2.7 is installed. An issue for MacOS users is that the installed system version of Python has a set of permissions that may always allow Python to run and may not allow users to install external packages. Therefore, I recommend the Anaconda distribution of Python is installed alongside the system version of Python that comes pre-installed with MacOS. You will be able to run Python code using the Anaconda distribution of Python, and you will be able to install external packages using the Anaconda distribution of Python.
Follow the steps below to install the Anaconda distribution of Python on MacOS.
Steps:
- Visit Anaconda.com/downloads
- Select MacOS and Download the .pkg installer
- Open the .pkg installer
- Follow the installation instructions
- Source your .bash-rc file
- Open a terminal and type python and run some code.
1. Visit the Anaconda downloads page
Go to the following link: Anaconda.com/downloads
2. Select MacOS and download the .pkg installer
In the operating systems box, select [MacOS]. Then download the most recent Python 3 distribution (at the time of this writing the most recent version is Python 3.6) graphical installer by clicking the Download link. Python 2.7 is legacy Python. For problem solvers, select the most recent Python 3 version.
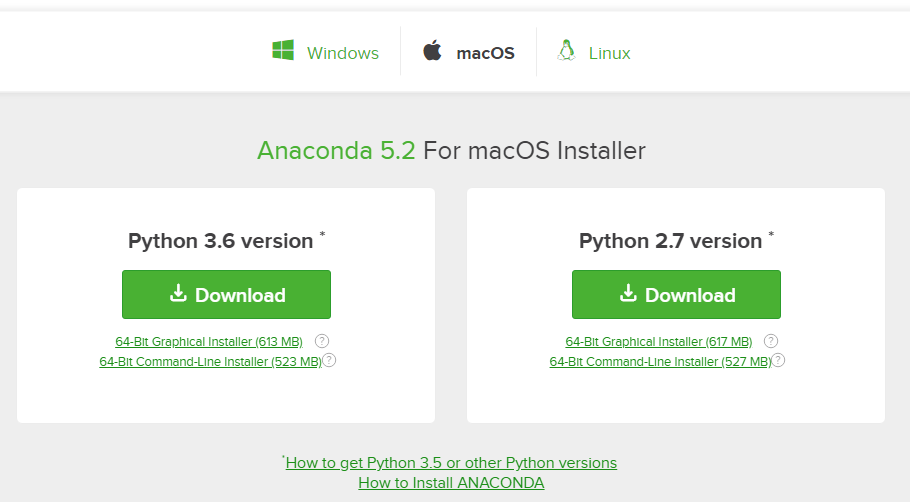
You may be prompted to enter your email. You can still download Anaconda if you click [No Thanks] or [x] and don’t enter your Work Email address.

3. Open the .pkg installer
Navigate to the Downloads folder and double-click the .pkg installer file you just downloaded. It may be helpful to order the contents of the Downloads folder by date to find the .pkg file.
4. Follow the installation instructions
Follow the installation instructions. It is advised that you install Anaconda for the current user and that Anaconda is added to your PATH.
5. Source your .bash-rc file
Once Anaconda is installed, you need to load the changes to your PATH environment variable in the current terminal session.
Open the MacOS Terminal and type:
- $ cd ~
- $ source .bashrc
6. Open a terminal and type python and run some code.
Open the MacOS Terminal and type:
$ python
You should see something like
Python 3.6.3 | Anaconda Inc. |
At the Python REPL (the Python >>> prompt) try:
>>> import this
If you see the Zen of Python, the installation was successful. Exit out of the Python REPL using the command exit(). Make sure to include the double parenthesis () after the exit command.
>>> exit()

Installing Anaconda on Linux
This section details the installation of the Anaconda distribution of Python on Linux, specifically Ubuntu 18.04, but the instructions should work for other Debian-based Linux distributions as well.
Ubuntu 18.04 comes pre-installed with Python (Version 3.6) and legacy Python (Version 2.7). You can confirm the legacy version of Python is installed by opening up a terminal.
In the terminal type:
$ python
You will most likely see Python Version 2.7 is installed. If you enter:
$ python3
You will most likely see Python Version 3.6 is also installed. You can use the 3.6 Version of Python, but each time a new package needs to be downloaded, the $ pip3 install command must be used.
Install the Anaconda distribution of Python to follow the examples in the book without the need to install additional third-party packages.
Steps:
- Visit Anaconda.com/downloads
- Select Linux
- Copy the bash (.sh file) installer link
- Use wget to download the bash installer
- Run the bash script to install Anaconda3
- source the .bash-rc file to add Anaconda to your PATH
- Start the Python REPL
1. Visit the Anaconda downloads page
Go to the following link: Anaconda.com/downloads
2. Select Linux
On the downloads page, select the Linux operating system

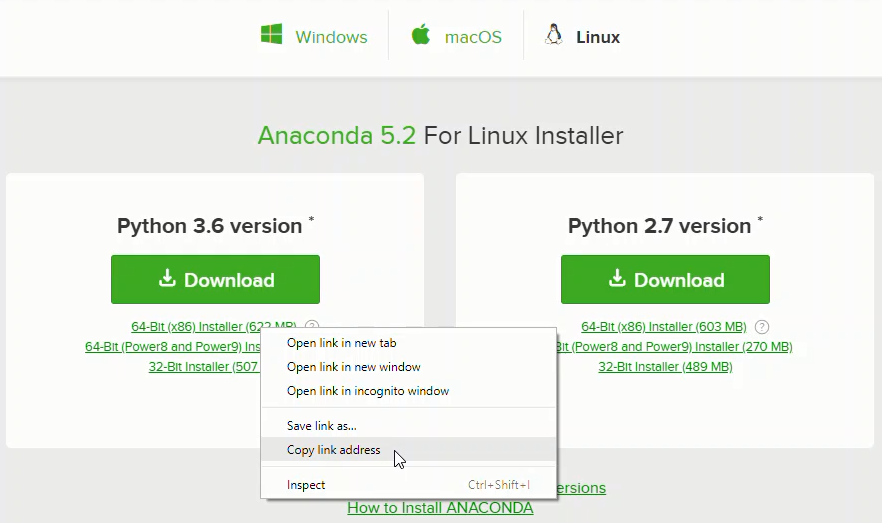
3. Copy the bash (.sh file) installer link
In the Python 3.6 Version* box, right-click on the [64-Bit(x86) Installer] link. Select [copy link address].
4. Use wget to download the bash installer
Now that the bash installer (.sh file) link is stored on the clipboard, use wget to download the installer script. In a terminal, cd into the home directory and make a new directory called tmp. cd into tmp and use wget to download the installer. Although the installer is a bash script, it is still quite large and the download will not be immediate (Note the link below includes <release>. the specific release depends on when you download the installer).
- $ cd ~
- $ mkdir tmp
- $ cd tmp
- $ https://repo.continuum.io/archive/Anaconda3<release>.sh
5. Run the bash script to install Anaconda3
With the bash installer script downloaded, run the .sh script to install Anaconda3. Ensure you are in the directory where the installer script downloaded:
$ ls
Anaconda3-5.2.0-Linux-x86_64.sh
Run the installer script with bash.
$ bash Anaconda3-5.2.0-Linux-x86_64.sh
Accept the Licence Agreement and allow Anaconda to be added to your PATH. By adding Anaconda to your PATH, the Anaconda distribution of Python will be called when you type $ python in a terminal.
6. source the .bash-rc file to add Anaconda to your PATH
Now that Anaconda3 is installed and Anaconda3 is added to our PATH, source the .bashrc file to load the new PATH environment variable into the current terminal session. Note the .bashrc file is in the home directory. You can see it with $ ls -a.
- $ cd ~
- $ source .bashrc
7. Start the Python REPL
To verify the installation is complete, open Python from the command line:
- $ python
- Python 3.6.5 |Anaconda, Inc.| (default, Mar 29 2018, 18:21:58)
- [GCC 7.2.0] on linux
- Type “help”, “copyright”, “credits” or “license” for more information.
- >>>
- If you see Python 3.6 from Anaconda listed, your installation is complete. To exit the Python REPL, type:
- >>> exit()
Installing Python from Python.org
Below is the recommended way to install a new version of Python from Python.org on each of the three major operating systems: Windows, MacOS and Linux.
This book is based on Python version 3.6. Some of the examples in the book may not work properly on legacy Python (version 2.7). I recommend installing the Anaconda Distribution of Python on Windows and MacOSX. The installation of Anaconda on these operating systems was detailed in previous sections.
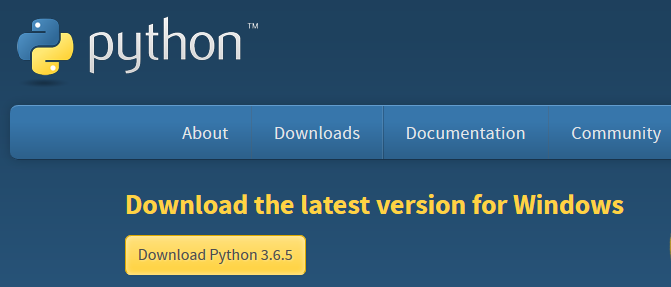
Installing Python on Windows
Go to https://www.python.org/downloads/ and download the latest release. Make sure to select the box [add Python to my path] during the installation.
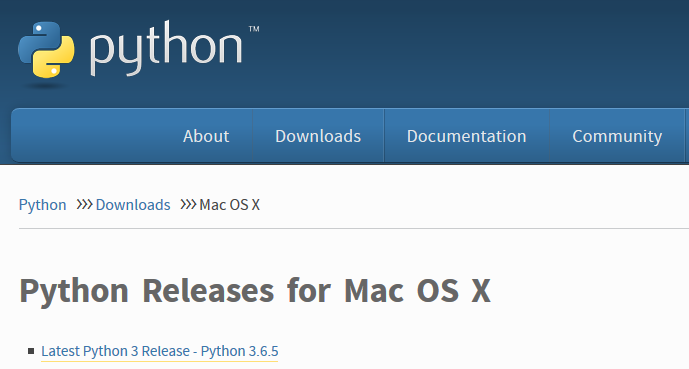
Installing Python on MacOS
Go to https://www.python.org/downloads/mac-osx/ and download the latest release.
Installing Python on Linux
Open a terminal and enter $ python to see if a version of Python is already installed on the system.
- $ python
- Python 2.7.12 (default, Dec 4 2017, 14:50:18)
- [GCC 5.4.0 20160609] on linux2
- Type “help”, “copyright”, “credits” or “license” for more information.
- >>> exit()
In the code block above, the version of Python is Python 2.7.12. If the Python version is 2.7 or below, try the command $ python3.
- $ python3
- Python 3.6.7 (default, Oct 22 2018, 11:32:17)
- [GCC 8.2.0] on linux
- Type “help”, “copyright”, “credits” or “license” for more information.
- >>> exit()
If no version of Python is shown, you can download a release of Python 3.6 from the deadsnakes package repository.
- $ sudo add-apt-repository ppa:deadsnakes/ppa
- [Enter]
- $ sudo apt-get update
- $ sudo apt-get install python3.6
After installation, you may need to append your PATH environment variable to ensure the newly installed Python 3.6 version is the version of Python called when using the terminal. The commands below will add /usr/bin to your PATH, and add an alias in .bashrc so that the command $ python3.6 produces the Python 3.6 REPL. Take care to ensure the double chevron >> is used, as a single chevron > will overwrite the .bashrc file.
- $ cd ~
- $ echo “PATH=/usr/bin:$PATH” >> ~/.bashrc
- $ echo “alias python3.6=’/usr/bin/python3.6′” >> ~/.bashrc
- $ source .bashrc
- $ python3.6
- Python 3.6.6 (default, Jun 28 2018, 04:42:43)
- [GCC 5.4.0 20160609] on linux
- Type “help”, “copyright”, “credits” or “license” for more information.
- >>> exit()