
- HTML Comments Tutorial | Convert Comments into HTML Codes
- Data Structure and Algorithms Tutorial | Ultimate Guide to Learn
- Gradle Tutorial | For Beginners [ STEP-IN ]
- Encapsulation In Java | Complete Tutorial With Examples
- What is Release Management? | A Comprehensive Tutorial for Beginners
- OOPs Concepts in Java | Learn from Basics with Examples
- The Top Basic Tools of Quality Tutorial | The Ultimate Guide
- Set Environment for C# – Learn How to Setup through this Tutorial
- C# Vs Java Tutorial | Overview and Key Difference
- List of IDEs to run C# Programs | Tutorial for Learning Path
- C Sharp Variables and Constants | The Ultimate Guide
- Unsafe Code in C-Sharp Tutorial | Everything You Need to Know
- Type Conversion Method in C# | A Complete Tutorial
- What Is Synchronization in c# Tutorial | The BEST Step-By-Step Guide
- Understanding Structures in C# | Learn in 1 Day FREE Tutorial
- Strings – C# Tutorial | A Definitive Programming Guide
- Static Keyword in C# Tutorial | Learn with Examples
- Stack Collection in C# Tutorial | A Definitive Guide for Beginners
- C# Sorted List Tutorial with Examples | Learn in 1 Day FREE
- C# Serialization Tutorial | Ultimate Guide to Learn [BEST & NEW]
- Regular Expression in C# Tutorial | Everything You Need to Know
- What is Reflection in C#? | Learn Now Tutorial
- Queue Collection in C# Tutorial | A Definitive Guide
- Properties in C# | The complete Tutorial
- C# Preprocessor Directives Tutorial | Learn in 1 Day FREE
- Polymorphism C# Tutorial | The Ultimate Guide
- C# Operators Tutorial | Learn Arithmetic, Comparison, Logical Concepts
- Namespaces – The complete C# Tutorial
- Multithreading in C# Tutorial | Learn With Examples and Advantages
- Methods – C# Tutorial | A Complete Programming Guide
- Linked List Implementation in C# Tutorial | Ultimate Guide to Learn [UPDATED]
- Introduction to C# Tutorial | Guide for Beginners
- What is Interface in C# | A Defined Free Tutorial
- C# Inheritance Tutorial | A Complete Free Tutorial
- Indexers in C# Tutorial | A Complete Programming Guide
- HashSet Collection in C# Tutorial | Complete Guide Tutorial For Free
- Generics in C# Tutorial | Learn Generic Classes and Methods
- Creating Your First C# Program Tutorial | Learn in 1 Day
- Basics of File Handling in C# Tutorial | The Ultimate Guide
- C# Exception Handling Tutorial | Learn with Best Practices
- Events – C# Tutorial | A Complete Programming Guide
- C# Enumerations Type Tutorial | Learn Everything about Enum
- Dictionary Collection in C# | Ultimate Guide to Learn [NEW & UPDATED]
- Delegates – C# Programming Guide | The Ultimate Guide for Beginners
- Understanding Decision Making Statements in C# | Learn Now Tutorial
- Classes and Objects – C# Fundamentals Tutorial
- C# BitArray Collection Tutorial | Learn in 1 Day FREE
- Attributes in C# Tutorial | Learn to work with attributes in C#
- C# Array Tutorial | Create, Declare, Initialize
- ArrayList Collection on in C# | A Complete tutorial For Beginners
- Anonymous Methods and Lambdas – C# Tutorial | A Complete Guide
- Abstraction in C# Tutorial – Learn the Abstract class and Interface
- Game Development using Unity 3D Tutorial | Ultimate Guide to Learn [UPDATED]
- C++ Reference Tutorial | A Comprehensive Guide for Beginners
- PHP vs Python | Which Is Better For Web Development
- C++ Constructors Tutorial: Types and Copy Constructors
- JavaScript Arrays Tutorial | Complete Beginner’s Guide
- What Is Maven | Maven Tutorial For Beginners
- Spring Tutorial | Perfect Guide for Beginners
- React Hooks Tutorial for Beginners | Ultimate Guide to Learn
- Python for Data Science Tutorial | Quickstart : A Complete Guide
- What is Golang? : A tutorial for beginners | Get started
- Hibernate Validator Tutorial | Learn in 1 Day FREE
- Postman Tutorial for Beginners: API Testing using Postman | A Complete Guide
- Akka Tutorial
- J2EE | Web Development Tutorial for Beginners
- Scala Exception Handling Tutorial | Learn in 1 Day [ STEP-IN ]
- Web development Tutorial
- Visual Studio Tutorial
- PyGame Tutorial
- Python Anaconda Tutorial
- Python Scikit-Learn Cheat Sheet Tutorial
- Mean Stack Tutorial
- Python Requests Tutorial
- Advanced Java Tutorial
- Spring Boot Microservices Tutorial
- Java Servlets Tutorial
- How to Install Pycharm
- Pycharm Tutorial
- Python Version Tutorial
- Python strings
- How to Download Python
- C Data Types Tutorial
- arrays in python
- Python While Loop Tutorial
- JAVA Tutorial
- Loops In C Tutorial
- Java File I/O Tutorial
- Variables in Python Tutorial
- Python Tutorial
- Python Pandas Cheat Sheet Tutorial
- Data Structures Cheat Sheet with Python Tutorial
- Python Tuples Tutorial
- Python If Else Statements Tutorial
- Python Functions Tutorial
Spring Boot Microservices Tutorial
Last updated on 12th Oct 2020, Blog, Software Engineering, Tutorials
Microservice Architecture is a Service Oriented Architecture. In the microservice architecture, there are a large number of microservices. By combining all the microservices, it constructs a big service. In the microservice architecture, all the services communicate with each other.
In the Microservices tutorial, we will understand how to implement microservices using Spring Cloud. We will learn how to establish communication between microservices, enable load balancing, scaling up and down of microservices. We will also learn to centralize the configuration of microservices with Spring Cloud Config Server. We will implement Eureka Naming Server and Distributed tracing with Spring Cloud Sleuth and Zipkin. We will create fault tolerance microservices with Zipkin.
Our microservices tutorial discusses the basic functionalities of Microservice Architecture along with relevant examples for easy understanding.
What are Microservices?
Definition: According to Sam Newman, “Microservices are the small services that work together.”
According to James Lewis and Martin Fowler, “The microservice architectural style is an approach to develop a single application as a suite of small services. Each microservice runs its process and communicates with lightweight mechanisms. These services are built around business capabilities and independently developed by fully automated deployment machinery.”
There is a bare minimum of centralized management of these services, which may be written in different programming language and use different data storage technologies.
Points to remember
- These are the services which are exposed by REST.
- These are small well-chosen deployable units.
- The services must be cloud-enabled.
The microservice defines an approach to the architecture that divides an application into a pool of loosely coupled services that implements business requirements. It is next to Service-Oriented Architecture (SOA). The most important feature of the microservice-based architecture is that it can perform continuous delivery of a large and complex application.
Microservice helps in breaking the application and build a logically independent smaller applications. For example, we can build a cloud application with the help of Amazon AWS with minimum efforts.
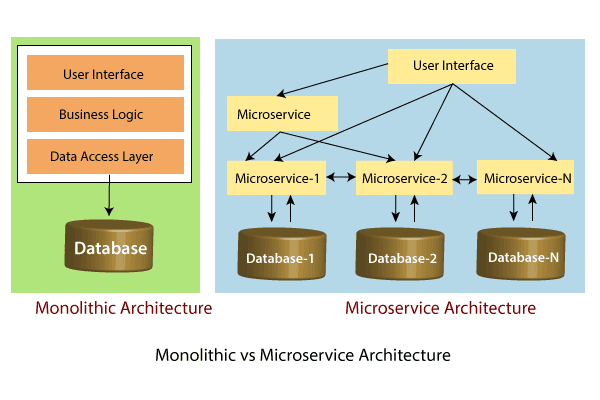
In the above figure, each microservice has its own business layer and database. If we change in one microservice, it does not affect the other services. These services communicate with each other by using lightweight protocols such as HTTP or REST or messaging protocols.
Principles of Microservices
There are the following principles of Microservices:
- Single Responsibility principle
- Modelled around business domain
- Isolate Failure
- Infrastructure automation
- Deploy independently
Single Responsibility Principle
The single responsibility principle states that a class or a module in a program should have only one responsibility. Any microservice cannot serve more than one responsibility, at a time.
Modeled around business domain
Microservice never restrict itself from accepting appropriate technology stack or database. The stack or database is most suitable for solving the business purpose.
Isolated Failure
The large application can remain mostly unaffected by the failure of a single module. It is possible that a service can fail at any time. So, it is important to detect failure quickly, if possible, automatically restore failure.
Infrastructure Automation
The infrastructure automation is the process of scripting environments. With the help of scripting environment, we can apply the same configuration to a single node or thousands of nodes. It is also known as configuration management, scripted infrastructures, and system configuration management.
Subscribe For Free Demo
Error: Contact form not found.
Deploy independently
Microservices are platform agnostic. It means we can design and deploy them independently without affecting the other services.
Audience
Our microservices tutorial is designed for Software Professionals and beginners who want to learn microservices architecture in easy steps. This tutorial will give you an in-depth knowledge of microservices architecture and its components like RabbitMQ Server, Eureka Naming Server, Zuul API Gateway, Ribbon, Hystrix, and Zipkin Server. After completing this tutorial, you can develop microservices services with Spring Cloud.
Challenges With Microservice Architecture
While developing a number of smaller microservices might look easy, there is a number of inherent complexities that are associated with microservices architectures. Let’s look at some of the challenges:
- Automating the Components: It becomes difficult to automate everything because there are a number of smaller components instead of a monolith, i.e. builds, deployment, monitoring, etc.
- Perceptibility: There is a number of small components to deploy and maintain which sometimes becomes difficult to monitor and identify problems. It requires great perceptibility around all the components.
- Configuration Management: There is a great need to maintain the configurations for the components across the various environments.
- Debugging: It becomes difficult to probe each and every service for an error. Centralized Logging and Dashboards are essential to make it easy to debug problems.
- Consistency: You cannot have a wide range of tools solving the same problem. While it is important to foster innovation, it is also important to have some decentralized governance around the languages, platforms, technology and tools used for implementing/deploying/monitoring microservices.
Building Architecture for Top Sports Brands With Spring Boot
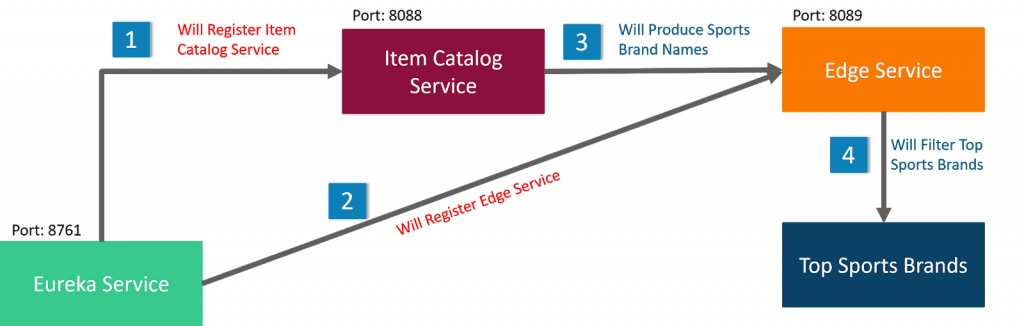
In this Spring Boot microservices example, we will be creating Top Sports Brands’ application, which will have three services:
- Eureka Service- This service will register every microservice and then the client microservice will look up the Eureka server to get a dependent microservice to get the job done. This Eureka Server is owned by Netflix and in this, Spring Cloud offers a declarative way to register and invoke services by Java annotation.
- Item Catalog Service – This service will generate the list of sports brands which are popular in the market.
- Edge Service – It is similar to the standalone Item service created in Bootiful Development with Spring Boot and Angular. However, it will have fallback capabilities which prevent the client from receiving an HTTP error when the service is not available
Let us see which of the following tools required to create this Spring Boot microservices example application.
If you facing any difficulty in installing and running the above tools, please refer to this blog.
Creating a Eureka Service
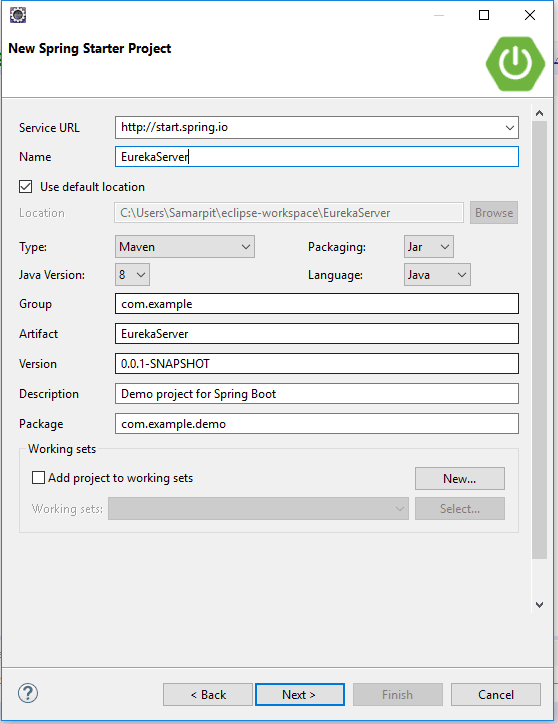
To begin with, create a EurekaServer Spring Starter Project in Eclipse IDE. Click on Spring Starter Project and click on Next.
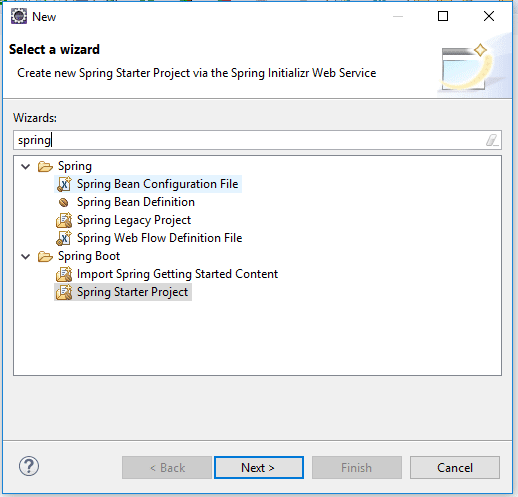
Name your Spring Starter Project as EurekaServer and other Information will be filledautomatically.
Note: Make sure your Internet is connected otherwise it will show an error.
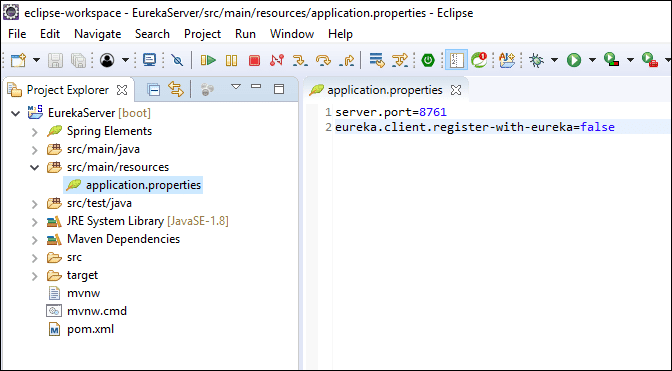
Now, modify EurekaServer/src/main/resources/application.properties file to add a port number and disable registration.
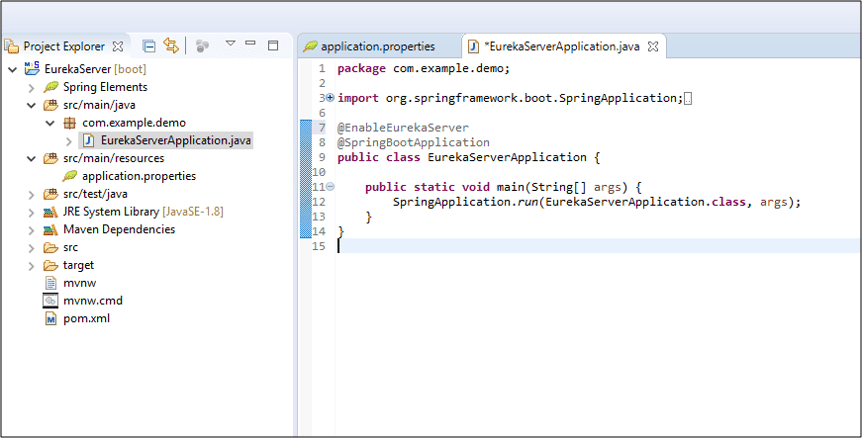
Open EurekaServer/src/main/java/com/example/EurekaServiceApplication.java and add @EnableEurekaServer above @SpringBootApplication.
import org.springframework.cloud.netflix.eureka.server.EnableEurekaServer;
@EnableEurekaServer @SpringBootApplication
This annotation will configure a registry that will allow other applications to communicate.
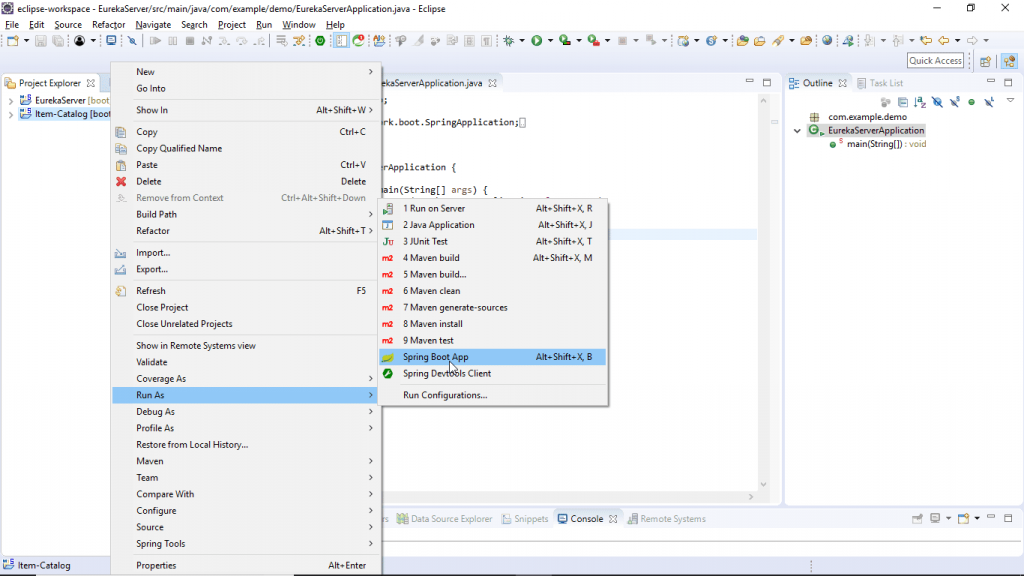
To start the Application: Right Click on the
Project -> Run As -> Click on ” Spring Boot App “
Spring Boot Microservices: Creating an Item Catalog Service
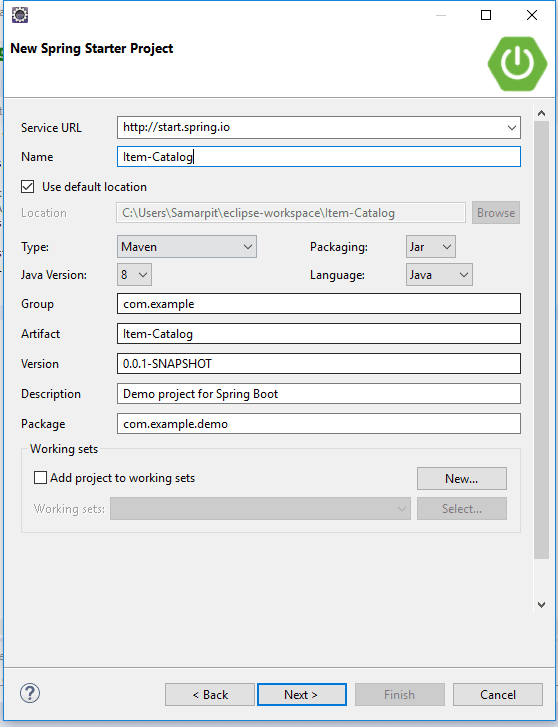
Again create a new project. Use Item-catalog-service for the artifact name and click on Next.
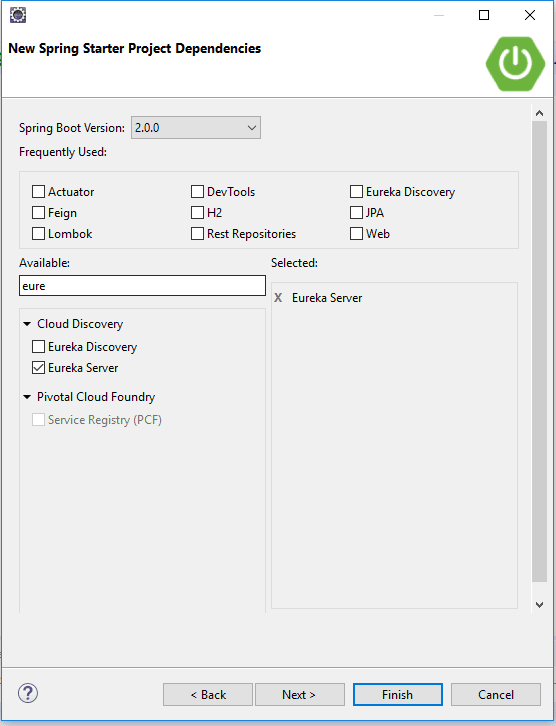
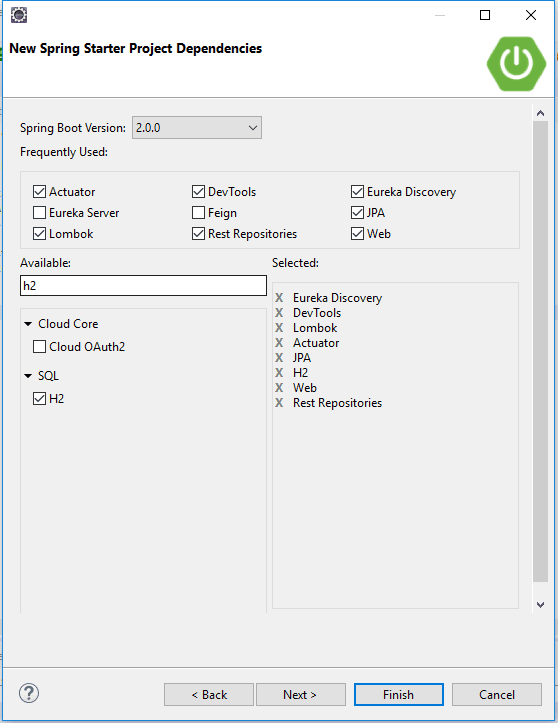
Add the following dependencies:
- Actuator: features to help you monitor and manage your application
- EurekaDiscovery: for service registration
- JPA: to save/retrieve data
- H2: an in-memory database
- RestRepositories: to expose JPA repositories as REST endpoints
- Web: Spring MVC and embedded Tomcat
- DevTools: to auto-reload the application when files change
- Lombok: to reduce boilerplate code

Learn Experts Curated Spring Boot Microservices Training to Build Your Skills & Ability
- Instructor-led Sessions
- Real-life Case Studies
- Assignments
Click on Finish.
Now, create an entity, to ItemCatalogServiceApplication.java . The code below assumes you’re putting all classes in the same file.
If you’re using an editor that doesn’t auto-import classes, here’s the list of imports needed at the top of ItemCatalogServiceApplication.java.
Add an application name in item-catalog-service/src/main/resources/application.properties file to display in the Eureka service, and set the port to 8088.
Now, Create the Cloud Properties file.
Click on File -> New -> Other -> File and add the below code in this file and save it.
- eureka.instance.hostname=${vcap.application.uris[0]:localhost}
- eureka.instance.nonSecurePort=80
- eureka.instance.metadataMap.instanceId=${vcap.application.instance_id:${spring.application.name}:${spring.application.instance_id:${server.port}}}
- eureka.instance.leaseRenewalIntervalInSeconds = 5
- eureka.client.region = default
- eureka.client.registryFetchIntervalSeconds = 5
- eureka.client.serviceUrl.defaultZone=${vcap.services.pwa-eureka-service.credentials.uri}/eureka/
Now, to start the Application:
Right Click on Project -> Run As -> Click on ” Spring Boot App “
Note: In case of error try this step: Right Click on the Project -> Run As -> Click on “Maven Build.”
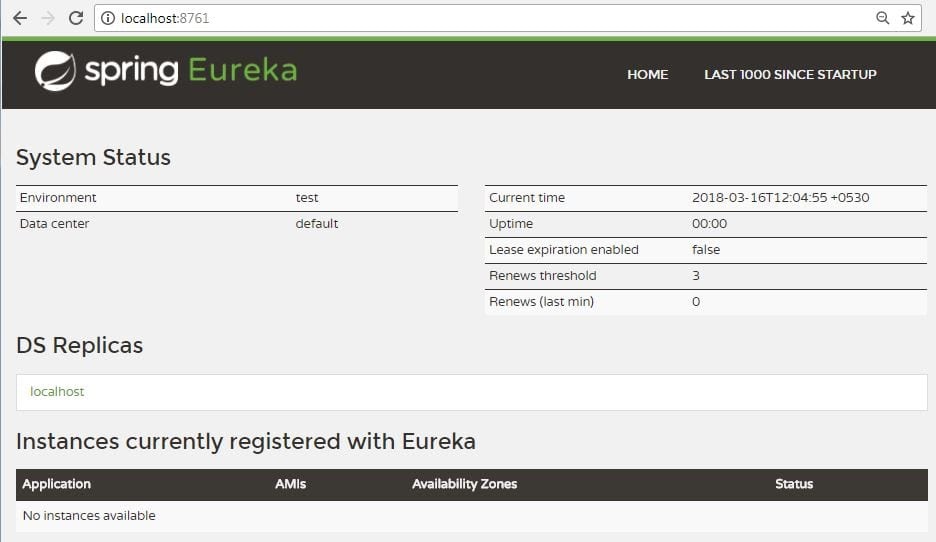
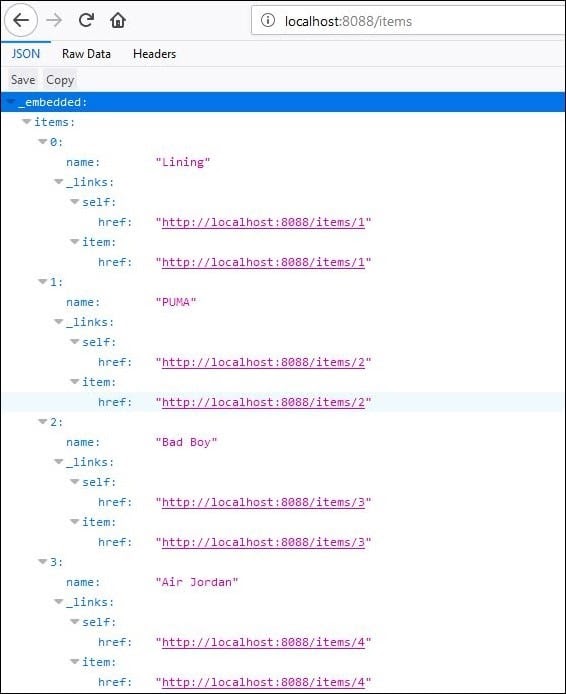
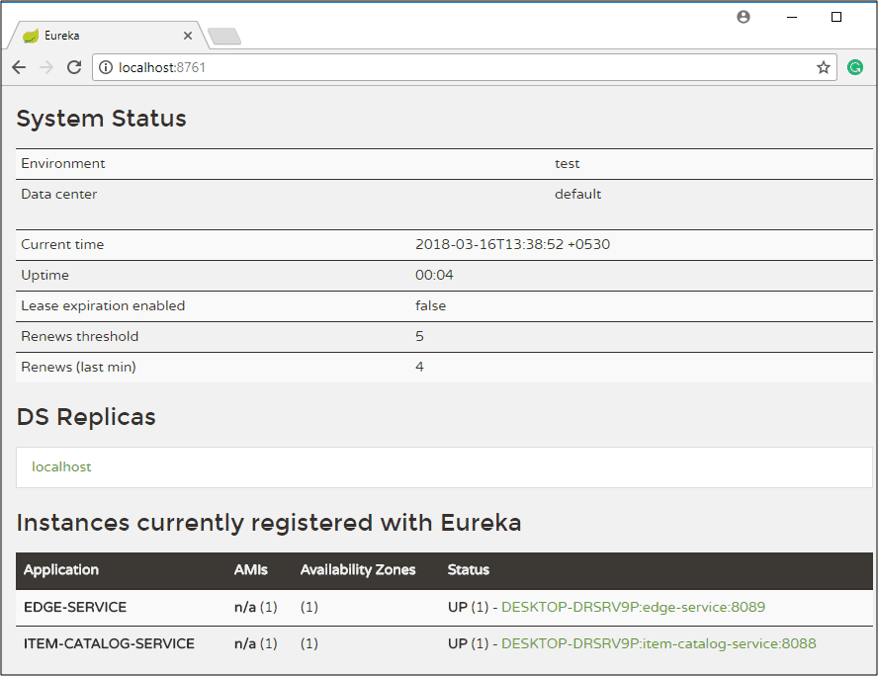
Now open http://localhost:8761. Here you will see Item Catalog service will be running.
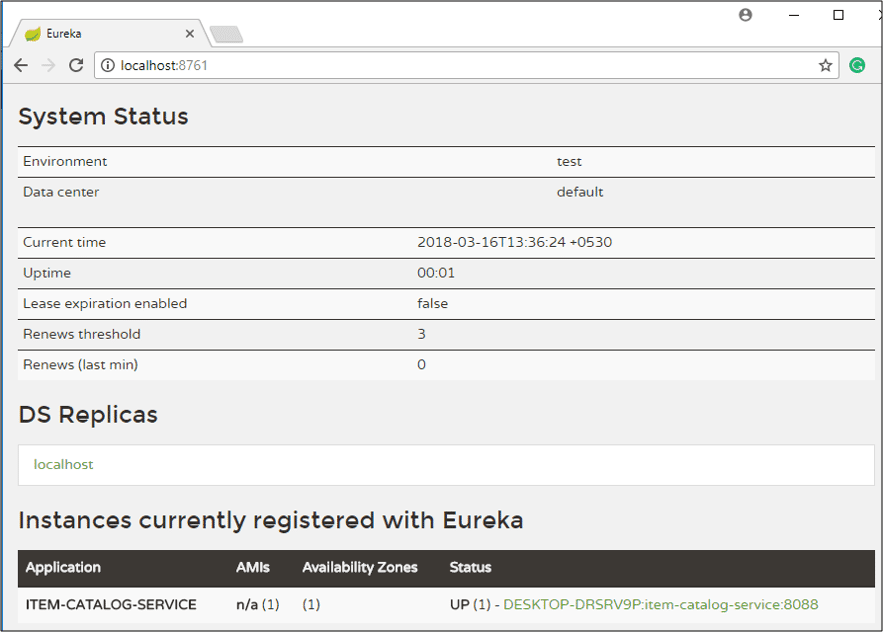
You will see the list of items from the catalog service.
Now let us move forward and create the Edge Service.
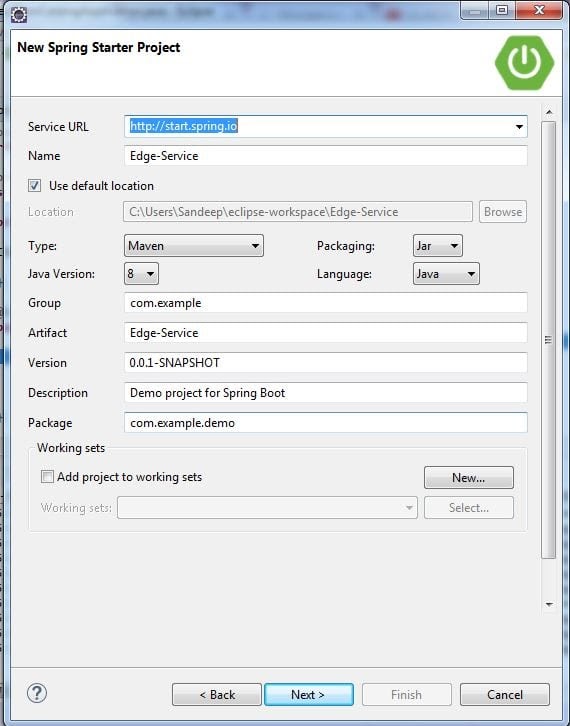
Creating an Edge Service
It is similar to the standalone Item service created in Bootiful Development with Spring Boot and Angular. However, it will have fallback capabilities which prevent the client from receiving an HTTP error when the service is not available.
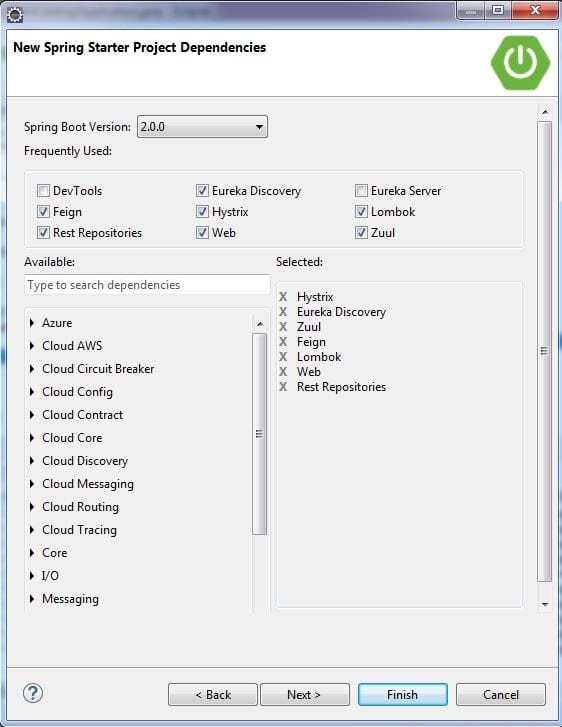
Again create a new project. Use edge-service for the artifact name:
- Eureka Discovery: for service registration
- Feign: a declarative web service client
- Zuul: provides intelligent routing
- Rest Repositories: to expose JPA repositories as REST endpoints
- Web: Spring MVC and embedded Tomcat
- Hystrix: a circuit breaker to stop cascading failure and enable resilience
- Lombok: to reduce boilerplate code
Click on Finish.
Since the item-catalog-service is running on port 8088, you’ll need to configure this application to run on a different port. Modify edge-service/src/main/resources/application.properties to set the port to 8089 and set an application name.
Now, Create the Cloud Properties file.
Click on File -> New -> Other -> File and add below code in this file and save it.
- eureka.instance.hostname=${vcap.application.uris[0]:localhost}
- eureka.instance.nonSecurePort=80
- eureka.instance.metadataMap.instanceId=${vcap.application.instance_id:${spring.application.name}:${spring.application.instance_id:${server.port}}}
- eureka.instance.leaseRenewalIntervalInSeconds = 5
- eureka.client.region = default
- eureka.client.registryFetchIntervalSeconds = 5
- eureka.client.serviceUrl.defaultZone=${vcap.services.pwa-eureka-service.credentials.uri}/eureka/
To enable Feign, Hystrix, and registration with the Eureka server, add the appropriate annotations to EdgeServiceApplication.java:
Create a Item DTO (Data Transfer Object) in this same file. Lombok’s will generate a methods, getters, setters, and appropriate constructors.
Create a ItemClient interface that uses Feign to communicate to the Item-catalog-service.
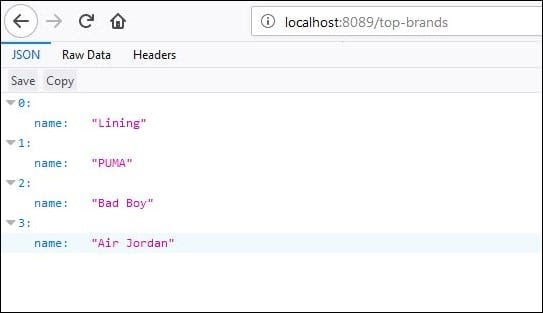
Create a RestController below the ItemClient that will filter out less-than-top brands and shows a /top-brands endpoint.
Start the edge-service application with Maven or your IDE and verify it registers successfully with the Eureka server.
Now invoke localhost:8089/top-brands, you will see the list of top brands from the catalog service.
Note: If you shut down the item-catalog-service application, you’ll get a 500 internal server error.
To fix this, you can use Hystrix to create a fallback method and tell the goodItems() method to use it.
Restart the edge-service and you should see an empty list returned.
Start the item-catalog-service again and this list should eventually return the full list of top brands names.