
- Functions and Closures in Swift | A Basic Tutorial
- Swift Tutorial – Enumerations & Structures | Everything You Need to Know
- Ionic Native Components | The Ultimate Guide
- Ionic Tutorial – Build Cross Platform Apps | A Complete Guide
- Introduction to Swift Control Flow | Learn in 1 Day FREE Tutorial
- Introduction to Swift | The Definitive Tutorial for Beginners
- Kotlin Tutorial for Beginners | Learn Kotlin at Ease
- Android Studio Tutorial
- React Native Tutorial
- iOS Architecture
- 5G Tutorial
Android Studio Tutorial
Last updated on 13th Oct 2020, Blog, Mobile app development, Tutorials
Android
Android is an open source and Linux-based operating system for mobile devices such as smartphones and tablet computers. Android was developed by the Open Handset Alliance, led by Google, and other companies.
Features of Android
There are numerous features of android. Some of them are listed below:
- Connectivity- Android supports multiple connectivity technologies including GSM/EDGE, IDEN, CDMA, EV-DO, UMTS, Bluetooth, Wi-Fi, LTE, NFC and WiMAX
- Storage- SQLite, a lightweight relational database, is used for data storage purposes
- Media support- Android supports various type of audio/video/still media formats like: H.263, H.264, MPEG-4 SP, AMR, AMR-WB, AAC, HE-AAC, AAC 5.1, MP3, MIDI, Ogg Vorbis, WAV, JPEG, PNG, GIF, BMP and WebP
- Web browser- The web browser available in Android is based on the open-source Blink (previously WebKit) layout engine, coupled with Chrome’s V8 JavaScript engine supporting HTML5 and CSS3
- Messaging- SMS and MMS are available forms of messaging, it also include threaded text messaging and Android Cloud To Device Messaging (C2DM) and now support the enhanced version of C2DM, Android Google Cloud Messaging (GCM) is also a part of Android Push Messaging services
- Multi-tasking- Multitasking of applications, with unique handling of memory allocation, is available, using this user can jump from one task to another and at the same time various application can run simultaneously
- Resizable widgets- Widgets are re-sizable, so users can expand them to show more content or shrink them to save space
- Multi-touch- Android has native support for multi-touch which was initially made available in handsets such as the HTC Hero
- Wi-Fi- A technology that lets apps discover and pair directly, over a high-bandwidth peer-to-peer connection.
- Screen capture- Android supports capturing a screenshot by pressing the power and home-screen buttons at the same time. This features supports after Android 4.0
- Android Beam- A popular NFC-based technology that lets users instantly share, just by touching two NFC-enabled phones together
- Multi-Language- Android supports multiple languages, also supports single direction and bi-directional text
Subscribe For Free Demo
Error: Contact form not found.
Why Android?
There are so many reasons you should choose the Android platform for mobile application development.
- Zero/negligible development cost- The development tools like Android SDK, JDK, and Eclipse IDE etc. are free to download for the android mobile application development. Also Google charges a small fee of $25, to distribute your mobile app on the Android Market.
- Open Source-The Android OS is an open-source platform based on the Linux kernel and multiple open-source libraries. In this way developers are free to contribute or extend the platform as necessary for building mobile apps which run on Android devices.
- Multi-Platform Support-In the market, there are a wide range of hardware devices powered by the Android OS, including many different phones and tablets. Even development of android mobile apps can occur on Windows, Mac OS or Linux.
- Multi-Carrier Support-A large number of telecom carriers like Airtel, Vodafone, Idea Cellular, AT&T Mobility, BSNL etc. are supporting Android powered phones.
- Open Distribution Model-Android Marketplace (Google Play store) has very few restrictions on the content or functionality of an android app. So the developer can distribute their app through Google Play store and as well other distribution channels like Amazon’s app store.
Architecture
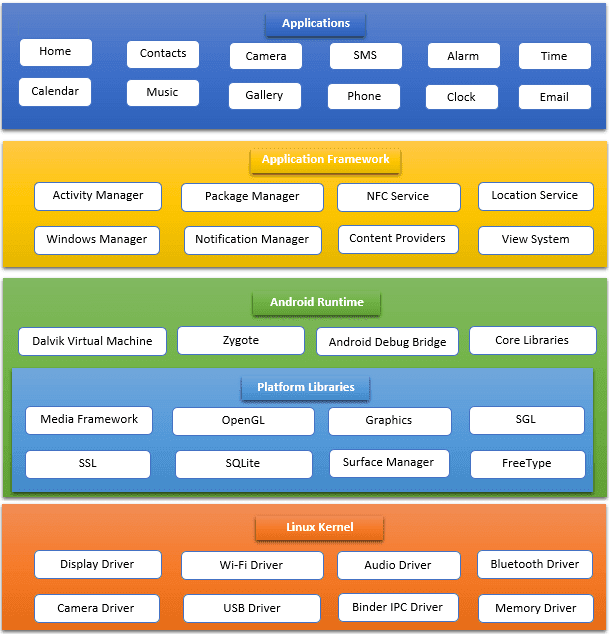
Android architecture is a software stack of components to support mobile device needs. Android software stack contains a Linux Kernel, collection of c/c++ libraries which are exposed through an application framework services, runtime, and application.
Following are main components of android architecture those are
- Applications
- Android Framework
- Android Runtime
- Platform Libraries
- Linux Kernel
In these components, the Linux Kernel is the main component in android to provide its operating system functions to mobile and Dalvik Virtual Machine (DVM) which is responsible for running a mobile application.
Following is the pictorial representation of android architecture with different components.
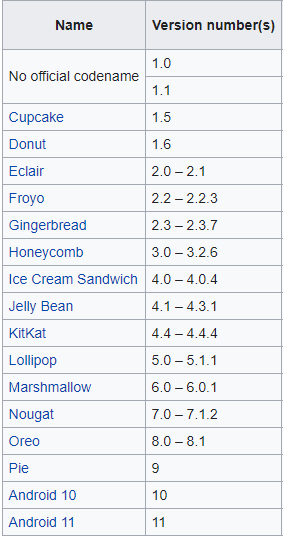
Android Versions
Advantages of android operating system:
- Millions of apps:-Users have a vast choice to choose which apps they need. Apps are categorized into topics and every topic has a large amount of apps to download.
- Third-party apps also supported:-You can also install third-party apps. These apps can be downloaded from different websites. Users are flexible in choosing which apps they want to download either from google play store or any other website. You just need to authorize the app to be downloaded.
- Notifications are nicely displayed:-All the notifications of apps, messages, emails, low battery are displayed nicely. Users can access the notification by just sliding from top to bottom. You can also see the notifications in lock mode.
- Sharing of internet among devices:-With a mobile hotspot, you can share your device internet with other devices or with PC. This can help save money also. If you living in a house then you can share your internet with your family members and they don’t need to buy separate internet packages.
- Variety of mobile models to choose from:-Android OS can run on a wide range of devices i.e. HTC, Samsung, OPPO, Huawei, Motorola, Sony Ericson and many others. You can choose any low-cost mobile or middle range mobile easily. Some android mobiles are costly too but it all depends upon your budget.
- Expandable memory:-Apple smartphones and tablets don’t support expandable memory but android devices come with expandable memory options. If you have a lot of data to store then you can attach an external memory card to expand your phone memory. You can store a lot of books, movies and songs in the extended memory card.
- Support large screens at an affordable price:-If you compare large screens Apple devices then android is giving you large screen devices at good prices. Android is also giving updates to all resolution screens and is adaptive.
- Run many apps at the same time:-If you have a good specification phone then you can smoothly run multiple apps at the same time. You can listen to music while using Instagram or Facebook.
- Multiple widgets on screen:-You can choose native widgets or 3rd party widgets to appear on the screen. For example, displaying temperature and clock widgets gives you information all the time when you switch on your phone.
- Foldable devices:-The new android 10 version supports foldable devices. With the passage of time, technology is changing and android is also adapting with the changes in the mobile world.
- Large community support:-There are a huge community of developers and users of android. So if you have any issue in the code or want to check the authenticity of the app then you can easily do this. You can check if the app is real by checking its reviews on google play store.
- Addition and removal of unwanted features:-Android is adding new features in every release and removing old features that are not favourable to the users.
- Android is Open source:-Android is licensed under apache. Mobile companies change the code of android to make the UI change a little bit. Developers have also access to the core code and can make changes to it.
- Cloud storage:-Gmail and other google products use cloud storage that means you can sync many devices with the same google account. 15 GB of cloud storage comes free with every account that is enough for normal users.
- Android developers have high job demands:-As there are millions of apps and to maintain and develop new apps, developers are needed. Android developers have high demand and there are a lot of resources on the internet to get help in the code.
- Restoring and backup of apps:-With the new OS, apps can restore and make backup of their data. This feature helps apps to recover from any bad update or user behaviour.
Disadvantages of android operating system:
- Apps run in the background:-In the older version of Android, most apps always run in the background and come to foreground as they wish. But in the new version of android apps cannot automatically come to foreground. As some apps run in the background then it consumes mobile battery and your device battery vanishes quickly.
- Developers have a tough time:-Learning and developing android apps is hard because there are a variety of screen sizes and to make apps adaptive to all screen sizes is challenging for the developers. Developers have to write more code and it is difficult to troubleshoot the app for final delivery. It is also difficult to make complex apps and doing advanced animation is hard.
- Low specification mobiles run slow:-As android is a very large operating system that consumes a lot of storage and some default apps also come with operating systems so low specification devices run slow. If you install many apps in these devices then your mobile will become unresponsive or heat up quickly.
- Virus protection:-Android is not good at virus protection. Users have rights to download and install apps from other external websites and these apps may contain a virus and steal your data and information. It is also noticed that some apps in google play store contain a virus.
- Many ads in apps:-Most of the android apps are free to use but they come with a lot of ads that display on the app screen or ads display when you perform any action in the app. This is irritating for users and users have to buy licenses for the app to remove ads or uninstall the app.
- Not friendly with old people:-Old people have a difficult time using android devices because of advanced touch screens. They may have an eyesight problem or have not used android mobile before.
- Google account needed:-For installing apps from google play store you need a Gmail account. You also need a google account to use other Google products. If you forget Gmail id then your device can be locked and for unlocking you need to get your Gmail account.
- Bad quality for apps:-Majority of apps in the app store have poor quality and some apps only want to earn money by displaying ads and they have no use for the users. Some apps are not updated for many years and this will affect users which update their operating system.
- The new app idea is difficult:-For developers, there are fewer chances that they make apps which are not already present. As all types of apps are already published in the app store, new companies and developers have a difficult time entering the android market.
- Google is strict to app developers:-If Google finds any issue in your app then it will behave very strictly and also terminate your developer account.

Get JOB Oriented Android Training from Real Time Experts
- Instructor-led Sessions
- Real-life Case Studies
- Assignments
Android IDEs
There are so many sophisticated Technologies are available to develop android applications, the familiar technologies, which are predominantly using tools as follows
- Android Studio
- Eclipse IDE(Deprecated)
Android studio
Android studio is Android Integrated Development Environment(IDE) which helps android developers to build high quality applications which support android platforms. This IDE facilitates Android developers by providing easy to use tools like an enriched source code editor,debugger,tester and various automation tools. This powerful IDE is created using the Intellij IDEA software.
Before downloading Android Studio, make sure your platform meets the following requirements:
Windows requirements
- Microsoft Windows 7/8/10 (32-bit or 64-bit)
- 3 GB RAM minimum, 8 GB RAM recommended (plus 1 GB for the Android Emulator)
- 2 GB of available disk space minimum, 4 GB recommended (500 MB for IDE plus 1.5 GB for Android SDK and emulator system image)
- 1280 x 800 minimum screen resolution
Mac OS requirements
- Mac OS X 10.10 (Yosemite) or higher, up to 10.13 (High Sierra)
- 3 GB RAM minimum, 8 GB RAM recommended (plus 1 GB for the Android Emulator)
- 2 GB of available disk space minimum, 4 GB recommended (500 MB for IDE plus 1.5 GB for Android SDK and emulator system image)
- 1280 x 800 minimum screen resolution
Following is the list of software’s you will need before you start your Android application programming.
- Java JDK5 or later version
- Java Runtime Environment (JRE) 6
- Android Studio
Setup Android Studio
You can download the latest version of android studio from Android Studio 2.2 Download, If you are new to installing Android Studio on windows,you will find a file, which is named as android-studio-bundle-143.3101438-windows.exe.So just download and run on windows machine according to android studio wizard guideline.
If you are installing Android Studio on Mac or Linux, You can download the latest version from Android Studio Mac Download,or Android Studio Linux Download, check the instructions provided along with the downloaded file for Mac OS and Linux.
Installation
So let’s launch Android Studio.exe,Make sure before launching Android Studio, Our Machine should require installed Java JDK. To install Java JDK,take a references of Android environment setup
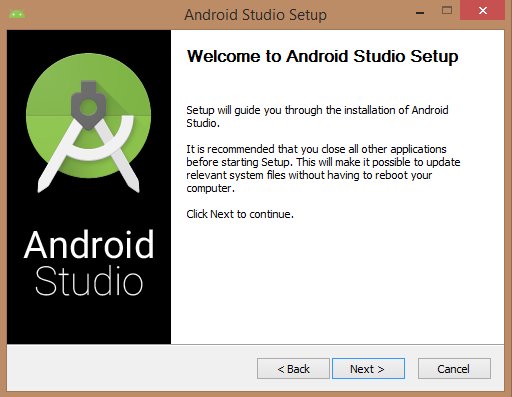
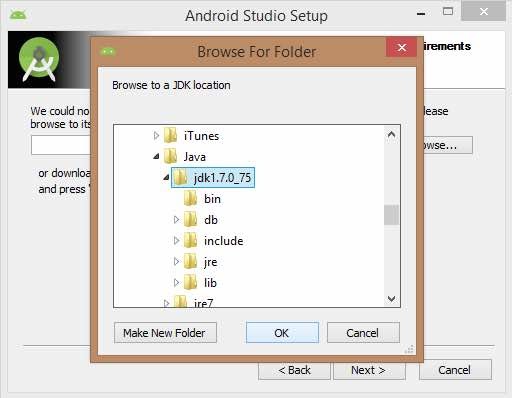
Once you launch Android Studio, it’s time to mention JDK7 path or later version in android studio installer.

Below the image initiating JDK to android SDK
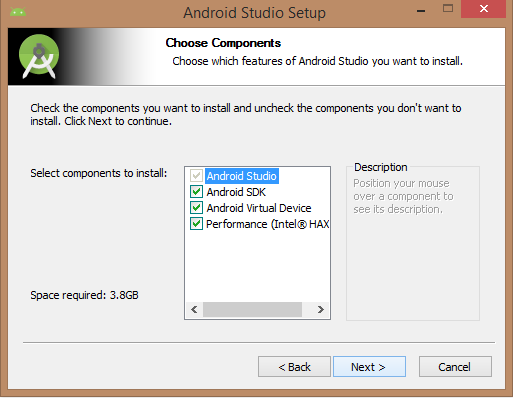
Need to check the components, which are required to create applications, below the image has selected Android Studio, Android SDK, Android Virtual Machine and performance(Intel chip).
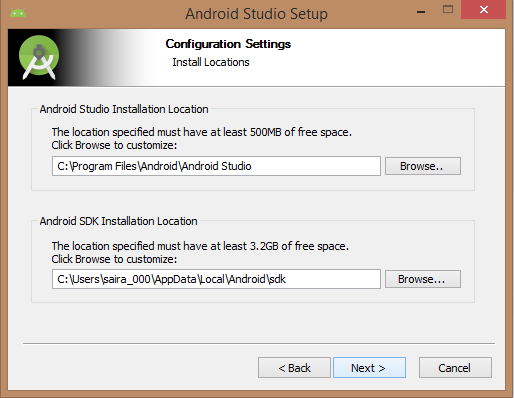
Need to specify the location of the local machine path for Android studio and Android SDK, below the image has taken default location of windows 8.1 x64 bit architecture.
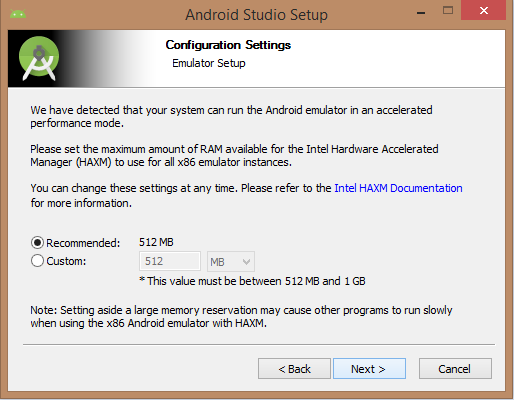
Need to specify the ram space for Android emulator by default it would take 512MB of local machine RAM.
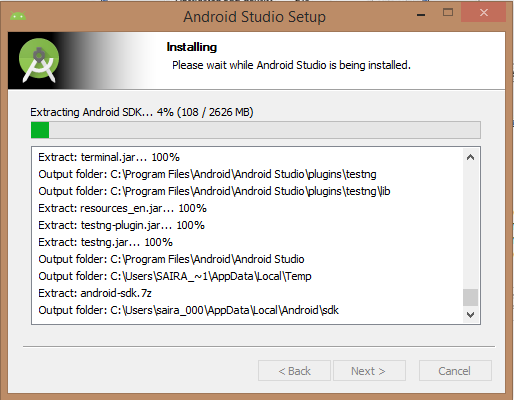
At the final stage, it would extract SDK packages into our local machine, it would take a while to finish the task and would take 2626MB of Hard disk space.
After done all above steps perfectly, you must get finish button and it gonna be open android studio project with Welcome to android studio message as shown below
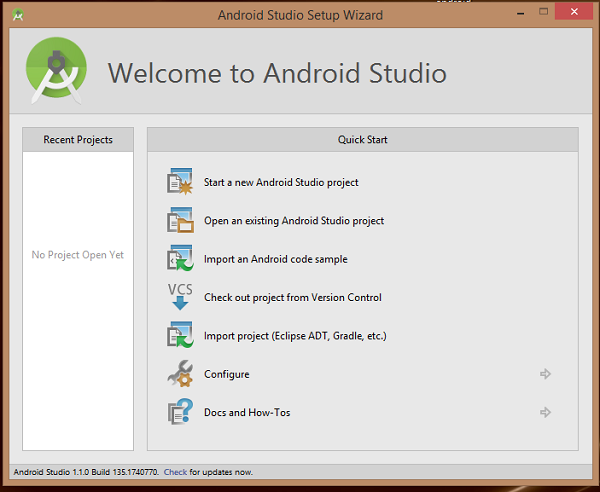
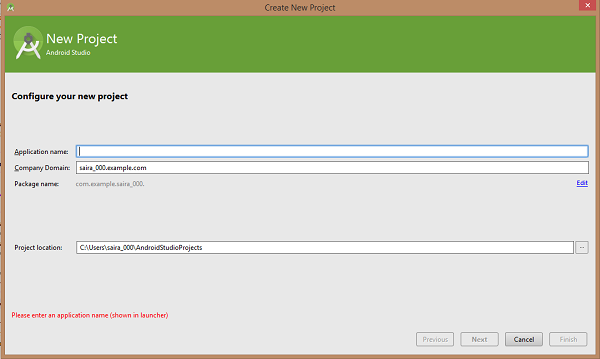
You can start your application development by calling start a new android studio project. in a new installation frame should ask Application name, package information and location of the project.
After entered application name, it going to be called select the form factors your application runs on, here need to specify Minimum SDK,

The next level of installation should contain selecting the activity to mobile, it specifies the default layout for Applications

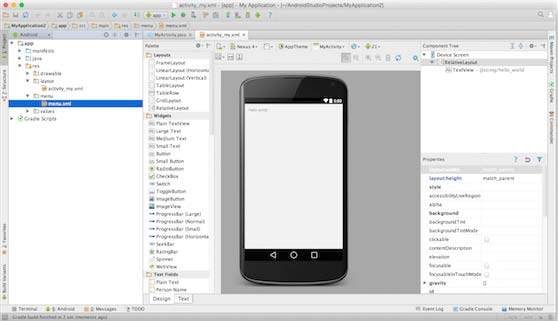
At the final stage it is going to be an open development tool to write the application code.
Create Android Virtual Device
To test your Android applications, you will need a virtual Android device. So before we start writing our code, let us create an Android virtual device. Launch Android AVD Manager Clicking AVD_Manager icon as shown below
After Click on a virtual device icon, it going to be shown by default virtual devices which are present on your SDK, or else need to create a virtual device by clicking Create new Virtual device button
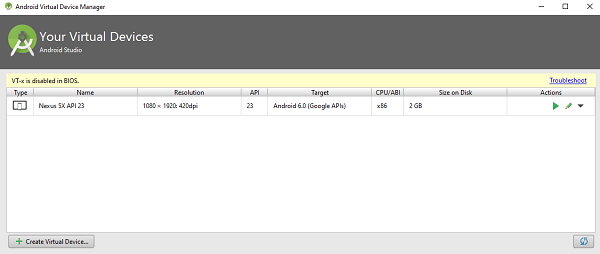
If your AVD is created successfully it means your environment is ready for Android application development. If you like, you can close this window using the top-right cross button. Better you restart your machine and once you are done with this last step, you are ready to proceed for your first Android application.

Best Hands-on Practical Android Course to Build Your Skills
Weekday / Weekend BatchesSee Batch DetailsApplication Components
Application components are the essential building blocks of an Android application. These components are loosely coupled by the application manifest file AndroidManifest.xml that describes each component of the application and how they interact.
There are following four main components that can be used within an Android application −
Activities
An activity represents a single screen with a user interface,in-short Activity performs actions on the screen. For example, an email application might have one activity that shows a list of new emails, another activity to compose an email, and another activity for reading emails. If an application has more than one activity, then one of them should be marked as the activity that is presented when the application is launched.
An activity is implemented as a subclass of Activity class as follows −
- public class MainActivity extends Activity {
- }
Services
A service is a component that runs in the background to perform long-running operations. For example, a service might play music in the background while the user is in a different application, or it might fetch data over the network without blocking user interaction with an activity.
A service is implemented as a subclass of Service class as follows −
- public class MyService extends Service {
- }
- Broadcast Receivers
Broadcast Receivers simply respond to broadcast messages from other applications or from the system. For example, applications can also initiate broadcasts to let other applications know that some data has been downloaded to the device and is available for them to use, so this is a broadcast receiver who will intercept this communication and will initiate appropriate action.
A broadcast receiver is implemented as a subclass of BroadcastReceiver class and each message is broadcast as an Intent object.
- public class MyReceiver extends BroadcastReceiver {
- public void onReceive(context,intent){}
- }
Content Providers
A content provider component supplies data from one application to others on request. Such requests are handled by the methods of the ContentResolver class. The data may be stored in the file system, the database or somewhere else entirely.
A content provider is implemented as a subclass of ContentProvider class and must implement a standard set of APIs that enable other applications to perform transactions.
- public class MyContentProvider extends ContentProvider {
- public void onCreate(){}
- }
Additional Components
There are additional components which will be used in the construction of above mentioned entities, their logic, and wiring between them. These components are −
- Fragments- Represents a portion of user interface in an Activity.
- Views- UI elements that are drawn on-screen including buttons, lists forms etc.
- Layouts-View hierarchies that control screen format and appearance of the views.
- Intents- Messages wiring components together.
- Resources- External elements, such as strings, constants and drawable pictures.
- Manifest- Configuration file for the application.
Build your first app
You will learn how to create a “Hello, World!” project with Android Studio and run it.
Create an Android project
This lesson shows you how to create a new Android project with Android Studio, and it describes some of the files in the project.
To create your new Android project, follow these steps:
- Install the latest version of Android Studio.
- In the Welcome to Android Studio window, click Start a new Android Studio project.
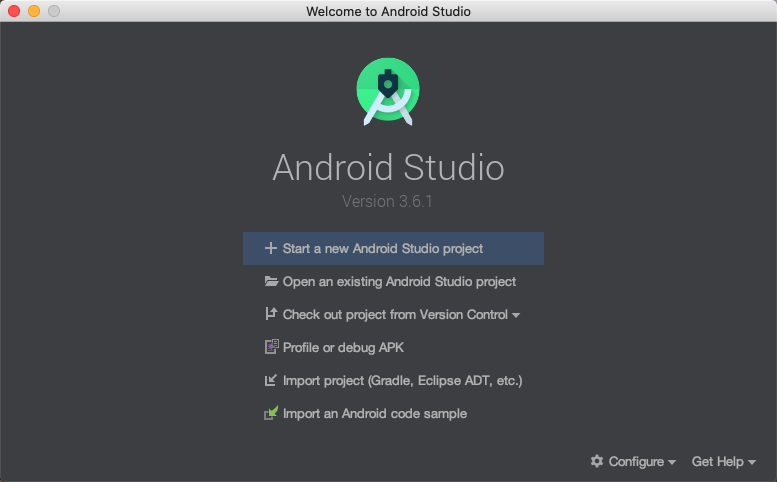
If you have a project already opened, select File > New > New Project.
- In the Select a Project Template window, select Empty Activity and click Next.
- In the Configure your project window, complete the following:
- Enter “My First App” in the Name field.
- Enter “com.example.myfirstapp” in the Package name field.
- If you’d like to place the project in a different folder, change its Save location.
- Select either Java or Kotlin from the Language drop-down menu.
- Select the lowest version of Android your app will support in the Minimum SDK field.
- If your app will require legacy library support, mark the Use legacy android.support libraries checkbox.
- Leave the other options as they are.
- Click Finish.
After some processing time, the Android Studio main window appears.
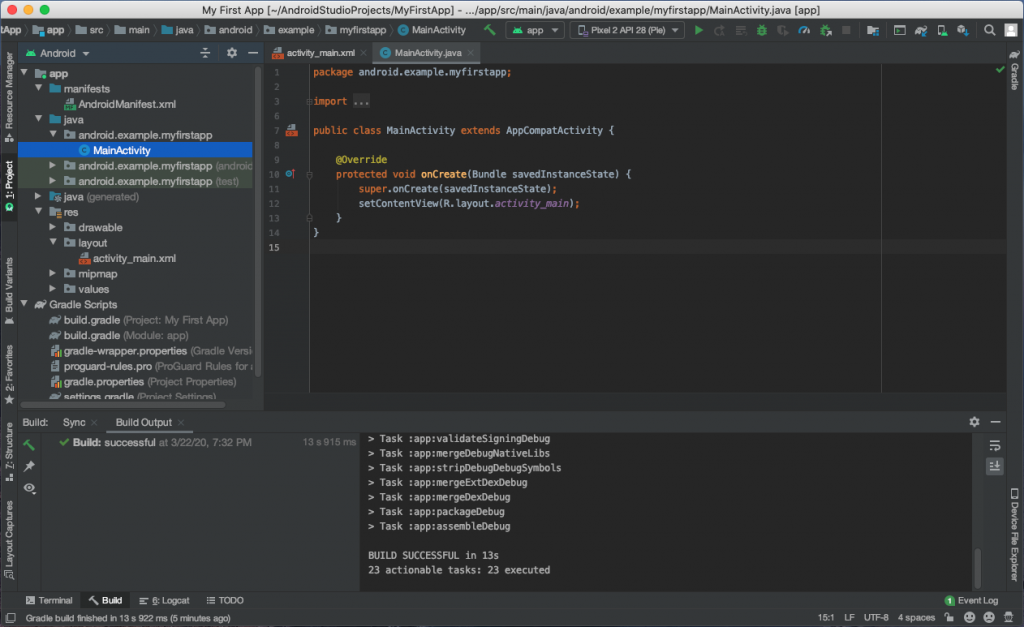
Now take a moment to review the most important files.
First, be sure the Project window is open (select View > Tool Windows > Project) and the Android view is selected from the drop-down list at the top of that window. You can then see the following files:
app > java > com.example.myfirstapp > MainActivity
This is the main activity. It’s the entry point for your app. When you build and run your app, the system launches an instance of this Activity and loads its layout.
app > res > layout > activity_main.xml
This XML file defines the layout for the activity’s user interface (UI). It contains a TextView element with the text “Hello, World!”
app > manifests > AndroidManifest.xml
The manifest file describes the fundamental characteristics of the app and defines each of its components.
Gradle Scripts > build.gradle
There are two files with this name: one for the project, “Project: My First App,” and one for the app module, “Module: app.” Each module has its own build.gradle file, but this project currently has just one module. Use each module’s build.gradle file to control how the Gradle plugin builds your app. For more information about this file, see Configure your build.
To run the app, continue to the next lesson, Run your app.
Run your app
you created an Android app that displays “Hello, World!” You can now run the app on an emulator.
Run on an emulator
Run the app on an emulator as follows:
- In Android Studio, create an Android Virtual Device (AVD) that the emulator can use to install and run your app.
- In the toolbar, select your app from the run/debug configurations drop-down menu.
- From the target device drop-down menu, select the AVD that you want to run your app on.
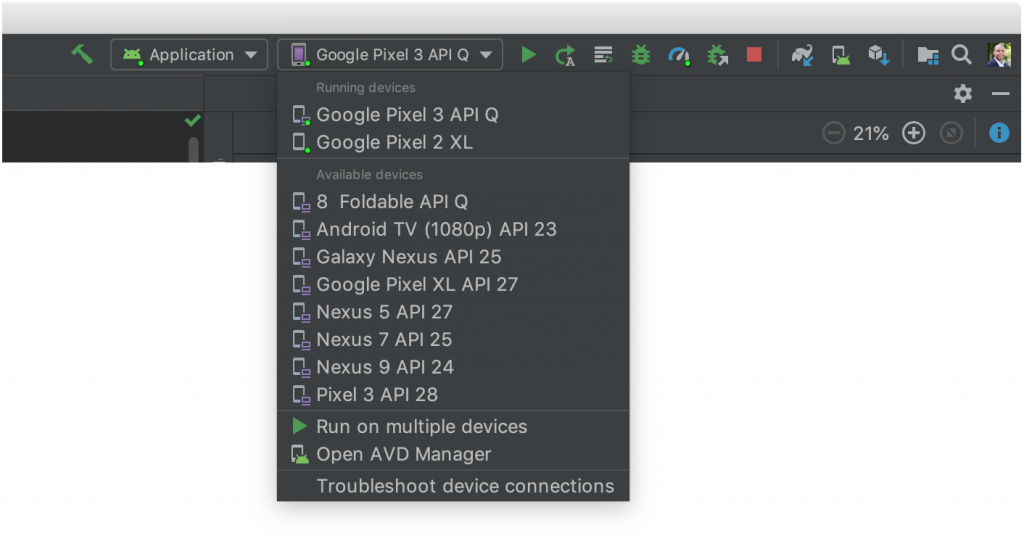
- Click Run
.
- Android Studio installs the app on the AVD and starts the emulator. You now see “Hello, World!” displayed in the app.