
- Robotic Process Automation with Python Tutorial | Learn to Write Python Script Command in RPA
- Kofax Tutorial: Getting Started | A Complete guide for beginners
- UFT Tutorial | Learn Unified Functional Testing – Best Guide
- Pega Tutorial : Learn the In-Built Features
- Automation Anywhere Tutorial | What is, RPA & Types of Bots
- SaltStack Tutorial
- Ansible Basic Cheat Sheet Tutorial
- RPA blue prism tutorial
- RPA Developer Tutorial
- UIPath Tutorial
- Appttus Tutorial
- Appium Tutorial
- Chef Tutorial
- Ansible Tutorial
- PowerShell Tutorial
- Blue Prism Tutorial
- Selenium Tutorial
- RPA Tutorial
Appium Tutorial
Last updated on 26th Sep 2020, Automation, Blog, Tutorials
We live in a mobile era. There is a mobile app out there for possibly everything you can imagine. As per statistics, iOS and Android app stores each contain close to 2 million apps! Additionally, majority of web applications are responsive nowadays, allowing mobile users to enjoy seamless browsing experience on their mobile devices. Needless to say, with all these inroads of mobile technology, all software testers have a daunting task at their hand. And that is to perform mobile testing!
Now, since mobile testing involves testing on a lot of different devices and platforms, it can become tedious quickly. And due to this, there are chances that a tester would get bogged down by the repetitive nature of this task. Thankfully, there is a way out of this. And that is to leverage automation using mobile automation tools. While there are many tools available for mobile automation right now, Appium is one of the most widely used among them. It’s flexible, scalable, feature rich and immensely helpful. No doubt learning it would make our mobile testing life a whole lot easier. So why not start learning it right now with this detailed Appium tutorial? Sounds exciting, right? Let’s start then, with our first step towards Appium journey.
A Bit About This Appium Tutorial
In this article, we will try to cover every aspect of Appium that a user starting from scratch would find interesting. So yes, you guessed it right. The target audience of this Appium tutorial is complete beginners. Although, experienced users will also find it a great refresher. In any case, if Appium is something that interests you, you will find this Appium tutorial useful.
Well, enough with the talks. Let’s get down to business and start this Appium tutorial with an introduction to Appium.
Introduction to Appium
To put it simply, Appium is an open-source tool for mobile automation. It allows automation of native, mobile web and hybrid mobile applications. Using Appium, we can automate iOS, Android and Windows Phone apps on both emulator/simulator and on physical mobile devices.
However, the real beauty of Appium lies in its ‘cross-platform’ support. It lets us write tests for multiple platforms (iOS, Android, and Windows Phone), using the same API. That means you can write your test for Android platform and use that same test for iOS or Windows Phone! The underlying API remains same. This results in a large amount of code reuse between different test suites.
Another cool feature of Appium is its ability to automate without recompiling the app. That means we don’t need access to our application code. Other mobile automation tools such as Calabash and Frank requires an extra agent compiled with the app code. But there’s no such requirement for Appium! This essentially means you will be testing the same app which you are going to submit in app stores.
Additionally, Appium is built according to philosophy which follows below 4 tenets. Let’s check out each of these and see how Appium follows them.
Why Is Appium A Popular Tool For Automating Mobile Apps?
Appium is a “cross-platform tool” i.e. it allows you to write tests on multiple platforms (iOS, Android, Windows), using the same APIs. Using Appium, you also run automated tests on actual devices like tablets, mobile phones, etc.
It is the most widely used tool for regression testing of Mobile Apps on mobile phones and tablets. Appium makes mobile app regression testing easy; especially, for large mobile apps that are updated frequently with new features and functionalities.
Appium Architecture
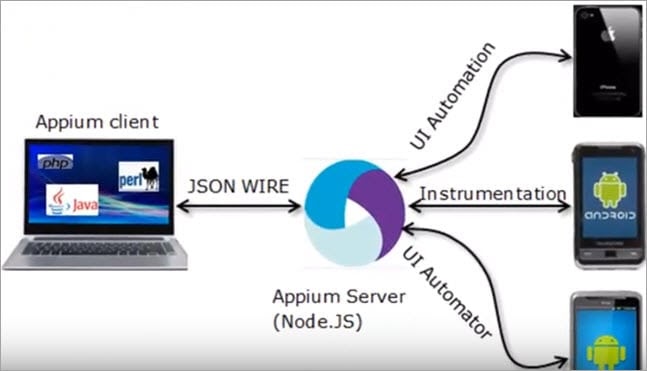
Understanding Appium architecture in this Appium tutorial will help us grasp a lot of important concepts. While its architecture is fairly straight forward, we have made its illustration as detailed as possible for you to understand it thoroughly. So, let’s dive right in.
Probably the most important aspect of Appium architecture is its client/server nature. Appium follows a client/server architecture. So at this point, it would be important for us to understand what is client and what is server in its design. We will check them out one by one below.
Server:
If you have ever used Selenium RC before, you’ll find that Appium works in a similar line. Just like Selenium server in Selenium RC, Appium essentially is a server at its very core. It facilitates communication between client and a mobile device. It is important to note here that Appium server is written in Node.js. That’s why we need Node.js installed in our system to use it.
Client:
Client in Appium terminology is one of the client libraries (in Java, Ruby, Python, PHP, JavaScript, and C#) available for Appium. These libraries provides mobile specific commands (such as multi-touch) in addition to standard Selenium commands.
Clear about client and server in Appium? Now, let’s see how they communicate with each other.
Subscribe For Free Demo
Error: Contact form not found.
Communication Between Client and Server
When Appium server starts, it basically exposes a REST API to client. Client initiates a session with it using a JSON ‘desired capabilities’ object. Server, in turn, starts a session and responds to client with a session ID. This result is the creation of a session between client and server.
Now that the session is established between them, client sends automation commands to server. Appium server executes those commands on mobile device and responds to client with results.
At this point, it is worth noting that Appium does not execute commands on mobile devices directly. Instead, it invokes vendor-provided automation frameworks specific to the platform that we are testing on. Vendors like Apple, Google and Microsoft provides automation frameworks for their platforms. Appium server hooks to these frameworks and carries out automation on device.
Below diagram explains the whole process.

Appium Architecture
Below is a list of vendor frameworks Appium uses for automation on different platforms.
- iOS: Apple’s UIAutomation
- Android 2.3+: Google’s UIAutomator
- Android 4.2+: Google’s Instrumentation
- Windows: Microsoft’s WinAppDriver
A Note About Desired Capabilities
We saw earlier in this Appium tutorial that client sends JSON ‘desired capabilities’ object to server to initiate a session. You must be wondering as to what is ‘desired capabilities’. Well, to put it simply, they are a set of key-value pairs to tell the Appium server what kind of automation session is required. For example, setting ‘platformVersion’ capability to 4.4 tells Appium to initiate an Android 4.4 session. Similarly, ‘platformName’ capability tells Appium to start iOS, Android or Windows platform session.
So, till now in this Appium tutorial, we have got all the basics covered. As you may already know, there are various other open source mobile automation tools available. Let’s see how Appium stacks up against each of them.
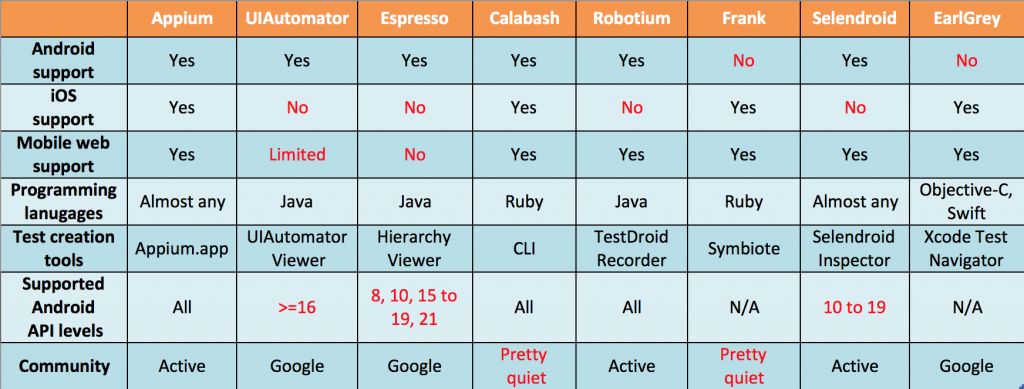
Comparing Appium with other mobile automation tools
As you can see in above comparison, Appium provides a lot of flexibility in terms of features and platform support. In addition to the features mentioned above, Appium provides GUI mode and a built-in test recording tool called Inspector. This tool is detailed below.
Appium Inspector
Much like Selenium IDE, Appium too provides a record and playback tool called Inspector. This tool can generate a test code by simply navigating around in mobile application — a pretty handy feature we must say. Not only this. Appium Inspector also makes finding locators an easy task. You just need to click on your app’s UI element and Inspector will load all of its available attributes in side panel.
The only gripe about this tool is its limited platform support. It is Mac and Windows only at the moment. So, you will not be able to use it on Linux platform. Nonetheless, it’s a great addition to Appium and it certainly makes mobile automation easier. Check out this amazing tool in action below.
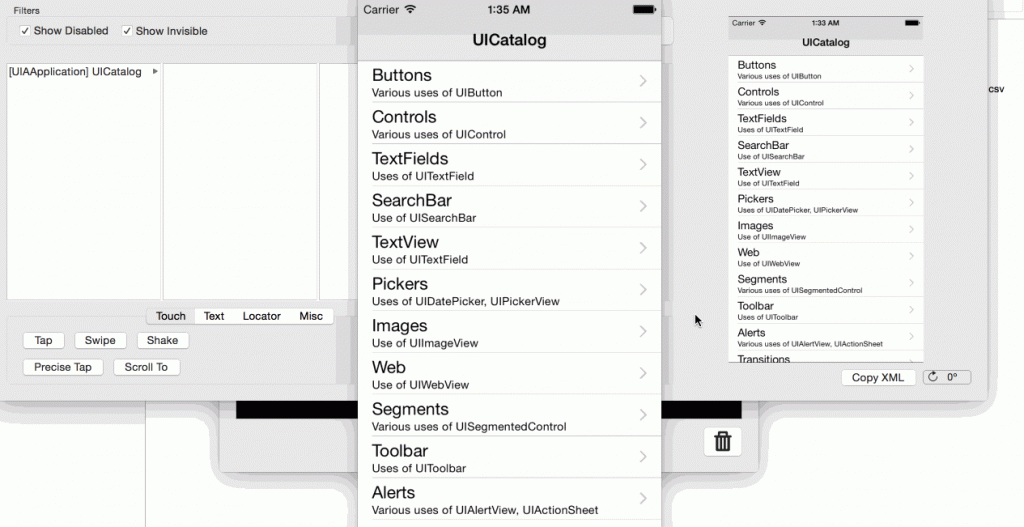
Appium Inspector in Action
So far, we have seen many advantages of Appium in this Appium tutorial. However, with all its cool features, Appium has some limitations as well. Namely below are some aspects where Appium falls short.
The WorkFlow Of Appium Architecture
The Appium Client which holds the configuration details and the automation script for the test cases sends the commands to the server in JSON format. The automation script is converted into JSON format by in-built jar files in the client.
Appium Server then recognizes the command and establishes a connection with the corresponding end device. Once the connection is made, it triggers the execution of test cases in the end device. The End Device responds to the request in the form of HTTP to the Appium.
As and when the test cases are executed in the Mobile device/emulator, it populates the log of all the actions performed in the device/emulator.
Working of Appium on iOS
This tool uses Apple’s UIAutomation API to interact with the UI elements of the application on an iOS device. UIAutomation is a JavaScript library provided by Apple Company. It uses these libraries to automate the applications in iOS.
When we execute the test scripts, the commands in the test scripts are taken in the form of JSON through an HTTP request to the Appium server. The server sends the command to these instruments, and the instruments look for the bootstrap.js file.
Then, these commands are executed in the bootstrap.js file within the iOS instruments’ environment. After the execution of the command, the client sends back the message(success/failure) to the Appium server with the log details of the executed command.
Working of Appium on Android
Appium uses the UIAutomator framework to interact with the UI elements of the application on an Android device. The UIAutomator is a framework that is developed by the Android developers to test its user interface.
Here, Instead of UIAutomation API as we saw in Apple, we have a UIAutomator/Selendroid and bootstrap.jar in place of the bootstrap.js file. It supports all Android versions that are greater than or equal to 17; for earlier versions of Android, Appium uses the Selendroid framework.
When we execute the test scripts, Appium sends the command in JSON format to the UIAutomator or Selendroid based on the Android version. Here, bootstrap.jar acts as a TCP server, which we can use to send the test command to execute the action on the Android device using UIAutomator/Selendroid.
Key Benefits Of Appium Studio
Various prime benefits of Appium Studio are listed below:

Learn Appium Training from the Expert Trainers to Advance Your Career
- Instructor-led Sessions
- Real-life Case Studies
- Assignments
1) Plug & Play Appium Testing – Quick Installation and Set up

It’s that simple!
Appium Studio comes stock with all required dependencies and tools. Whether this is your first install or not, there will be no further components necessary after the initial download. There is no hassle related to constant maintenance of version compatibility or third-party updates.
The set-up and installation of Appium Studio is made simpler through the possibility of iOS test execution on Windows machines and vice-versa.
Not only is there an online guide, but a community forum for the Appium Studio community which also serves as a useful tool. There, the Experitest team and a growing community of users will be able to answers queries with an increasing speed.
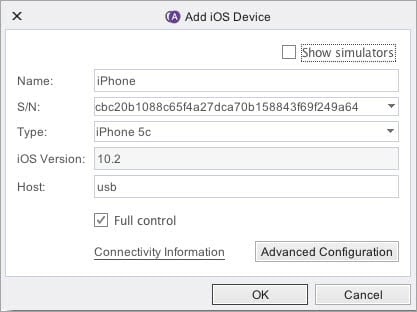
Quick Connection to local or remote mobile devices
With Appium Studio, you can perform tests on locally USB-connected devices or on a selection of remote mobile devices in Experitest’s cloud, called the SeeTest Digital Assurance Lab.
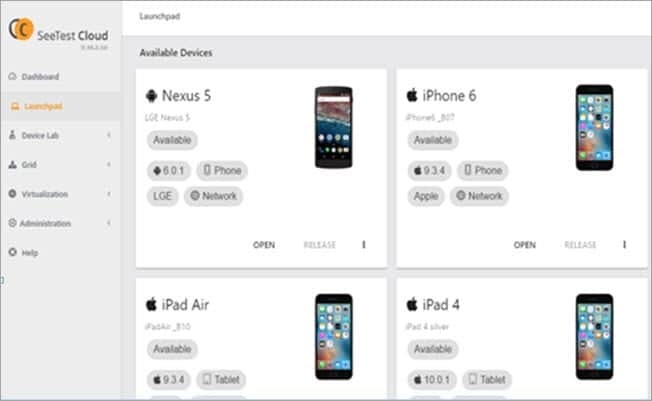
Both Windows and iOS machines can be used to test both iOS and Android devices – this is a direct improvement over Appium alone, along with support for simulators and emulators.
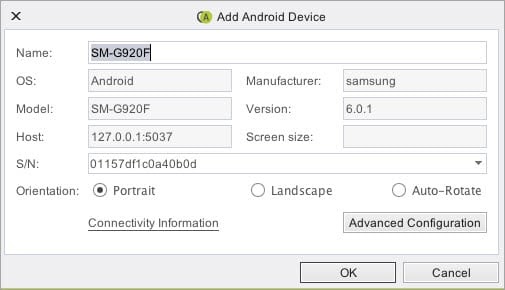
To connect local devices, you can use Appium Studio’s step-by-step connection wizard.
Quick Provisioning of Apple credentials
Apple credentials can be quickly provisioned using a simple Appium Studio wizard, which gathers the information once and then provisions it any time it is needed.
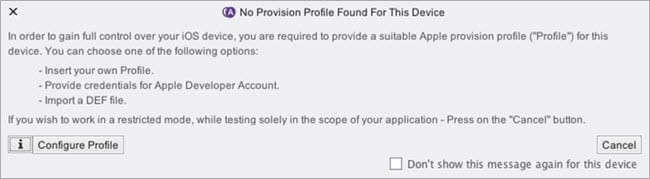
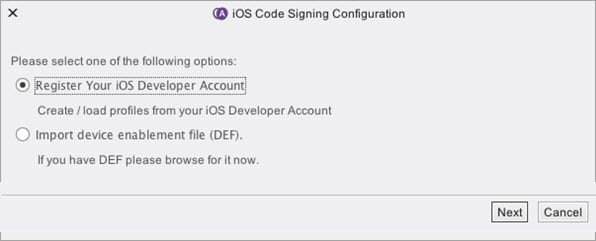

The wizard will prompt you to enter your Apple Developer account username and password, and once you have, you will be able to register an account to this “Provisioning Profile” once it’s opened.
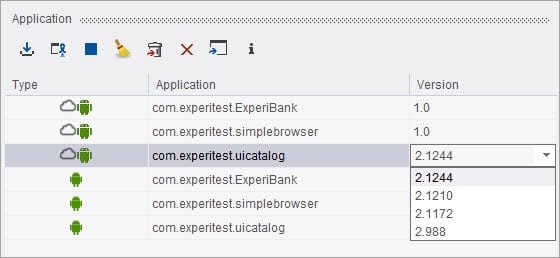
Installing and Opening Applications is quick and easy
Application installs can be made locally or they can be made at the SeeTest Digital Lab remotely after upload.
Either option is easy and can be performed with the application manager. All manual actions can be implemented into an automation script using utility commands.
There are several application management functions that the application manager allows for. These include launch, close, and installation, as well as instrumentation, data clearance, signing and management of language files, and uninstallation.
Version control is also supported by Appium Studio, making your automation scripting even more effective.
The required capabilities of an application are automatically identified by Appium Studio and are sent to the capabilities area.Whichever test scenario you wish to automate, you may select or deselect the appropriate capabilities from this area to simulate it.
There are numerous applications and tests built into Appium Studio so that you can get started easily.
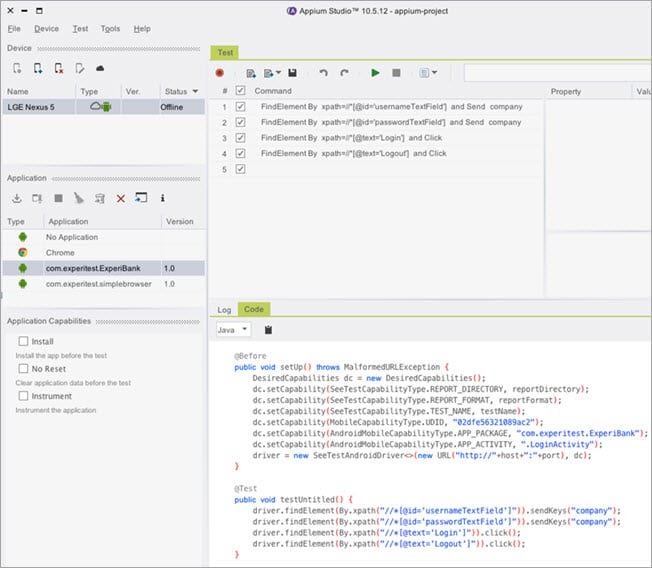
2) Visual Interface for easy Appium Testing
Device reflection and a set of other easy-to-use visual tools make test scripting a breeze in Appium Studio.The Object Spy visual tool or recorder can be used for test creation.
Either method can be used for all apps, whether they are native, web, or third-party.
Within the visual interface of Appium Studio, the primary tools are the Device Manager, Application Manager, Command Area, Device Reflection, and Object Spy.

Join in Appium Certification Course with Global Recognised Certification
Weekday / Weekend BatchesSee Batch DetailsDynamic Device Reflection
When you select a device locally or remotely, a fully controllable device reflection is opened. You can control the device orientation, perform operations, click on the screen, access systems and third-party applications, click soft buttons, and use swipes or gestures. Important testing and development tools are also accessible through the device reflection, including the Object Spy, a device vitals monitor, the device log, and much more.
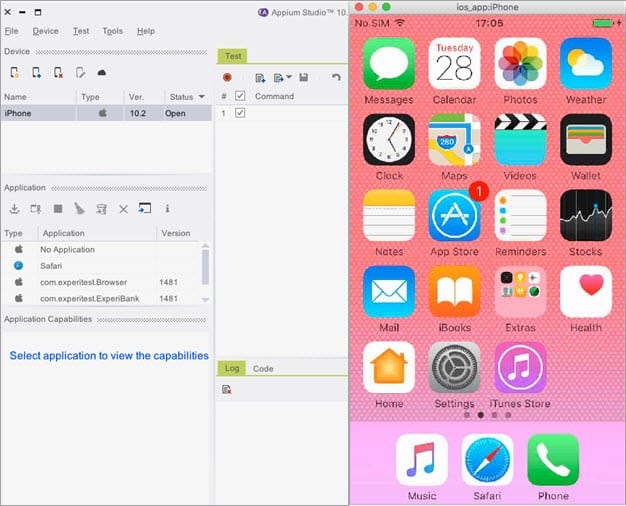
This is a very powerful tool for both validation and development of tests. Tests can be viewed in the device reflection live as they are run in Appium Studio.
The Test Recorder
Using the device reflection to perform your use case is as simple as clicking the record button in the Appium Studio command area and going from there.
After that, all relevant commands will be populated within the command area. The tests can then be run for any purpose, such as verification or management. Test steps can be selected and deselected as the developers see fit.
The Object Spy
New tests can be created and recorded tests can be edited using the Object Spy.
This tool can identify and/or highlight elements on any page and populate them with unique identifiers. This can be done for both native and web apps.
The copy-paste features allow you to move unique identifiers from anywhere into the command area, contributing to more robust tests overall.
Elements in the Object Spy are color-coded according to whether they are instrumented, in red, non-instrumented, in yellow, or a plain element/web element, in blue. Selected elements are green, regardless of their type.
Testing outside the application
In Appium, you are unable to create any tests outside of the application context. Appium Studio rights that wrong, even for iOS apps.Systems apps and third-party apps are just as testable as native apps are, making integration a snap.
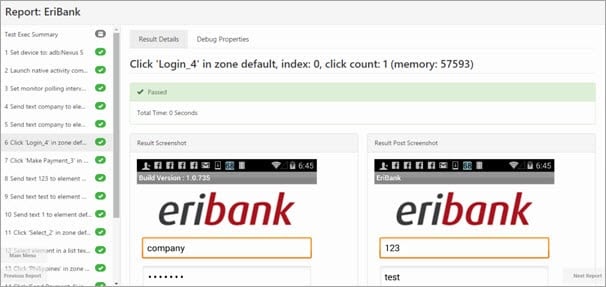
Visual Test Reports
Whenever you execute a test, a report is generated which contains detailed results, screenshots of the test, and videos.
The menu allows you to easily access these reports.

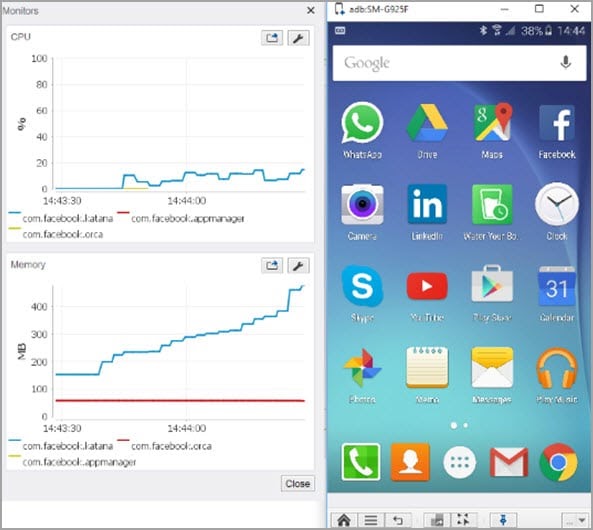
2.5. Performance Testing
Another thing missing from Appium is extended coverage. Appium Studio allows this expansion of coverage area through device behavior monitoring, including monitoring of battery usage, CPU consumption, and Experitest-specific tools, like Network Visualization.
3) Robust Test Execution (local or remote)
Both local and remote devices can be used to execute tests from Appium Studio. This can be done using specific commands and with or without test capabilities.
Using the device reflection, you will be able to watch the test as it is executed.
If you would like to create an automation project, all you have to do is copy your script and paste it into your IDE’s automation project window.
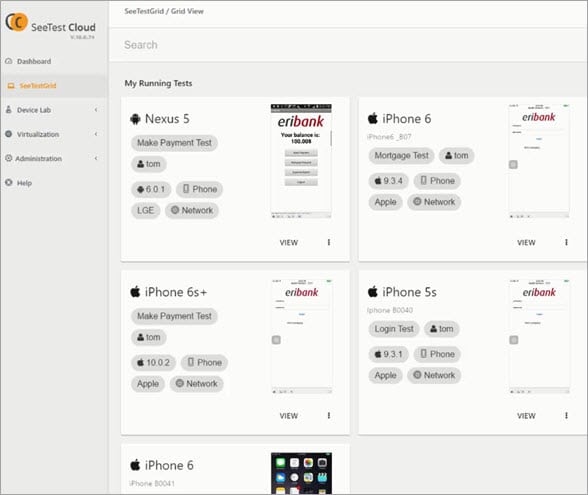
Large-scale Parallel Execution
In the mobile testing space, the variety of devices and frameworks within which an app will be run can quickly multiply the number of tests that require execution. With Appium Studio, this problem is tackled using parallel execution.
Our software comes with grid capabilities through the SeeTest Digital Assurance Lab straight out of the box.
Running your test scripts in an IDE
IDEs like Eclipse and IntelliJ can be used to run Appium Studio scripts when test cases are exported as code script.
This gives testers more control over the scenario and more flexibility in choosing their unit testing framework (JUnit, TestNG, NUnit for .NET). It also gives them the ability to run their tests on multiple devices simultaneously and fork scenarios.
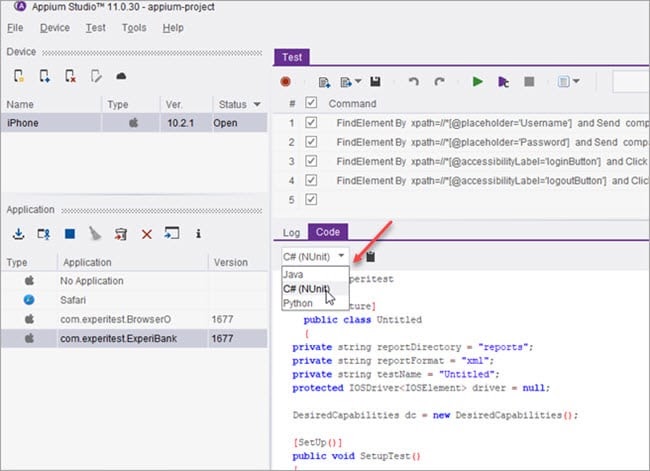
Create a test case by adding the steps one by one. Then use Appium Studio’s export feature by clicking the “code” tab below the list of test steps. Your test case will be there as a test script with all of the steps and capabilities integrated into the code.
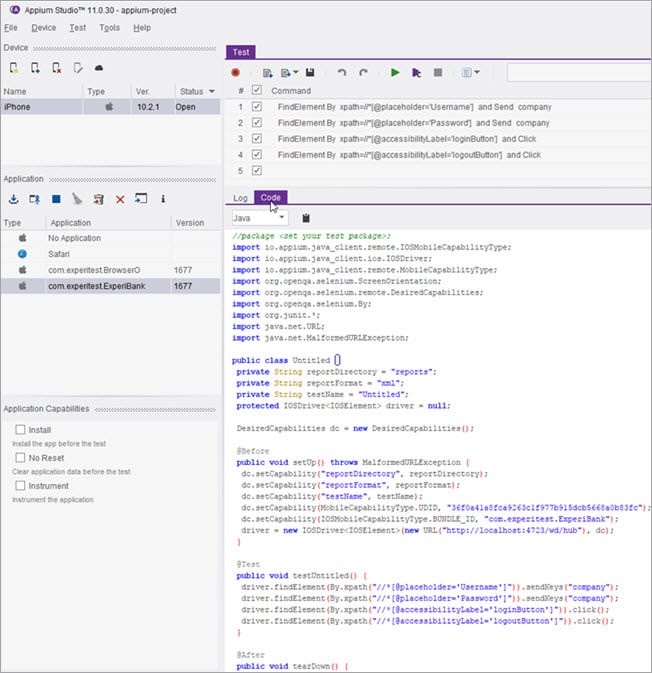
Numerous programming languages, including Java, C#, and Python, can be used for this code export feature. Pick whichever one you prefer!
Appium Limitations
- Probably the single most limiting factor for Appium is its inability to properly synchronize with AUT. We can look at it this way. When our automation tests are running, we wait for some action to complete. It can be waiting for some element to load or waiting for an element to get ready for further actions. Appium does not handle this delay intelligently. Sure, you can put a wait command to overcome this. But it is not efficient solution and it can make your automation tests slower, ultimately defeating the very purpose of automation. Tools like Espresso and EarlGrey takes the cake here for intelligently handling synchronization.
- As an automation tester, you always want your tests to be scalable, right? However from scalability perspective, Appium can be a tough nut to crack if you are testing on iOS platform. Due to technical limitation of Apple’s Instruments framework, you can only execute one test at a time per Mac. This is a big limitation as buying multiple Macs can prove costly. One way to control this limitation is to take help of mobile cloud services like SauceLabs.
- As we have seen earlier in this Appium tutorial, Appium uses Selendroid framework for API level < 16 and UIAutomator framework for API level > 16. This different configuration for single platform can be an overhead while setting up Appium.
- You will need Mac system to run iOS tests. So you can’t automate iOS apps on Windows or Linux systems. It’s because Appium requires Xcode for iOS automation which is Mac-only at the moment.
- Furthermore, if you are just starting out with automation, Appium can be a little tough to setup.
OK, so we are getting at the end of our Appium tutorial. But before we finish it, let’s check out some Appium cloud services.
Appium Cloud Services
Here are some notable cloud services which allows us to scale our Appium tests.
- SauceLabs
- AWS Device Farm
- Xamarin Test Cloud
- Testdroid Cloud
Well, that marks the end of our Appium tutorial.We hope you have enjoyed reading this Appium tutorial. If yes, we urge you to share it with fellow testers who might also be interested in learning Appium. Oh and please don’t forget to share your feedback in comments.