
- Using Firebase to Persist Data Tutorial | Complete Guide [STEP-IN]
- MongoDB and Node.js Tutorial | Create Database
- What Are the Benefits of Using MongoDB Tutorial | A Concise Tutorial Just An Hour
- PL/SQL Tutorial : Learn PL/SQL in 7 Days
- PostgreSQL Tutorial
- How to Download and Install SQL Server?
- Date Functions In SQL Server And MySQL Tutorial
- SQL Server Tutorial
- SQL Applications Tutorial
- Full Join in SQL
- SQL Command Cheat Sheet
- Data Modelling
- Order By and Group By in SQL Tutorial
- Apache Cassandra Interfaces Tutorial
- mysql workbench tutorial
- Apache Cassandra Architecture Tutorial
- NoSQL Database Tutorial
- Data Manipulation in SQL Tutorial
- SQL Server Reporting Services (SSRS) Tutorial

mysql workbench tutorial
Last updated on 26th Sep 2020, Blog, Database, Tutorials
What Is MySQL?
MySQL is an open-source relational database management system, which works on many platforms. It provides multi-user access to support many storage engines.
MySQL has various features that enable us to do many tasks such as comprehensive application development, providing availability and scalability.
Now, obviously, when you work at an industry level, you can’t do everything on the terminal right? You need some kind of dashboard which makes it easy for you to work with large databases and create models.
Well, the dashboard that can perform these actions is the MySQL Workbench.
MySQL Features
MySQL is a relational database management system (RDBMS) based on the SQL (Structured Query Language) queries. It is one of the most popular languages for accessing and managing the records in the table. MySQL is open-source and free software under the GNU license. Oracle Company supports it.
The following are the most important features of MySQL:
1.Relational Database Management System (RDBMS)
MySQL is a relational database management system. This database language is based on the SQL queries to access and manage the records of the table.
2.Easy to use
MySQL is easy to use. We have to get only the basic knowledge of SQL. We can build and interact with MySQL by using only a few simple SQL statements.
3.It is secure
MySQL consists of a solid data security layer that protects sensitive data from intruders. Also, passwords are encrypted in MySQL.
4.Client/ Server Architecture
MySQL follows the working of a client/server architecture. There is a database server (MySQL) and arbitrarily many clients (application programs), which communicate with the server; that is, they can query data, save changes, etc.
5.Free to download
MySQL is free to use so that we can download it from MySQL official website without any cost.
6.It is scalable
MySQL supports multi-threading that makes it easily scalable. It can handle almost any amount of data, up to as much as 50 million rows or more. The default file size limit is about 4 GB. However, we can increase this number to a theoretical limit of 8 TB of data.
7.Speed
MySQL is considered one of the very fast database languages, backed by a large number of the benchmark test.
8.High Flexibility
MySQL supports a large number of embedded applications, which makes MySQL very flexible.
9.Compatible on many operating systems
MySQL is compatible to run on many operating systems, like Novell NetWare, Windows* Linux*, many varieties of UNIX* (such as Sun* Solaris*, AIX, and DEC* UNIX), OS/2, FreeBSD*, and others. MySQL also provides a facility that the clients can run on the same computer as the server or on another computer (communication via a local network or the Internet).
10.Allows roll-back
MySQL allows transactions to be rolled back, commit, and crash recovery.
11.Memory efficiency
Its efficiency is high because it has a very low memory leakage problem.
12.High Performance
MySQL is faster, more reliable, and cheaper because of its unique storage engine architecture. It provides very high-performance results in comparison to other databases without losing an essential functionality of the software. It has fast loading utilities because of the different cache memory.
13.High Productivity
MySQL uses Triggers, Stored procedures, and views that allow the developer to give higher productivity.
14.Platform Independent
It can download, install, and execute on most of the available operating systems.
15.Partitioning
This feature improves the performance and provides fast management of the large database.
16.GUI Support
MySQL provides a unified visual database graphical user interface tool named “MySQL Workbench” to work with database architects, developers, and Database Administrators. MySQL Workbench provides SQL development, data modeling, data migration, and comprehensive administration tools for server configuration, user administration, backup, and many more. MySQL has a fully GUI supports from MySQL Server version 5.6 and higher.
17.Dual Password Support
MySQL version 8.0 provides support for dual passwords: one is the current password, and another is a secondary password, which allows us to transition to the new password.
Disadvantages/Drawback of MySQL
- MySQL version less than 5.0 doesn’t support ROLE, COMMIT, and stored procedure.
- MySQL does not support a very large database size as efficiently.
- MySQL doesn’t handle transactions very efficiently, and it is prone to data corruption.
- MySQL is accused that it doesn’t have a good developing and debugging tool compared to paid databases.
- MySQL doesn’t support SQL check constraints.
Subscribe For Free Demo
Error: Contact form not found.
MySQL Workbench Tutorial: MySQL Workbench and Its Functionalities
MySQL Workbench is a designing or a graphical tool that is used for working with MySQL servers and databases. This tool compatible with the older server 5.x versions and does not support the 4.x server versions.
The functionalities of MySQL Workbench are as follows:
- SQL Development: This functionality provides the capability to execute SQL queries, create and manage connections to database servers using the built-in SQL Editor.
- Data Modeling (Design): This functionality enables you to create models of your database schema graphically, perform reverse and forward engineer between a schema and a live database, and edit all aspects of your database using the comprehensive Table Editor.
- Server Administration: This functionality enables you to administer MySQL server instances by administering users, performing backup and recovery, inspecting audit data, viewing database health, and monitoring the MySQL server performance.
- Data Migration: This functionality allows you to migrate from Microsoft SQL Server, Microsoft Access, and other RDBMS tables, objects, and data to MySQL.
- MySQL Enterprise Support: This functionality provides support for Enterprise products such as MySQL Enterprise Backup, MySQL Firewall, and MySQL Audit.
Now that you know about MySQL Workbench, let me next tell you the basic requirements and the steps to install MySQL Workbench.
MySQL Workbench (Download and Installation)
MySQL Workbench is a unified visual database designing or graphical user interface tool used for working with database architects, developers, and Database Administrators. It is developed and maintained by Oracle. It provides SQL development, data modeling, data migration, and comprehensive administration tools for server configuration, user administration, backup, and many more. We can use this Server Administration for creating new physical data models, E-R diagrams, and for SQL development (run queries, etc.). It is available for all major operating systems like Mac OS, Windows, and Linux. MySQL Workbench fully supports MySQL Server version v5.6 and higher.
MySQL Workbench covers five main functionalities, which are given below:
1.SQL Development: This functionality provides the capability that enables you to execute SQL queries, create and manage connections to the database Servers with the help of built-in SQL editor.
2.Data Modelling (Design): This functionality provides the capability that enables you to create models of the database Schema graphically, performs reverse and forward engineering between a Schema and a live database, and edit all aspects of the database using the comprehensive Table editor. The Table editor gives the facilities for editing tables, columns, indexes, views, triggers, partitioning, etc.
3.Server Administration: This functionality enables you to administer MySQL Server instances by administering users, inspecting audit data, viewing database health, performing backup and recovery, and monitoring the performance of MySQL Server.
4.Data Migration: This functionality allows you to migrate from Microsoft SQL Server, SQLite, Microsoft Access, PostgreSQL, Sybase ASE, SQL Anywhere, and other RDBMS tables, objects, and data to MySQL. It also supports migrating from the previous versions of MySQL to the latest releases.
5.MySQL Enterprise Supports: This functionality gives the support for Enterprise products such as MySQL firewall, MySQL Enterprise Backup, and MySQL Audit.
MySQL Workbench Editions
MySQL Workbench is mainly available in three editions, which are given below:
- Community Edition (Open Source, GPL)
- Standard Edition (Commercial)
- Enterprise Edition (Commercial)
Community Edition
The Community Edition is an open-source and freely downloadable version of the most popular database system. It came under the GPL license and is supported by a huge community of developers.
Standard Edition
It is the commercial edition that provides the capability to deliver high-performance and scalable Online Transaction Processing (OLTP) applications. It has made MySQL famous along with industrial-strength, performance, and reliability.
Enterprise Edition
It is the commercial edition that includes a set of advanced features, management tools, and technical support to achieve the highest scalability, security, reliability, and uptime. This edition also reduces the risk, cost, complexity in the development, deployment, and managing MySQL applications.
Let us understand it with the following comparison chart.
| Functionality | Community Edition | Enterprise Edition | |
|---|---|---|---|
| Visual SQL Development | Yes | Yes | Yes |
| Visual Database Administration | Yes | Yes | Yes |
| Performance Tuning | Yes | Yes | Yes |
| User and Session Management | Yes | Yes | Yes |
| Connection Management | Yes | Yes | Yes |
| Object Management | Yes | Yes | Yes |
| Data Management | Yes | Yes | Yes |
| Visual Data Modelling | Yes | Yes | Yes |
| Reverse Engineering | Yes | Yes | Yes |
| Forward Engineering | Yes | Yes | Yes |
| Schema Synchronization | Yes | Yes | Yes |
| Schema & Model Validation | No | Yes | Yes |
| DBDoc | No | Yes | Yes |
| GUI for MySQL Enterprise Backup | No | No | Yes |
| GUI for MySQL Enterprise Audit | No | No | Yes |
| GUI for MySQL Enterprise Firewall | No | Yes | Yes |
| Scripting & Plugins | Yes | Yes | Yes |
| Database Migration | Yes | Yes | Yes |
MySQL Workbench Environment Setup
Here, we are going to learn how we can download and install MySQL Workbench.
Prerequisites
The following requirements should be available in your system to work with MySQL Workbench:
- MySQL Server: You can download it from here.
- MySQL Workbench: You can download it from here.
- Microsoft .NET Framework 4.5.2
- Microsoft Visual C++ Redistributable for Visual Studio 2019
- RAM 4 GB (6 GB recommended)
Installation
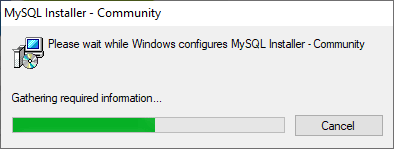
Step 1: Install the MySQL Community Server. To install MySQL Server, double click the MySQL installer .exe file. After clicking the .exe file, you can see the following screen:
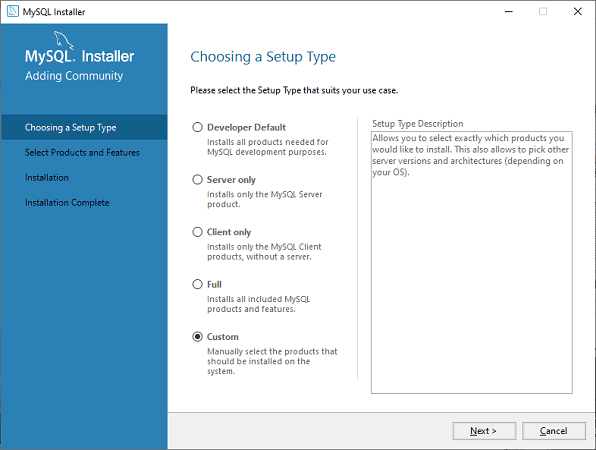
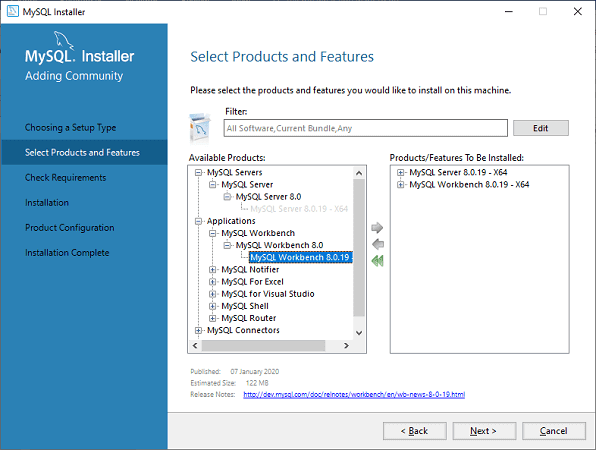
Step 2: Choose the Setup Type and click on the Next button. There are several types available, and you need to choose the appropriate option to install MySQL product and features. Here, we are going to select a Custom option because there is a need for only MySQL Server and Workbench. If you need more features, you can choose the Full option.
Step 3: When you click on the Next button, it will give the following screen.
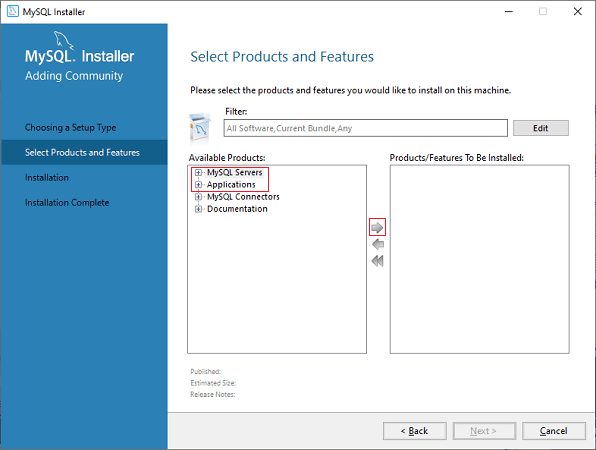
In this screen, go to the MySQL Server section, click the plus (+) icon. Here, you need to choose the MySQL Server and add it to the right side box by clicking on the right arrow symbol.
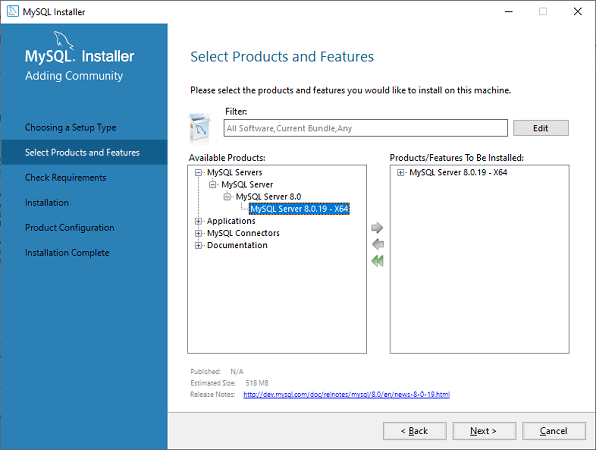
Now, in the Application section, you need to do the same thing that you had to perform with MySQL Server and click on the Next button. The following screen explains it more clearly.
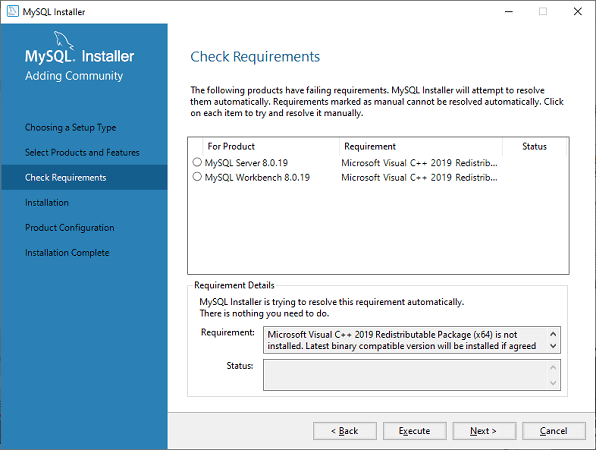
Step 4: When you click on Next, it will give the following screen. This screen checks all the requirements for installing MySQL Server and Workbench. As soon as you click on the Execute button, it will install all requirements automatically. Now, click on the Next button.
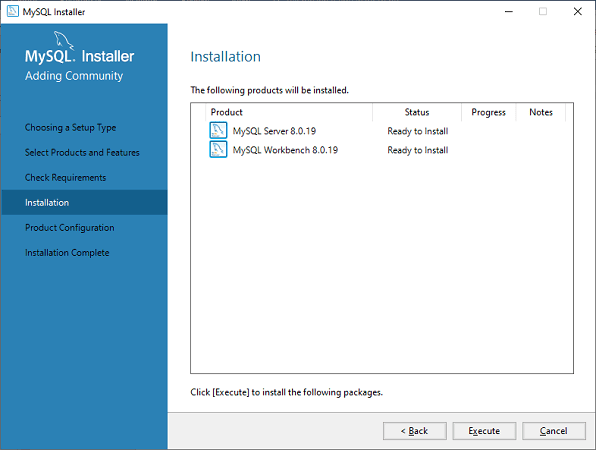
Step 5: In this screen, click on the Execute button to download and install the MySQL Server and Workbench.
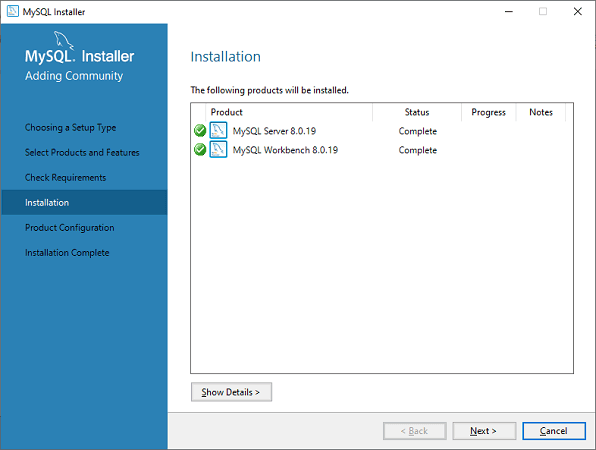
When the downloading and installation is complete, click on Next button.
Step 6: In the next screen, we need to configure the MySQL Server and click on Next button.
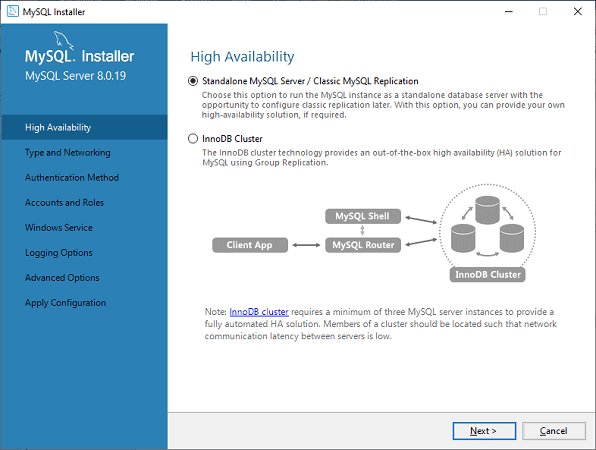
Step 7: As soon as you will click on the Next button, you can see the screen below. Here, we have to configure the MySQL Server. Now, choose the Standalone MySQL Server/Classic MySQL Replication option and click on Next.
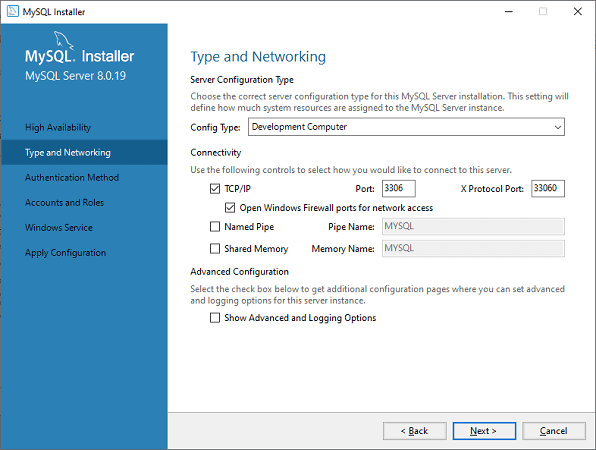
Step 8: In the next screen, the system will ask you to choose the Config Type and other connectivity options. Here, we are going to select the Config Type as ‘Development Machine’ and Connectivity as TCP/IP, and Port Number is 3306, then click on Next.

Enroll in Best MYSQL Training and Get Hired by TOP MNCs
- Instructor-led Sessions
- Real-life Case Studies
- Assignments
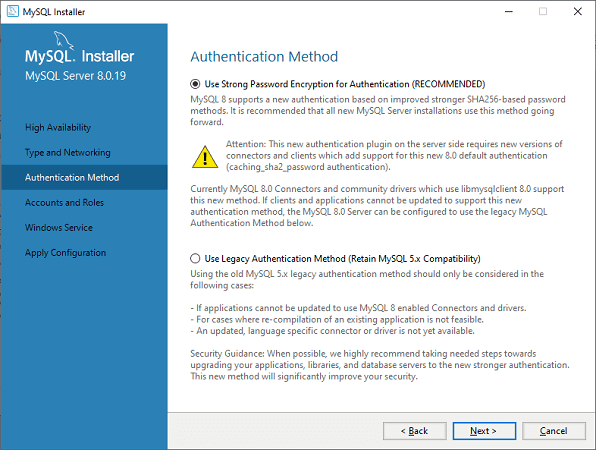
Step 9: Now, select the Authentication Method and click on Next.
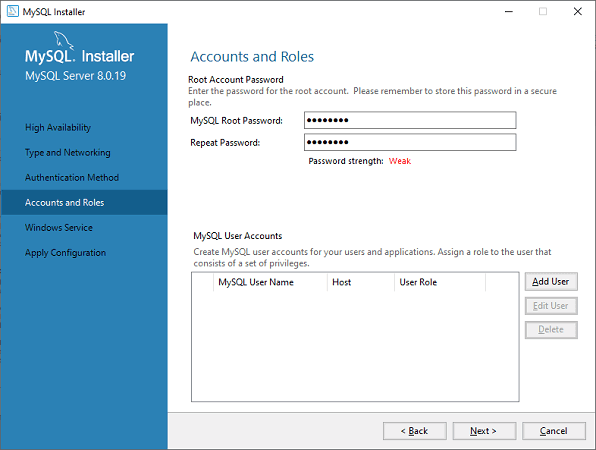
Step 10: The next screen will ask you to choose the account, username, and password. After filling all the details, click on the Next button.
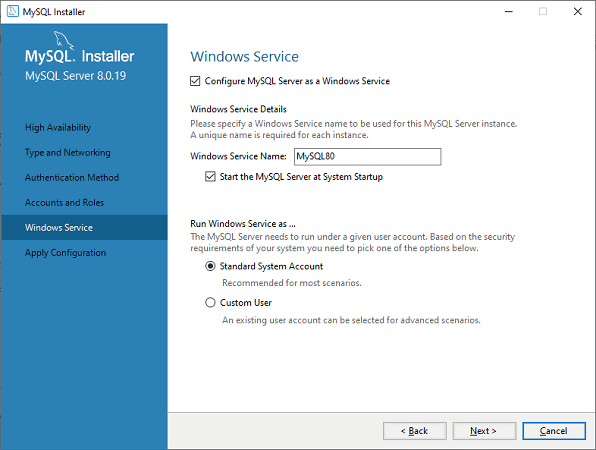
Step 11: The next screen will ask you to configure the Windows Service. Keep the default setup and click on Next.
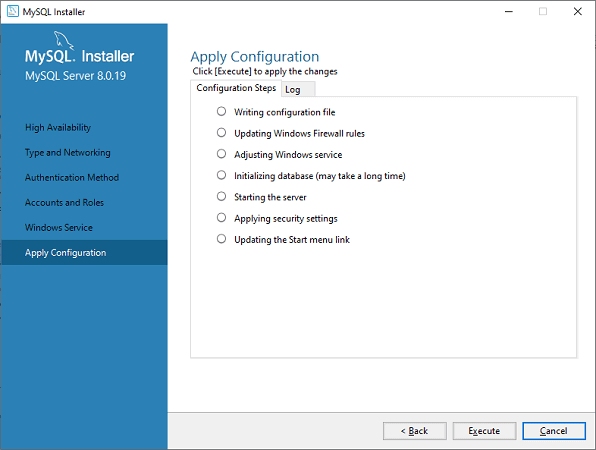
Step 12: In the next screen, the system will ask you to apply the Server Configuration. For this configuration, click on the Execute button.
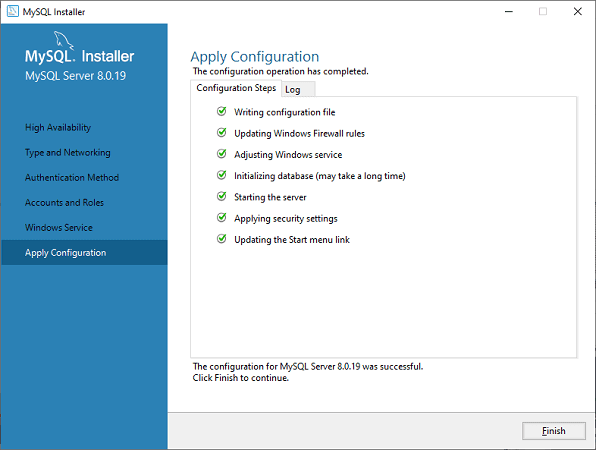
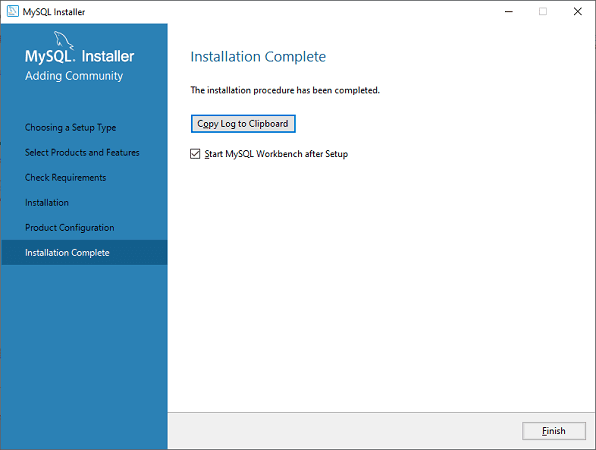
Step 13: Once the configuration has completed, you will get the screen below. Now, click on the Finish button to continue.
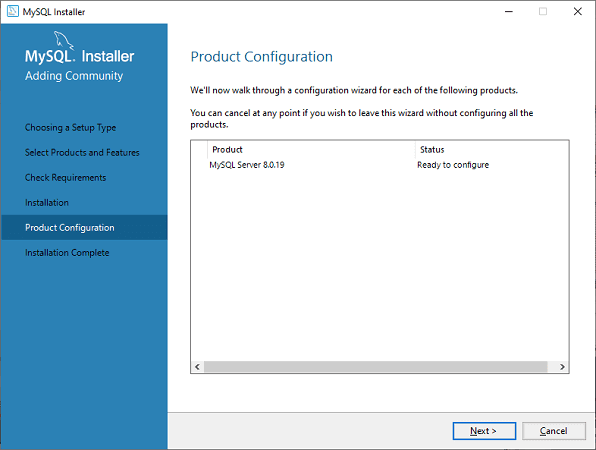
Step 14: In the next screen, you can see that the Product Configuration is completed. Keep the default setting.

click on the Next-> Finish button to complete the MySQL package installation.
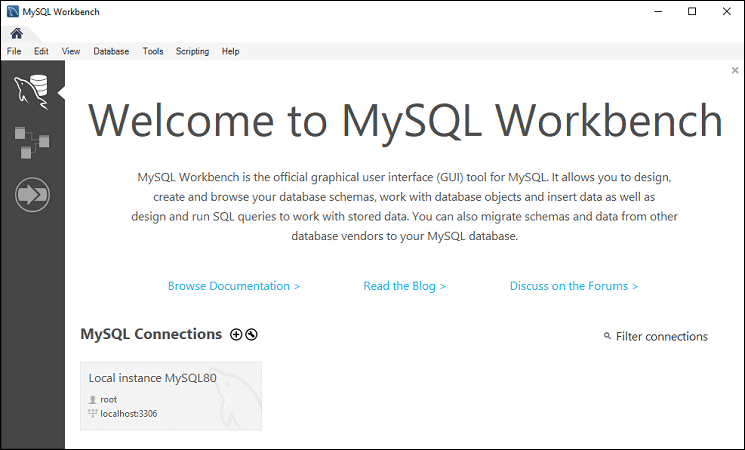
Step 15: Once you click the Finish button, the MySQL Workbench should be open on your system, as shown in the screen below.
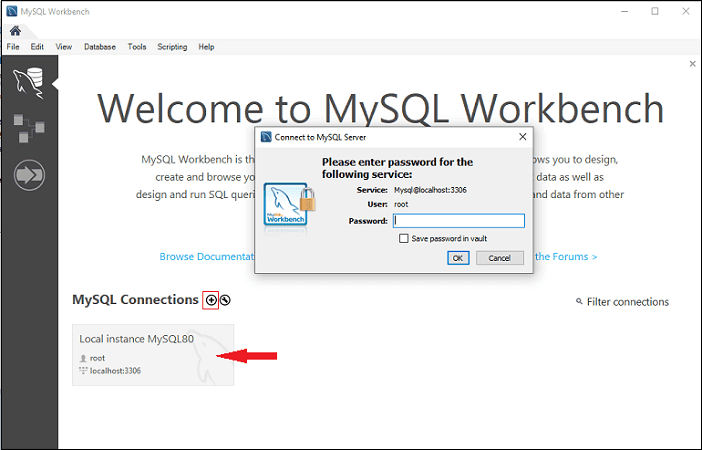
Step 16: In the above screen, you need to make a connection. To do this, double click the box designated by the red arrow. Here, you will get the popup screen that asks to enter the password created earlier during the installation. After entering the password, you are able to connect with the Server.
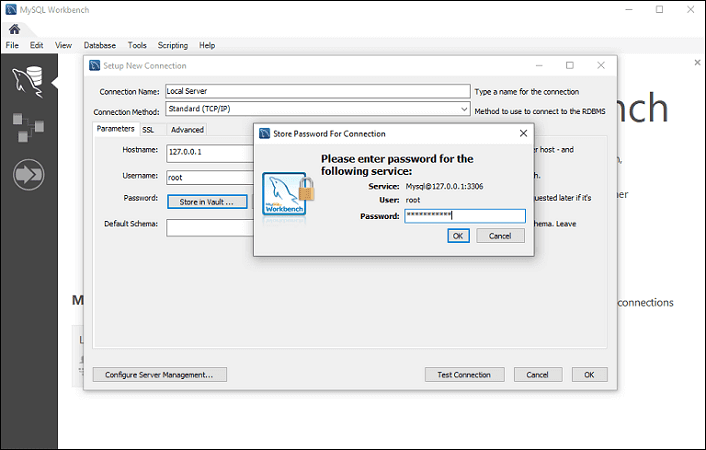
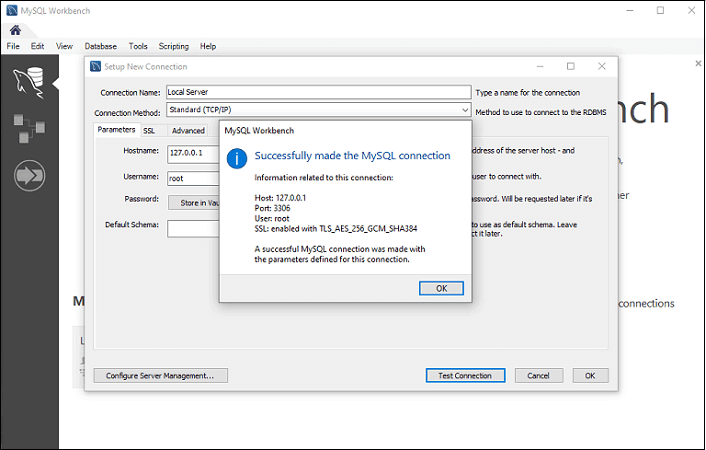
Step 17: If you do not have a connection, you can create a new connection. To make a connection, click the plus (+) icon or go to the menu bar -> Database -> Connect to Database, the following screen appears. Now, you need to fill all the details. Here, you have to make sure that the entered password should be the same as you have created earlier.
Step 18: After entering all the details, click on the Test Connection to test the database connectivity. If the connection is successful, you will get the following screen. Now, click on OK->OK button to finish the setup.
Step 19: Once you have finished all the setup, it will open the MySQL Workbench screen. Now, double click on the newly created connection, you will get the following screen where the SQL command can be executed.
MySQL Workbench Administration Tool
The Administration Tool plays an important role in securing the data of the company. Here, we are going to discuss the user’s management, Server configuration, Database backup and restorations, Server logs, and many more.
User Administration
It is a visual utility that allows for managing the user that relate to an active MySQL Server instance. Here, you can add and manage user accounts, grant and drop privileges, view user-profiles, and expire passwords.
Server Configuration
It allows for advanced configuration of the Server. It provides detailed information about the Server and status variable, a number of threads, buffer allocation size, fine-tuning for optimal performance, and many more.
Database backup and restorations
It is a visual tool, which is used for importing/exporting MySQL dump files. The dump files contain SQL scripts for creating databases, tables, views, and stored procedures.
Server Logs
It displays log information for the MySQL Server by each connection tab. For each connection tab, it includes an additional tab for the general error logs.
Performance Dashboard
This tab provides the statistical view of the Server performance. You can open it by navigating to the Navigation tab, and under the Performance section, choose Dashboard.
MySQL Workbench Create, Alter, Drop Database
In this section, we are going to see how a database is created, altered, and drop by using the MySQL Workbench. Let us see in detail one by one.
Create Database
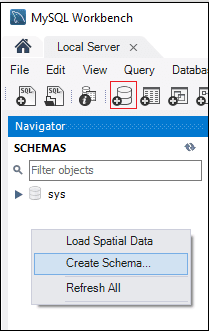
1.Open the MySQL Workbench and logged in using username and password. Then, go to the Navigation tab and click on the Schema menu. Here, you can see all the previously created databases.
2. If you want to create a new database, right-click under the Schema menu and select Create Schema or click the database icon (red rectangle), as shown in the following screen.

Get Experts Curated MYSQL Certification Course to Build Your Skills
Weekday / Weekend BatchesSee Batch Details3. The new Schema window screen open. Enter the new database name (for example, mytestdb) and use default Collation. Collation is used to store specific data characters, mainly useful for storing foreign languages. Now, click on the Apply button as shown in the screen below:
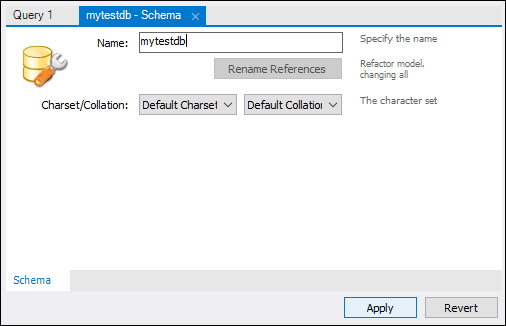
4. A new popup window appears, click Apply->Finish button to create a new database.
5. After the successful creation of the database, you can see this new database in the Schema menu. If you do not see this, click on the refresh icon into the Schema menu.
6. If you want to see more information about the database, select mytestdb database, and click on the ‘i’ icon. The information window displays several options, like Table, Column, Functions, Users, and many more.
7. MySQL Workbench does not provide an option to rename the database name, but we can create, update, and delete the table and data rows from the database.
Drop Database
1. To delete a database, you need to choose the database, right-click on it, and select the Drop Schema option. The following screen appears:
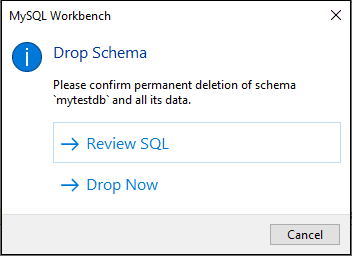
2. Select Drop Now option in the popup window and the database including table, data rows will be deleted from the database Server.
MySQL Workbench Create, Alter, Drop Table
In this section, we are going to see how a table is created, altered, and drop by using the MySQL Workbench. Let us see in detail one by one.
Create Table
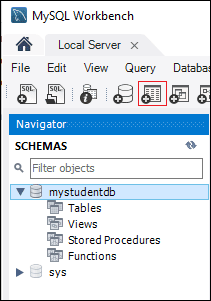
1. Open the MySQL Workbench and logged in using username and password. Then, go to the Navigation tab and click on the Schema menu. Here, you can see all the previously created databases. You can also create a new database.
2. Select the newly created database, double click on it, and you will get the sub-menu under the database. The sub-menu under the database are Tables, Views, Functions, and Stored Procedures, as shown in the below screen.
3. Select Tables sub-menu, right-click on it and select Create Table option. You can also click on create a new table icon (shown in red rectangle) to create a table.
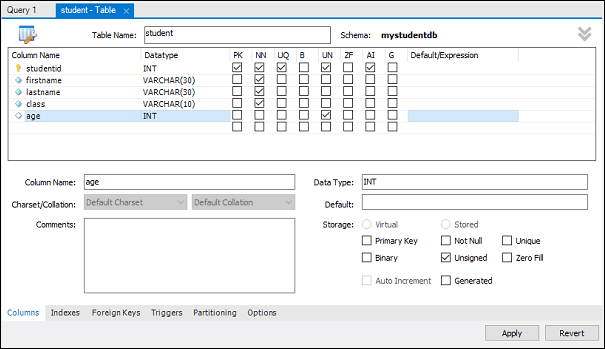
4. On the new table screen, you need to fill all the details to create a table. Here, we are going to enter the table name (for example, student) and use default collation and engine.
5. Click inside the middle window and fill the column details. Here, the column name contains many attributes such as Primary Key(PK), Not Null (NN), Unique Index (UI), Binary(B), Unsigned Data type(UN), Auto Incremental (AI), etc. The following screen explains it more clearly. After filling all the details, click on the Apply button.
6. As soon as you click on the Apply button, it will open the SQL statement window. Again, click on the Apply button to execute the statement and Finish button to save the changes.
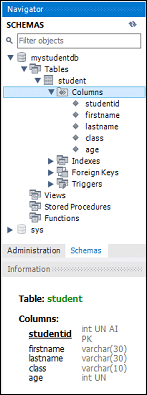
7. Now, go to the Schema menu and select the database which contains the newly created table, as shown in the screen below.
Alter Table
1. Select the table you want to modify, click on the ‘i’ icon, and you will get the following screen.
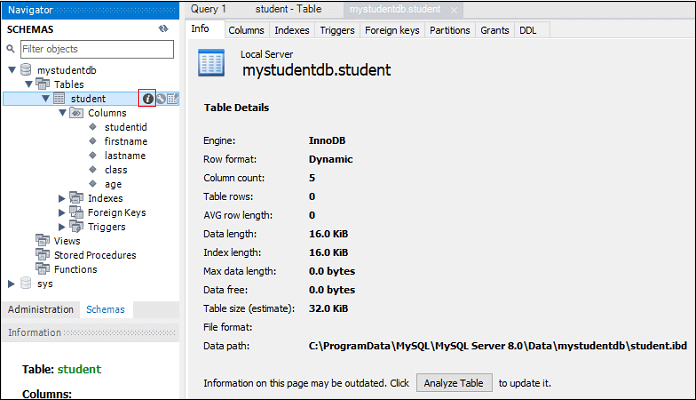
2. In the above screen, you can modify the column name, data type, and other table settings.
Drop a Table
1. To delete a table, you need to choose the table, right-click on it, and select the Drop Table option. The following screen appears:
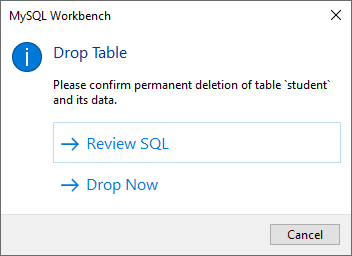
2. Select Drop Now option in the popup window to delete the table from the database instantly.
MySQL Workbench Insert, Read, Update, Delete Data Rows
In this section, we are going to see how we can insert, read, update, and delete data rows by using the MySQL Workbench. Let us see in detail one by one.
1. Open the MySQL Workbench and logged in using username and password. Then, go to the Navigation tab and click on the Schema menu. Here, we have successfully created a database (mystudentdb) and student table using MySQL Workbench.
2. Select the table, and when we hour a mouse pointer over the student table, you can see the table icons appears here. Click the table, which will open a new window where the upper section shows the MySQL statement, and the lower section shows the data rows.

3. To enter a data row, select the respected column, and insert the data value. Inserting data value in rows is similar to the Microsoft Excel Worksheet.
4. After entering the data rows, click on the Apply->Apply>Finish button to save the data rows.
5. Similarly, we can edit or modify the previously saved data rows. After modification, save new value, click on the Apply button to save changes. It will generate an SQL update statement save the changes to the database.
Delete Row
1. To delete an individual row from the table, you need to select a data row, right-click on the right icon in front of the row and select Delete Row(s) option.
2. Now, click Apply->Finish button to save changes to the database.
MySQL Workbench Export and Import Database(Table)
In this section, we are going to learn how we can export and import the database or table by using the MySQL Workbench.
Export Databases(Tables)
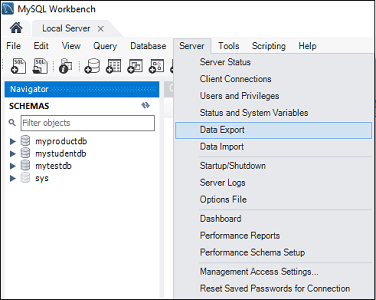
1. To export databases or tables, go to the Menu bar, click on Server, and select the Data Export option, as shown in the following screen. It will open a new window of data export settings and options.
2. Select any database, and it will display all the corresponding tables under the selected database. Here, we can also select one or multiple database checkboxes to include the database in the Export file. Similarly, we can select one or multiple tables from the left section of the window.
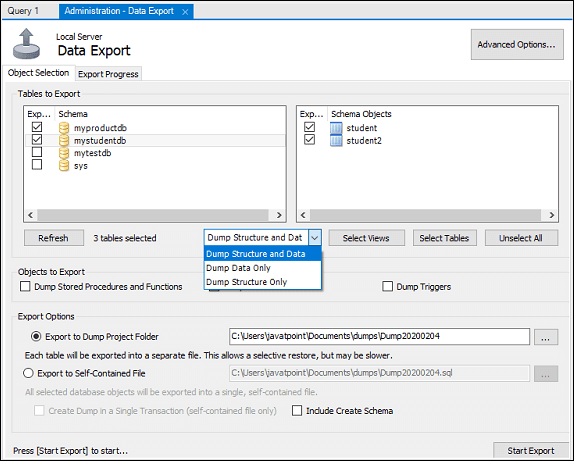
3. Let us select two databases, namely (myproductdb and mystudentdb), including all tables under this database. Now, go to the drop-down setting, we can select ‘Dump Structure and Data’, ‘Dump Data Only’, and ‘Dump Structure Only’ option.
- Dump Data and Structure: It will save both table structure and data rows.
- Dump Data Only: It will save only the inserted rows in the tables.
- Dump Structure Only: It will save only the table structure, which are database columns and data types defined by us.
4. In the Export option, you can select the export path of your choice. Here, I will keep the default setting. Also, there are two radio buttons that are explained below.
- Export to Dump Project Folder: It will save all the tables as separate SQL files under one folder. It will be useful when you import or restore the export file one by one table.
- Export to Self-Contained File: It will store all the databases and tables in a single SQL file. It is a good option when you want to import all the databases, tables, and data rows using a single SQL file.
5. Click the Start Export button, which displays the progress bar and log. Now, open the Document folder in your system to locate the export files.
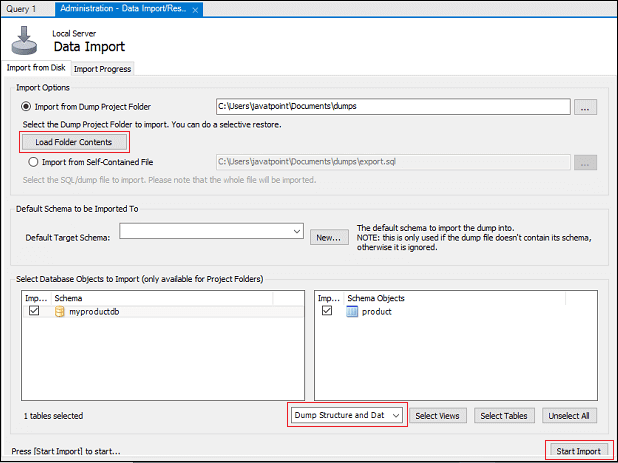
Import Databases (Tables)
1. To import databases or tables, go to the Menu bar, click on Server, and select the Data Import option. It will open a new window of data import settings and options.
2. Here, you can see the two radio options to import databases and tables, which are:
- Import from Dump Project Folder
- Import by using Self-Contained File
3. We are going to select ‘Import from Dump Project Folder’ and click on ‘Load Folder Content’ to display all the available databases in the project folder.
4. Select myproductdb database from the Data Import option and also select the corresponding product table.
5. Choose the ‘Dump Structure and Data’ option and click the Start Import button to import the databases and tables from the backup file.
6. Now, go to the Schema->myproductdb->table and refresh it to see the currently imported database or table.