SQL Server Tutorial
Last updated on 12th Oct 2020, Blog, Tutorials
MS SQL Server is a relational database management system (RDBMS) developed by Microsoft. This product is built for the basic function of storing retrieving data as required by other applications. It can be run either on the same computer or on another across a network. This tutorial explains some basic and advanced concepts of SQL Server such as how to create and restore data, create login and backup, assign permissions, etc. Each topic is explained using examples for easy understanding.
What is SQL Server?
- It is a software, developed by Microsoft, which is implemented from the specification of RDBMS.
- It is also an ORDBMS.
- It is platform dependent.
- It is both GUI and command based software.
- It supports SQL (SEQUEL) language which is an IBM product, non-procedural, common database and case insensitive language.
Usage of SQL Server :
- To create databases.
- To maintain databases.
- To analyze the data through SQL Server Analysis Services (SSAS).
- To generate reports through SQL Server Reporting Services (SSRS).
- To carry out ETL operations through SQL Server Integration Services (SSIS).
SQL Server Components :
SQL Server works in client-server architecture, hence it supports two types of components − (a) Workstation and (b) Server.
- Workstation components are installed in every device/SQL Server operator’s machine. These are just interfaces to interact with Server components. Example: SSMS, SSCM, Profiler, BIDS, SQLEM etc.
- Server components are installed in centralized server. These are services. Example: SQL Server, SQL Server Agent, SSIS, SSAS, SSRS, SQL browser, SQL Server full text search etc.
Instance of SQL Server :
- An instance is an installation of SQL Server.
- An instance is an exact copy of the same software.
- If we install ‘n’ times, then ‘n’ instances will be created.
- There are two types of instances in SQL Server a) Default b) Named.
- Only one default instance will be supported in one Server.
- Multiple named instances will be supported in one Server.
- Default instance will take the server name as Instance name.
- Default instance service name is MSSQLSERVER.
- 16 instances will be supported in 2000 version.
- 50 instances will supported in 2005 and later versions.
Advantages of Instances :
- To install different versions in one machine.
- To reduce cost.
- To maintain production, development, and test environments separately.
- To reduce temporary database problems.
- To separate security privileges.
- To maintain standby server.
Editions :
SQL Server is available in various editions. This chapter lists the multiple editions with its features.
- Enterprise − This is the top-end edition with a full feature set.
- Standard − This has less features than Enterprise, when there is no requirement of advanced features.
- Workgroup − This is suitable for remote offices of a larger company.
- Web − This is designed for web applications.
- Developer − This is similar to Enterprise, but licensed to only one user for development, testing and demo. It can be easily upgraded to Enterprise without reinstallation.
- Express − This is free entry level database. It can utilize only 1 CPU and 1 GB memory, the maximum size of the database is 10 GB.
- Compact − This is free embedded database for mobile application development. The maximum size of the database is 4 GB.
- Datacenter − The major change in new SQL Server 2008 R2 is Datacenter Edition. The Datacenter edition has no memory limitation and offers support for more than 25 instances.
- Business Intelligence − Business Intelligence Edition is a new introduction in SQL Server 2012. This edition includes all the features in the Standard edition and support for advanced BI features such as Power View and PowerPivot, but it lacks support for advanced availability features like AlwaysOn Availability Groups and other online operations.
- Enterprise Evaluation − The SQL Server Evaluation Edition is a great way to get a fully functional and free instance of SQL Server for learning and developing solutions. This edition has a built-in expiry of 6 months from the time that you install it.
Subscribe For Free Demo
Error: Contact form not found.
Install SQL Server
Once the download completes, you double-click the file SQLServer2017-SSEI-Dev.exe to launch the installer.
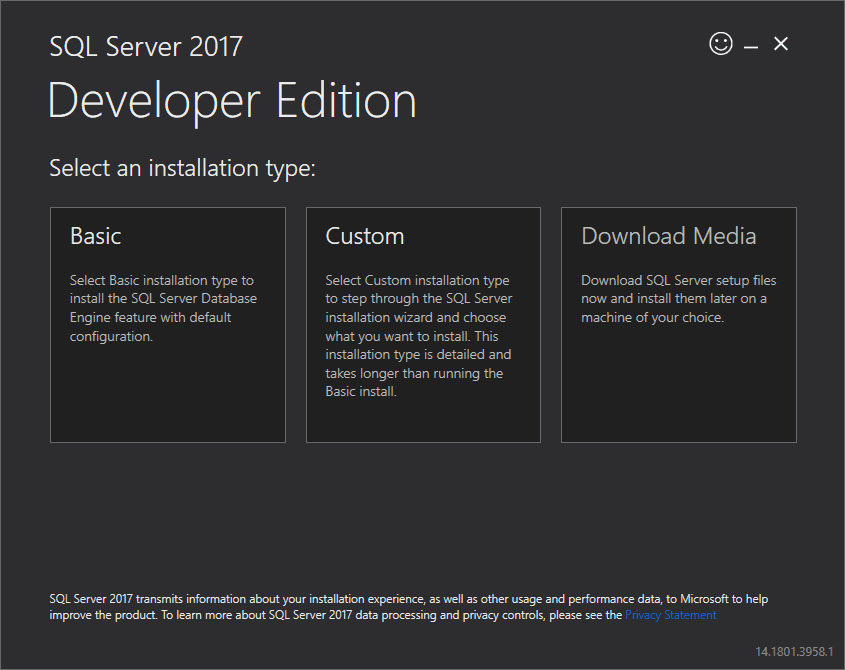
1. The installer asks you to select the installation type, choose the Custom installation type allows you to step through the SQL Server installation wizard and select the features that you want to install.
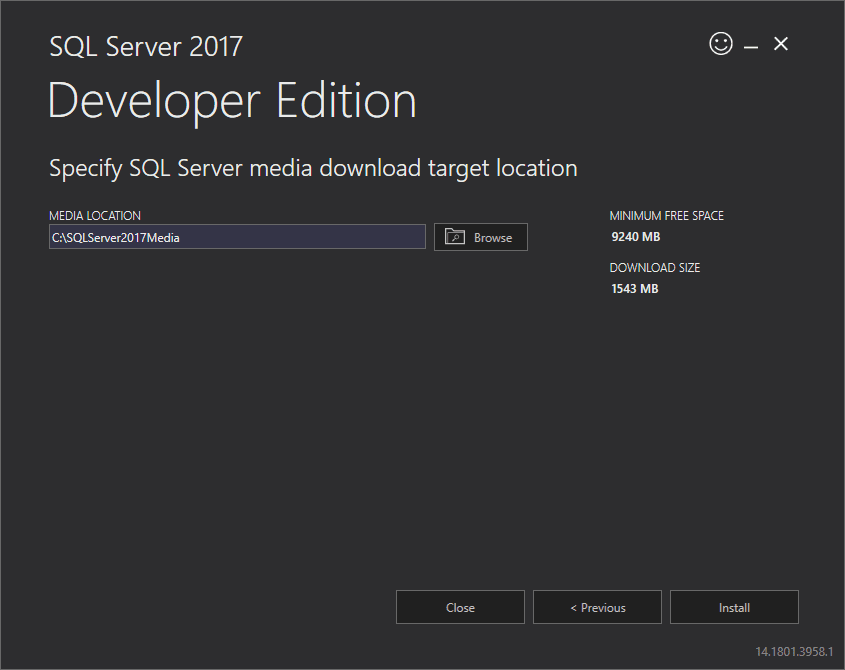
2. Specify the folder for storing the installation files that the installer will download, then click the Install button.
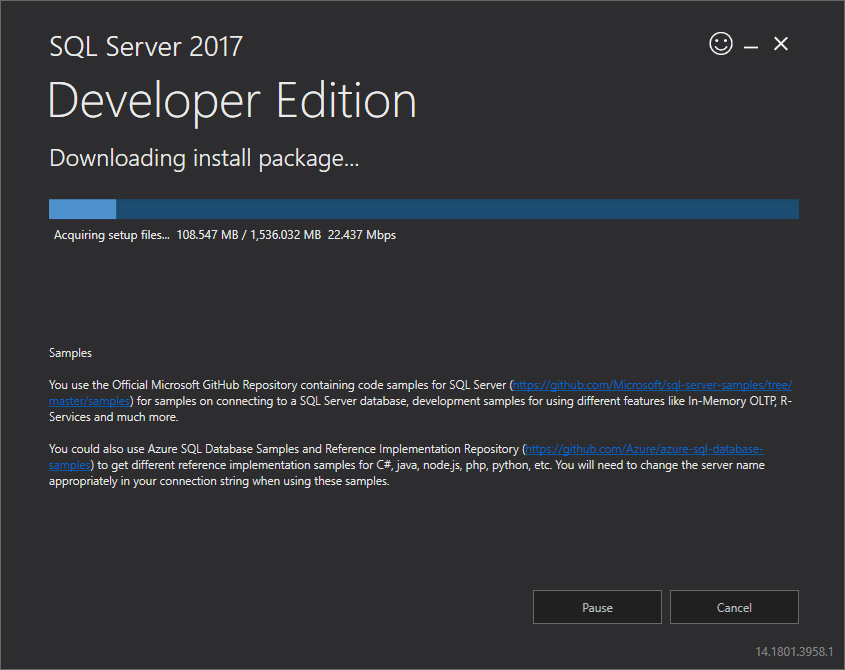
3. The installer starts downloading the install package for a while.
4. Once the download completes, open the folder that stores the install package and double-click the SETUP.exe file.
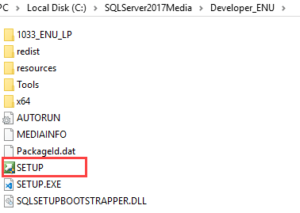
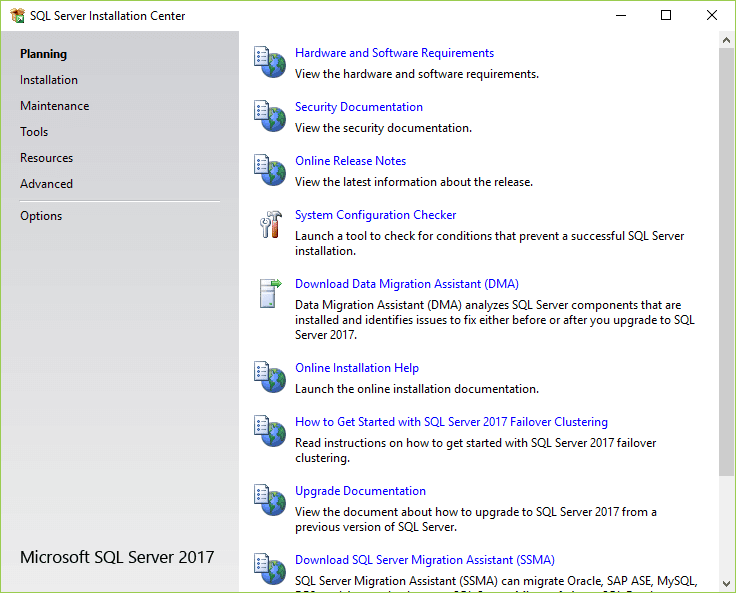
5. The following window displays; select the installation option on the left.
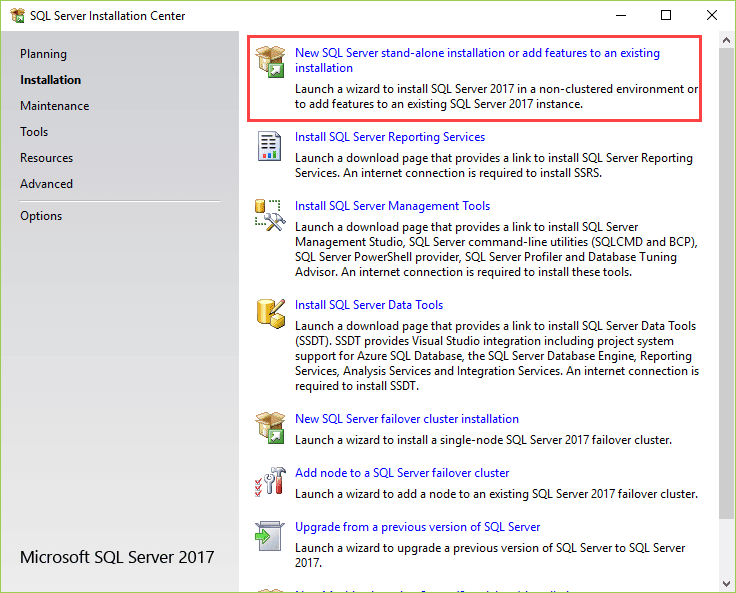
6. Click the first link to launch a wizard to install SQL Server 2017.
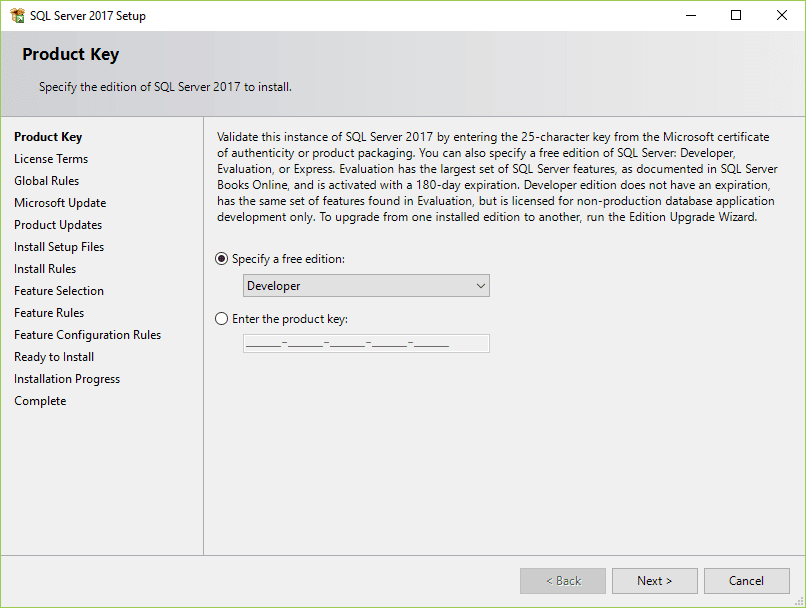
7. Specify the edition that you want to install, select Developer edition and click the Next button.
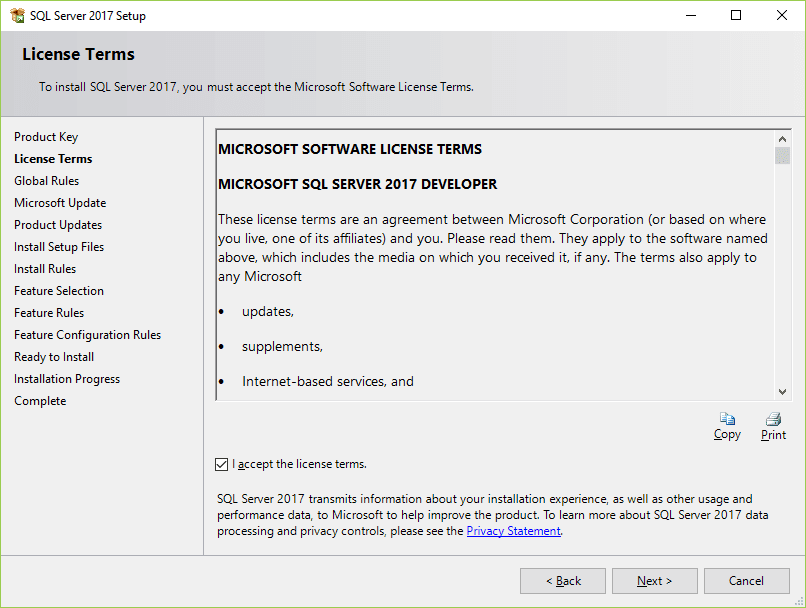
8. Select the “I accept the license terms.” and click the Next button.
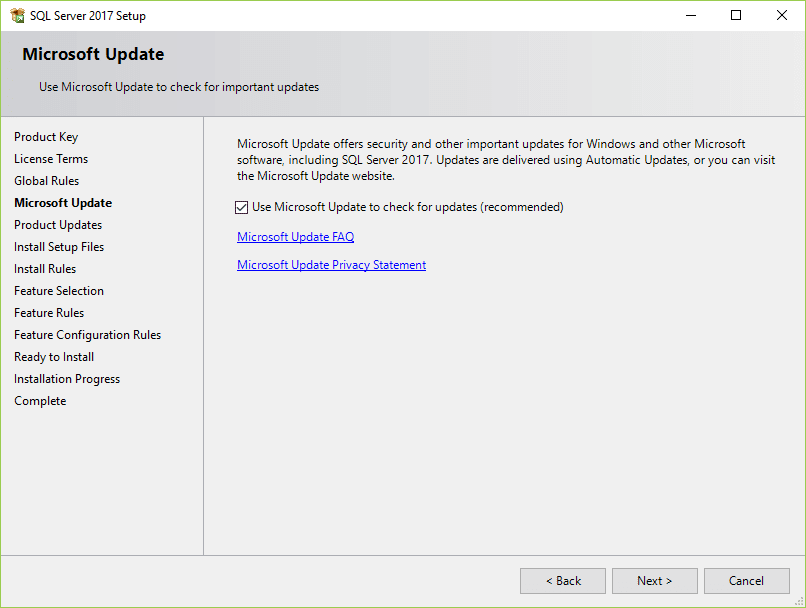
9. Check the “Use Microsoft Update to check for updates (recommended)” to get the security and other important updates for the SQL Server and click the Next button.
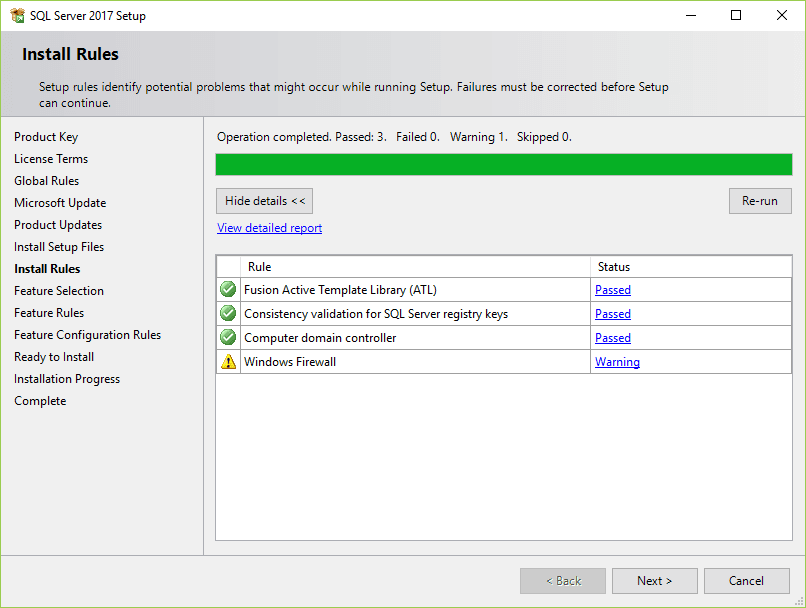
10. The installation checks for the prerequisites before installation. If no error found, click the Next button.
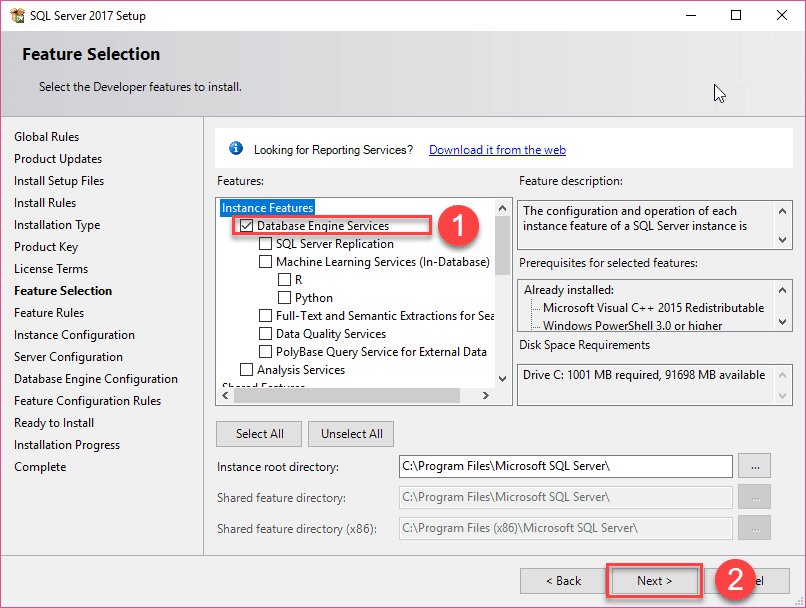
11. Select the features that you want to install. For now, you just need the Database Engine Services, just check the checkbox and click the Next button to continue
12. Specify the name and install ID for the instance of the SQL Server and click the Next button.
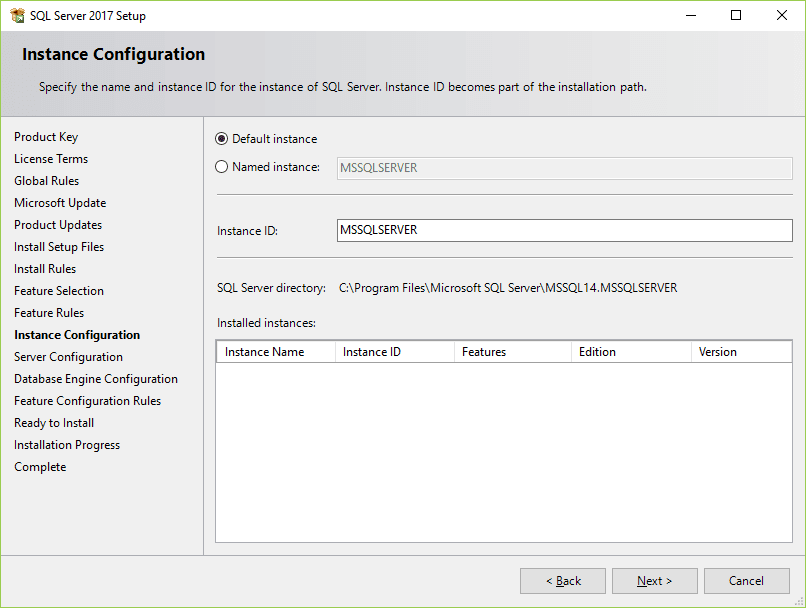
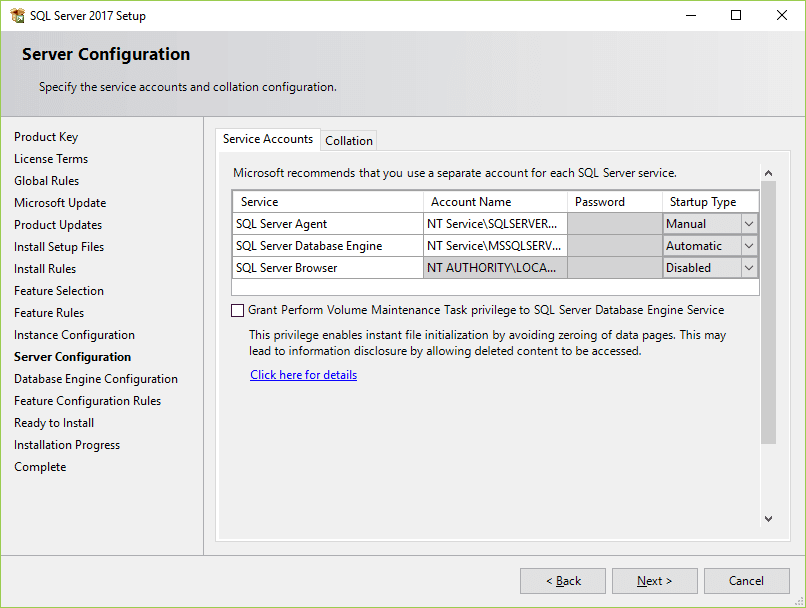
13. Specify the service account and collation configuration. Just use the default configuration and click the Next button.
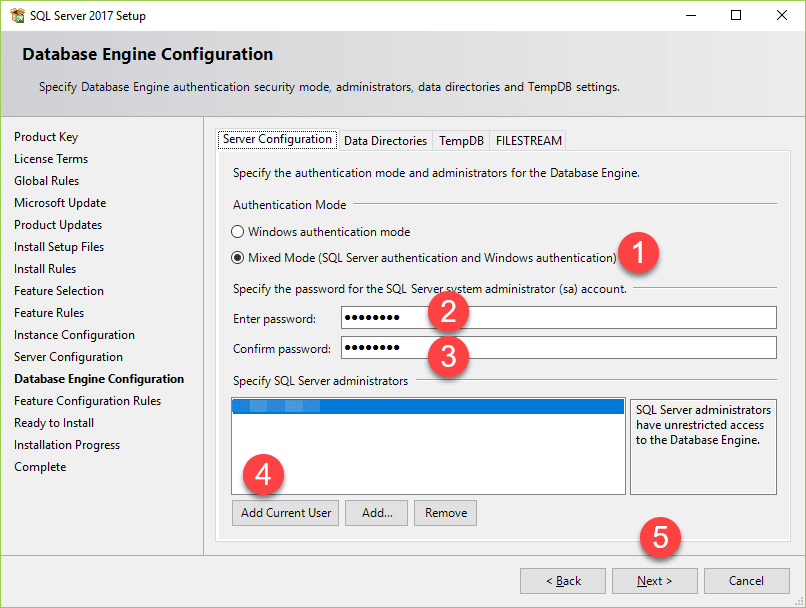
14. Specify the database engine security mode. First, choose Mixed Mode. Next, enter the password for the SQL Server system administrator (sa) account. Then, re-enter the same password to confirm it. After that, click the Add Current User button. Finally, click the Next button.
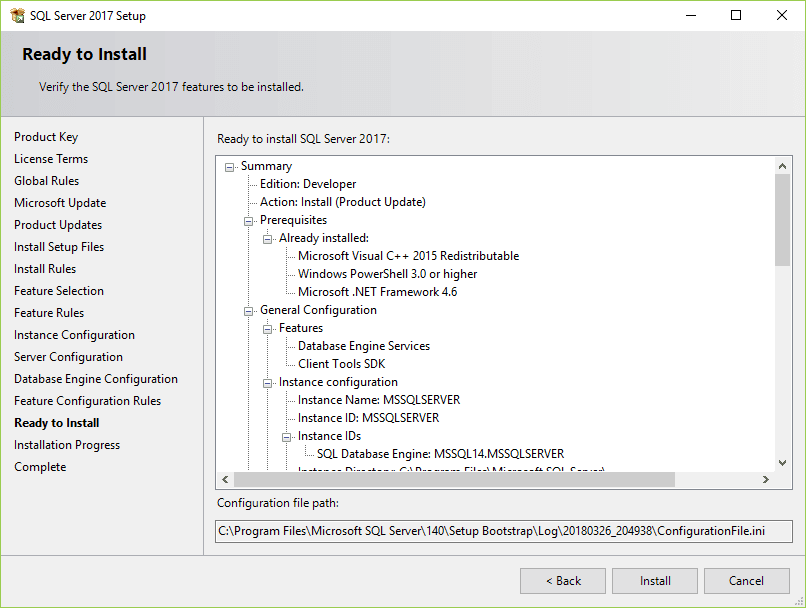
15. Verify the SQL Server 2017 features to be installed:
16. The installer starts the installation process
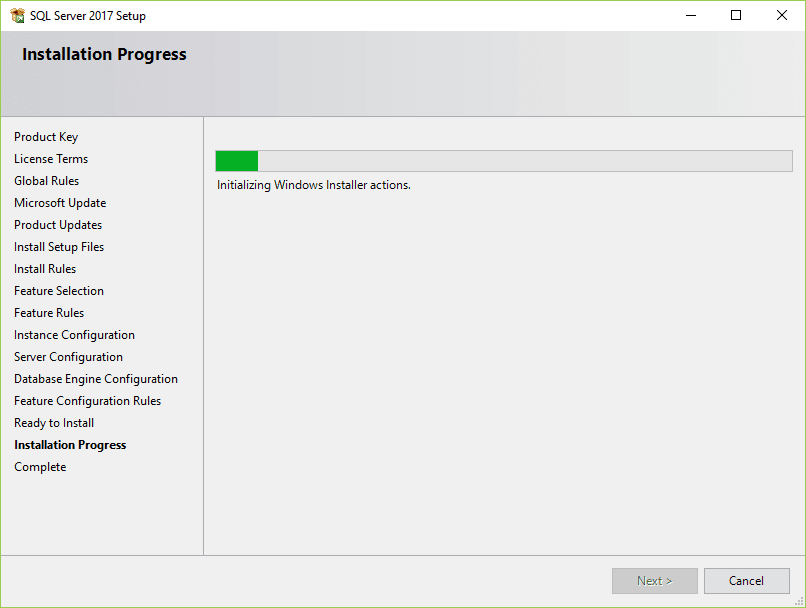
17. Once it completes, the following window displays. Click the OK button.
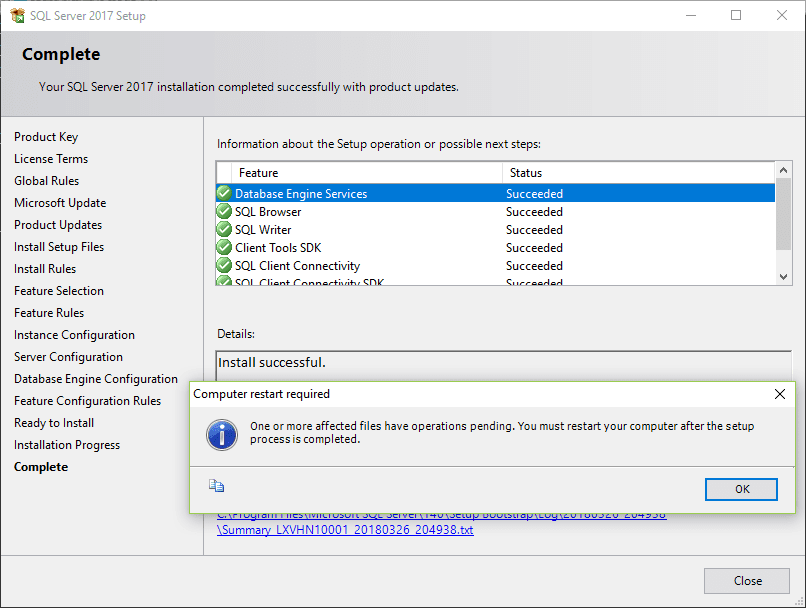
18. Click the Close button to complete the installation
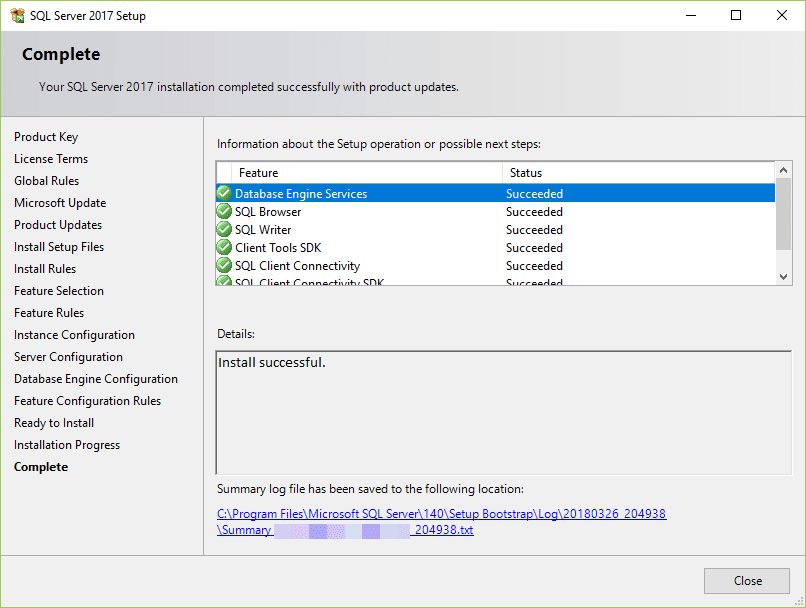
Congratulation! you have successfully installed SQL Server Developer Edition.
SQL Server Architecture Explained: Named Pipes, Optimizer, Buffer Manager
MS SQL Server is a client-server architecture. MS SQL Server process starts with the client application sending a request. The SQL Server accepts, processes and replies to the request with processed data. Let’s discuss in detail the entire architecture shown below:
As the below Diagram depicts there are three major components in SQL Server Architecture:
- Protocol Layer
- Relational Engine
- Storage Engine
Protocol Layer – SNI
MS SQL SERVER PROTOCOL LAYER supports 3 Type of Client Server Architecture. We will start with “Three Type of Client Server Architecture” which MS SQL Server supports.
Shared Memory
Let’s reconsider an early morning Conversation scenario.
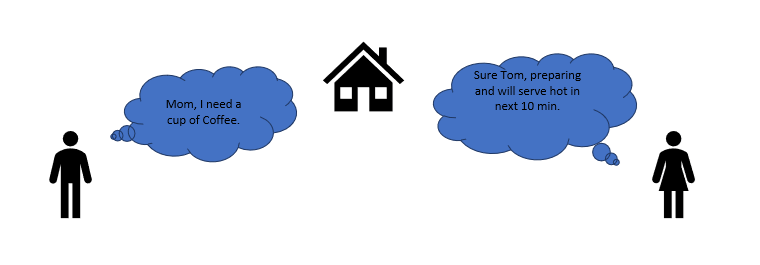
MOM and TOM – Here Tom and his Mom, were at the same logical place, i.e. at their home. Tom was able to ask for Coffee and Mom was able it serve it hot.
MS SQL SERVER – Here MS SQL server provides SHARED MEMORY PROTOCOL. Here CLIENT and MS SQL server run on the same machine. Both can communicate via Shared Memory protocol.
Analogy: Lets map entities in the above two scenarios. We can easily map Tom to Client, Mom to SQL server, Home to Machine, and Verbal Communication to Shared Memory Protocol.
From the desk of configuration and installation:
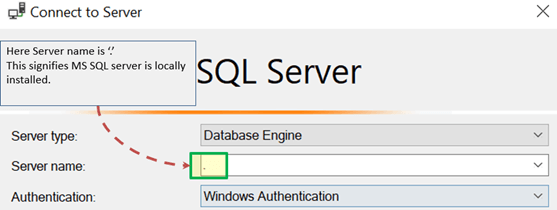
For Connection to Local DB – In SQL Management Studio, “Server Name” Option could be
“.”
“localhost”
“127.0.0.1”
“Machine\Instance”
TCP/IP
Now consider in the evening, Tom is in the party mood. He wants a Coffee ordered from a well-known Coffee Shop. The Coffee shop is located 10 km away from his home.

Here Tom and Starbuck are in different physical location. Tom at home and Starbucks at the busy marketplace. They’re communicating via Cellular network. Similarly, MS SQL SERVER provides the capability to interact via TCP/IP protocol, where CLIENT and MS SQL Server are remote to each other and installed on a separate machine.
Analogy: Lets map entities in the above two scenarios. We can easily map Tom to Client, Starbuck to SQL server, the Home/Market place to Remote location and finally Cellular network to TCP/IP protocol.
Notes from the desk of Configuration/installation:
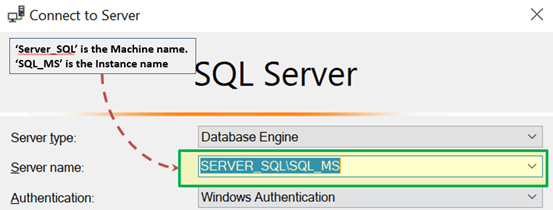
- In SQL Management Studio – For Connection via TCP\IP, “Server Name” Option has to be “Machine\Instance of the server.”
- SQL server uses port 1433 in TCP/IP.
Named Pipes
Now finally at night, Tom wanted to have a light green tea which her neighbor, Sierra prepare very well.
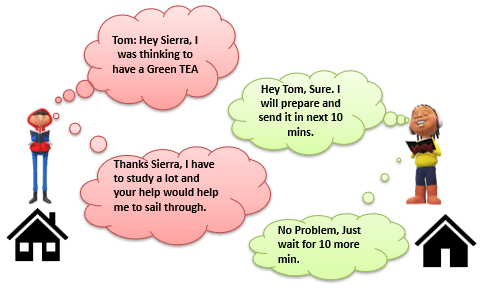
Here Tom and his Neighbor, Sierra, are in same physical location, being each other’s neighbor. They’re communicating via Intra network. Similarly, MS SQL SERVER provides the capability to interact via the Named Pipe protocol. Here the CLIENT and MS SQL SERVER are in connection via LAN.
Analogy: Lets map entities in the above two scenarios. We can easily map Tom to Client, Sierra to SQL server, Neighbor to LAN and finally Intra network to Named Pipe Protocol.
Notes from the desk of Configuration/installation:
- For Connection via Named Pipe. This option is disabled by default and needs to be enabled by the SQL Configuration Manager.
What is TDS?
Now that we know that there are three types of Client-Server Architecture, lets us have a glance at TDS:
- TDS stands for Tabular Data Stream.
- All 3 protocols use TDS packets. TDS is encapsulated in Network packets. This enables data transfer from the client machine to the server machine.
- TDS was first developed by Sybase and is now Owned by Microsoft
Relational Engine
The Relational Engine is also known as the Query Processor. It has the SQL Server components that determine what exactly a query needs to do and how it can be done best. It is responsible for the execution of user queries by requesting data from the storage engine and processing the results that are returned.
As depicted in the Architectural Diagram there are 3 major components of the Relational Engine. Let’s study the components in detail:
CMD Parser
Data once received from Protocol Layer is then passed to Relational Engine. “CMD Parser” is the first component of Relational Engine to receive the Query data. The principal job of CMD Parser is to check the query for Syntactic and Semantic error. Finally, it generates a Query Tree. Let’s discuss in detail.
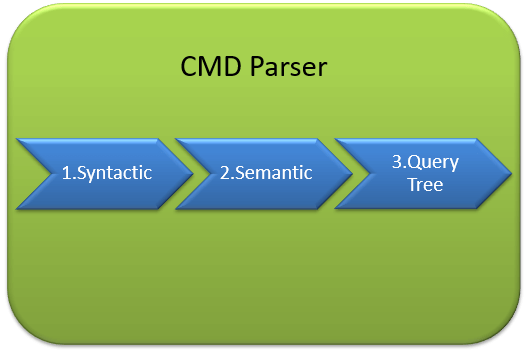
Syntactic check:
- Like every other Programming language, MS SQL also has the predefined set of Keywords. Also, SQL Server has its own grammar which SQL server understands.
- SELECT, INSERT, UPDATE, and many others belong to MS SQL predefined Keyword lists.
- CMD Parser does syntactic check. If users’ input does not follow these language syntax or grammar rules, it returns an error.
Example: Let’s say a Russian went to a Japanese restaurant. He orders fast food in the Russian language. Unfortunately, the waiter only understands Japanese. What would be the most obvious result?
The Answer is – the waiter is unable to process the order further.
There should not be any deviation in Grammar or language which SQL server accepts. If there are, SQL server cannot process it and hence will return an error message.
We will learn about MS SQL query more in upcoming tutorials. Yet, consider below most basic Query Syntax as
- SELECT * from <TABLE_NAME>;
Now, to get the perception of what syntactic does, say if the user runs the basic query as below:
- SELECR * from <TABLE_NAME>
Note that instead of ‘SELECT’ user typed “SELECR.”
Result: THE CMD Parser will parse this statement and will throw the error message. As “SELECR” does not follow the predefined keyword name and grammar. Here CMD Parser was expecting “SELECT.”
Semantic check:
- This is performed by Normalizer.
- In its simplest form, it checks whether Column name, Table name being queried exist in Schema. And if it exists, bind it to Query. This is also known as Binding.
- Complexity increases when user queries contain VIEW. Normalizer performs the replacement with the internally stored view definition and much more.
Let’s understand this with help of below example –
- SELECT * from USER_ID
Result: THE CMD Parser will parse this statement for Semantic check. The parser will throw an error message as Normalizer will not find the requested table (USER_ID) as it does not exist.
Create Query Tree:
- This step generates different execution tree in which query can be run.
- Note that, all the different trees have the same desired output.
Optimizer
The work of the optimizer is to create an execution plan for the user’s query. This is the plan that will determine how the user query will be executed.
Note that not all queries are optimized. Optimization is done for DML (Data Modification Language) commands like SELECT, INSERT, DELETE, and UPDATE. Such queries are first marked then send to the optimizer. DDL commands like CREATE and ALTER are not optimized, but they are instead compiled into an internal form. The query cost is calculated based on factors like CPU usage, Memory usage, and Input/ Output needs.
Optimizer’s role is to find the cheapest, not the best, cost-effective execution plan.
Before we Jump into more technical detail of Optimizer consider below real-life example:
Example:
Let’s say, you want to open an online Bank account. You already know about one Bank which takes a maximum of 2 Days to open an account. But, you also have a list of 20 other banks, which may or may not take less than 2 days. You can start engaging with these banks to determine which banks take less than 2 days. Now, you may not find a bank which takes less than 2 Days, and there is additional time lost due to the search activity itself. It would have been better to open an account with the first bank itself.
It’s is more important to select wisely. To be precise, choose which option is best, not the cheapest.
Similarly, MS SQL Optimizer works on inbuilt exhaustive/heuristic algorithms. The goal is to minimize query run time. All the Optimizer algorithms are propriety of Microsoft and a secret. Although, below are the high-level steps performed by MS SQL Optimizer. Searches of Optimization follows three phases as shown in the below diagram:
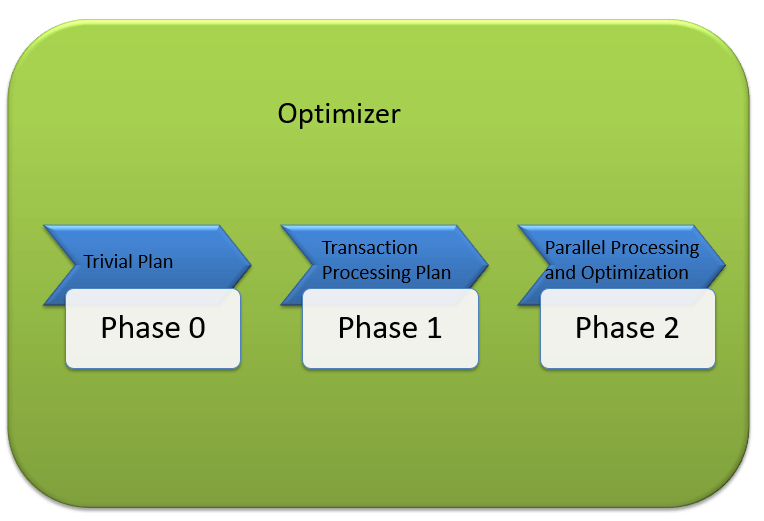
Phase 0: Search for Trivial Plan:
- This is also known as Pre-optimization stage.
- For some cases, there could be only one practical, workable plan, known as a trivial plan. There is no need for creating an optimized plan. The reason is, searching more would result in finding the same run time execution plan. That too with the extra cost of Searching for optimized Plan which was not required at all.
- If no Trivial plan found, then 1st Phase starts.
Phase 1: Search for Transaction processing plans
- This includes the search for Simple and Complex Plan.
- Simple Plan Search: Past Data of column and Index involved in Query, will be used for Statistical Analysis. This usually consists but not restricted to one Index Per table.
- Still, if the simple plan is not found, then more complex Plan is searched. It involves Multiple Index per table.
Phase 2: Parallel Processing and Optimization.
- If none of the above strategies work, Optimizer searches for Parallel Processing possibilities. This depends on the Machine’s processing capabilities and configuration.
- If that is still not possible, then the final optimization phase starts. Now, the final optimization aim is finding all other possible options for executing the query in the best way. Final optimization phase Algorithms are Microsoft Propriety.
Query Executor
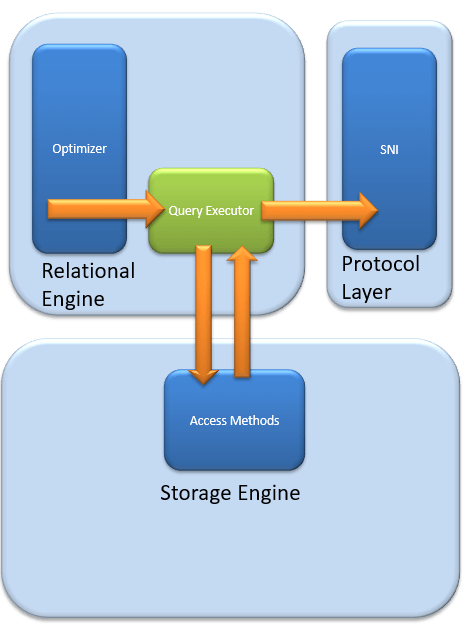
Query executer calls Access Method. It provides an execution plan for data fetching logic required for execution. Once data is received from Storage Engine, the result gets published to the Protocol layer. Finally, data is sent to the end user.
Storage Engine
The work of the Storage Engine is to store data in a storage system like Disk or SAN and retrieve the data when needed. Before we deep dive into Storage engine, let’s have a look at how data is stored in Database and type of files available.
Data File and Extent:
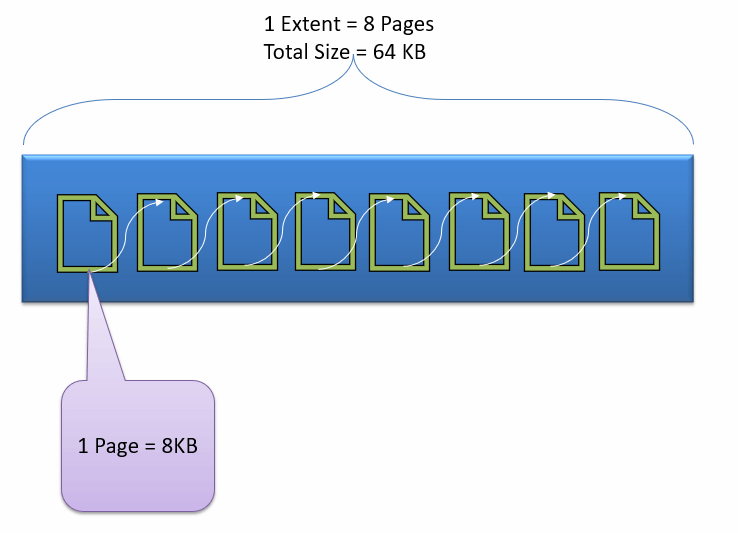
Data File, physically stores data in the form of data pages, with each data page having a size of 8KB, forming the smallest storage unit in SQL Server. These data pages are logically grouped to form extents. No object is assigned a page in SQL Server.
The maintenance of the object is done via extents. The page has a section called the Page Header with a size of 96 bytes, carrying the metadata information about the page like the Page Type, Page Number, Size of Used Space, Size of Free Space, and Pointer to the next page and previous page, etc.
File types
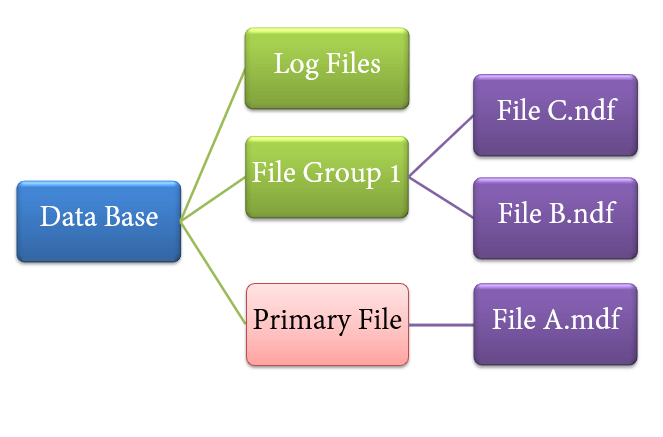
1. Primary file
- Every database contains one Primary file.
- This store all important data related to tables, views, Triggers, etc.
- Extension is .mdf usually but can be of any extension.
2. Secondary file
- Database may or may not contains multiple Secondary files.
- This is optional and contain user-specific data.
- Extension is .ndf usually but can be of any extension.
3. Log file
- Also known as Write ahead logs.
- Extension is .ldf
- Used for Transaction Management.
- This is used to recover from any unwanted instances. Perform important task of Rollback to uncommitted transactions.
Storage Engine has 3 components; let’s look into them in detail.
Access Method
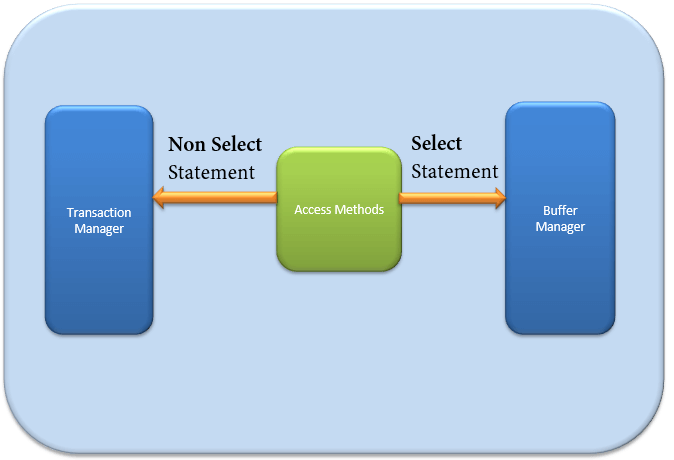
It acts as an interface between query executor and Buffer Manager/Transaction Logs.
Access Method itself does not do any execution.
The first action is to determine whether the query is:
- Select Statement (DDL)
- Non- Select Statement (DDL & DML)
Depending upon the result, the Access Method takes the following steps:
- If the query is DDL, SELECT statement, the query is pass to the Buffer Manager for further processing.
- And if query if DDL, NON-SELECT statement, the query is pass to Transaction Manager. This mostly includes the UPDATE statement.
Buffer Manager
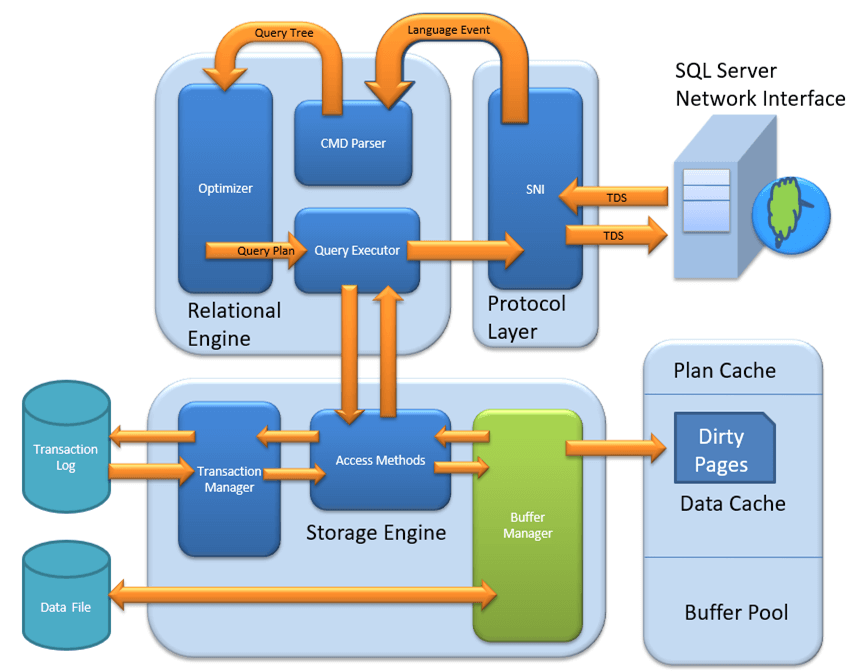
Buffer manager manages core functions for modules below:
- Plan Cache
- Data Parsing: Buffer cache & Data storage
- Dirty Page
We will learn Plan, Buffer and Data cache in this section. We will cover Dirty pages in the Transaction section.
Plan Cache
- Existing Query plan: The buffer manager checks if the execution plan is there in the stored Plan Cache. If Yes, then query plan cache and its associated data cache is used.
- First time Cache plan: Where does existing Plan cache come from?
If the first-time query execution plan is being run and is complex, it makes sense to store it in in the Plane cache. This will ensure faster availability when the next time SQL server gets the same query. So, it’s nothing else but the query itself which Plan execution is being stored if it is being run for the first time.
Data Parsing: Buffer cache & Data Storage
Buffer manager provides access to the data required. Below two approaches are possible depending upon whether data exist in the data cache or not:
Buffer Cache – Soft Parsing:
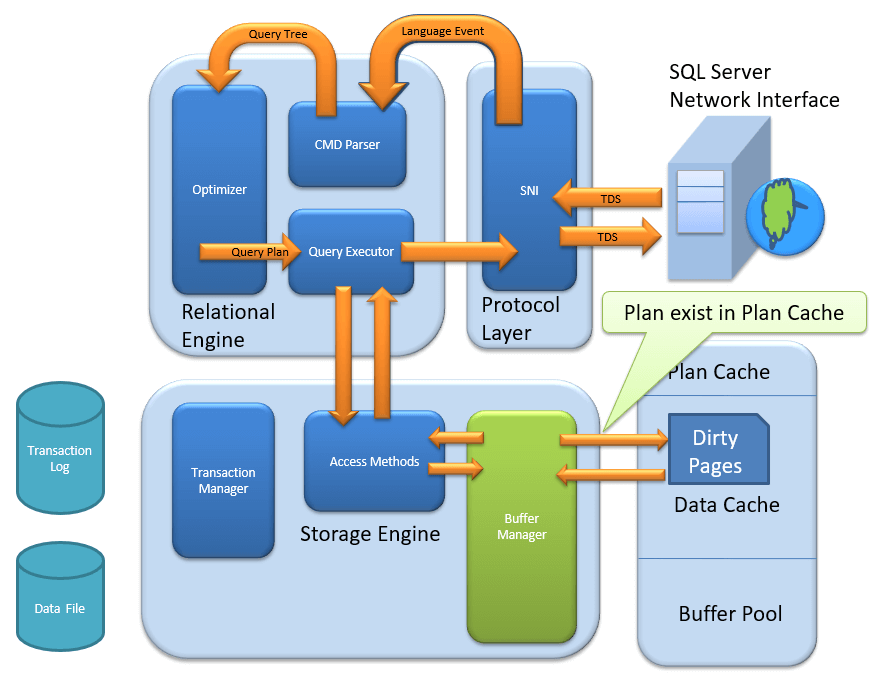
Buffer Manager looks for Data in Buffer in Data cache. If present, then this Data is used by Query Executor. This improves the performance as the number of I/O operation is reduced when fetching data from the cache as compared to fetching data from Data storage.
Data Storage – Hard Parsing:
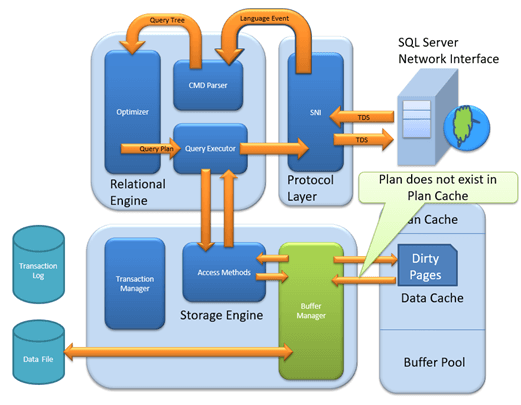
If data is not present in Buffer Manager than required Data is searched in Data Storage. If also stores data in the data cache for future use.
Dirty Page
It is stored as a processing logic of Transaction Manager. We will learn in detail in Transaction Manager section.
Transaction Manager
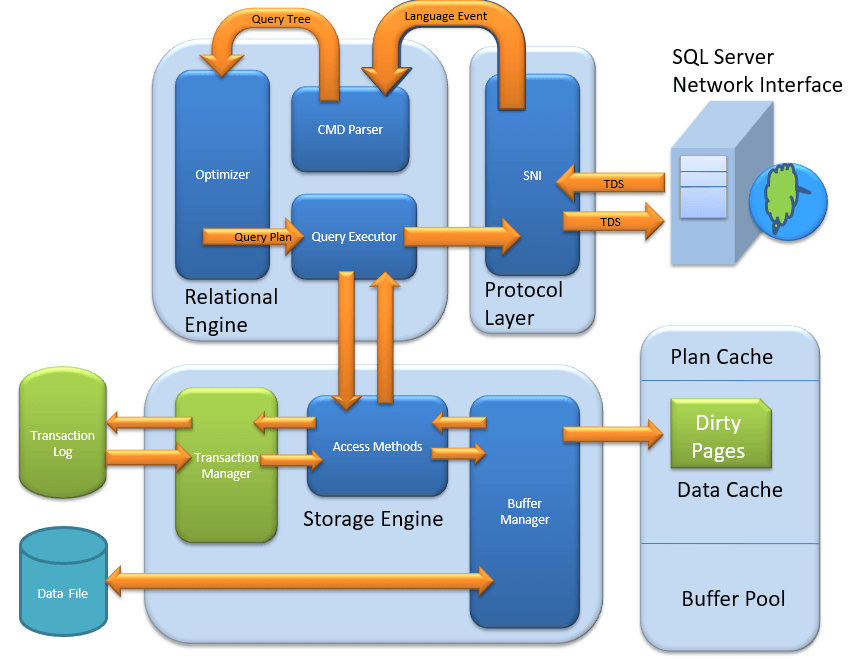
Transaction Manager is invoked when access method determines that Query is a Non-Select statement.
Log Manager
- Log Manager keeps a track of all updates done in the system via logs in Transaction Logs.
- Logs have Logs Sequence Number with the Transaction ID and Data Modification Record.
- This is used for keeping track of Transaction Committed and Transaction Rollback.
Lock Manager
- During Transaction, the associated data in Data Storage is in the Lock state. This process is handled by Lock Manager.
- This process ensures data consistency and isolation. Also known as ACID properties.
Execution Process
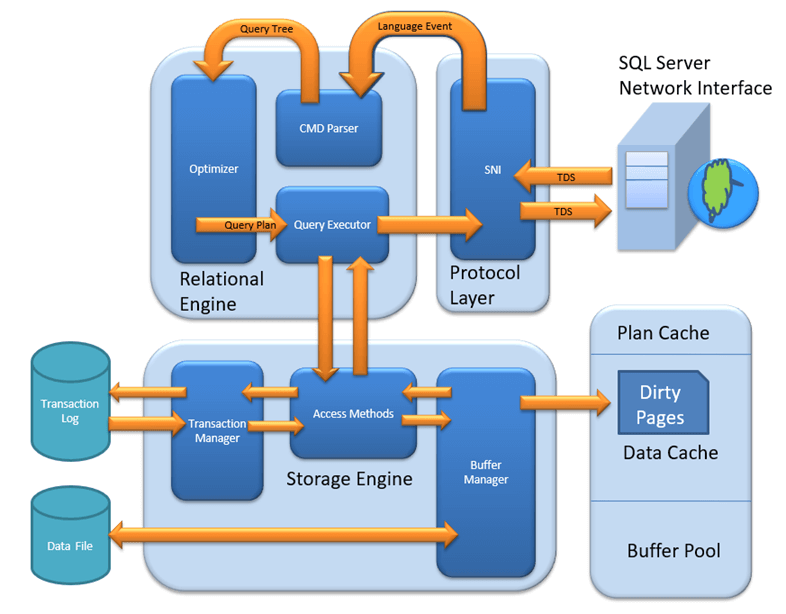
SQL Server Architecture Diagram
Conclusion
In this tutorial, you have learned how to use SQL Server Integration Services (SSIS), Master Data Services (MDS), and Data Quality Services (DQS) together to implement a sample Enterprise Information Management (EIM) solution. First, you used the Data Quality Client tool to create a DQS knowledge base with the knowledge about suppliers, cleansed the input supplier data in an excel file against the knowledge base, and then matched the supplier data by using a matching policy in the knowledge base to identify and remove duplicates in the data. Next, by using the MDS Add-in for Excel, you stored the cleansed and matched supplier list in MDS. Finally, you automated the whole process of receiving input data, cleansing and matching the data, and storing the master data in MDS by creating an SSIS solution.
Are you looking training with Right Jobs?
Contact Us- Different types of Joins in SQL Server
- SQL Interview Questions and Answers
- SQL Applications Tutorial
- Date Functions In SQL Server And MySQL Tutorial
- How to Download and Install SQL Server?
Related Articles
Popular Courses
- Sap Hana Training
11025 Learners - Oracle Sql Plsql Training
12022 Learners - Teradata Training
11141 Learners
- What is Dimension Reduction? | Know the techniques
- Difference between Data Lake vs Data Warehouse: A Complete Guide For Beginners with Best Practices
- What is Dimension Reduction? | Know the techniques
- What does the Yield keyword do and How to use Yield in python ? [ OverView ]
- Agile Sprint Planning | Everything You Need to Know


