- Difference between Waterfall approach and Agile approach
- CCIE Certification Cost in India
- What is IOT? | Know about IOT Application
- How to install Jenkins on Ubuntu? : A Complete Guide
- What is AWS Instance Types? : A Complete Guide
- VMware Site Recovery Manager : Know all about it
- What is Big Engineering? | Know about the salary
- What is Data Model in Salesforce ?
- Splunk architecture| Know from the basics [ OverView ]
- What is Azure Arc? | Integration Guide | A Complete Guide with Best Practices
- Introduction To Docker Networking: Advantages and Working | Everything You Need to Know
- Introduction to Azure ASR-enabled servers | All you need to know [ OverView ]
- Create Alarms in Amazon CloudWatch | Integration Guide | A Complete Guide with Best Practices
- What’s AWS VPC? Amazon Virtual Private Cloud Explained | A Complete Guide with Best Practices
- What Makes the Difference between Containers Vs Virtual Machines | All you need to know [ OverView ]
- What is a CDN? | How Do Content Delivery Networks Work | A Complete Guide with Best Practices
- Top Real World Applications of Cloud Computing | A Complete Guide with Best Practices
- What to Expect AWS Reinvent Reinforces the Growth of Cloud Computing|All you need to know [ OverView ]
- What is Cloud Computing Technology with SalesForce Integration | How its Work [ OverView ]
- Kubernetes vs Docker Swarm | What’s the Difference and Which Should You Learn?
- Big Data vs Data Warehouse | Know Their Differences and Which Should You Learn?
- Public Cloud vs Private Cloud | Know Their Differences and Which Should You Learn?
- Red Hat Certification Path: A Complete Guide For Beginners with Best Practices
- An Overview of AWS SDK and Toolkit | A Complete Guide with Best Practices
- An Overview of MuleSoft Anypoint | Benefits and Special Features | A Definitive Guide with Best Practices
- What is Amazon Elastic Load Balancer? : Benefits and Special Features with REAL-TIME Examples
- What is AWS Console ? : A Complete Guide with Best Practices
- Microsoft Azure Application Gateway | Step-By-Step Process with REAL-TIME Examples
- A Definitive Guide for Azure Automation | Benefits and Special Features
- Azure ExpressRoute | Everything You Need to Know | Expert’s Top Picks
- What is Hybrid Cloud? | Everything You Need to Know | Expert’s Top Picks
- A Complete Citrix Certification Path | A Complete Guide For Beginners [ OverView ]
- What is Azure Active Directory B2C ? : Step-By-Step Process with REAL-TIME Examples
- What is Azure DNS ? Azure DNS – Azure Domain Name System | REAL-TIME Examples
- Top AWS Statistics | Everything You Need to Know | Expert’s Top Picks
- Docker Swarm Architecture | Everything You Need to Know [ OverView ]
- What is Dell Boomi? | Everything You Need to Know [ OverView ]
- Cloud Architect Salary in India | All you need to know [ For Freshers and Experience ]
- What Is Multitenancy ? : Characteristics , Features , Benefits | All you need to know [ OverView ]
- What Is the Recommended List of AWS Whitepapers? | Expert’s Top Picks
- OSCP vs CEH | Difference You Should Know
- Openshift vs Kubernetes | Difference You Should Know
- AWS Cloud Practitioner and Required Skills | Expert’s Top Picks
- CRISC Certification and Benefits | A Complete Guide with Best Practices
- Kali vs Parrot | Difference You Should Know
- How to Install Docker on Ubuntu | Comprehensive Guide
- AWS Certification Cost and Types of Exams [ Job & Future ]
- What is the Average AWS Solutions Architect Salary?
- Reasons to Take up A Cloud Computing Certification
- What is Cloud Databases
- What is Cloud Computing Architecture?
- AWS vs Azure vs Google Cloud
- Top AWS Services
- Advantages and Disadvantages of Cloud Computing
- Cloud Computing 2020: An Analysis Of Cisco’s Cloud Index Survey, 2016
- What Are The Fundamental Microsoft Cloud Services That Are In Demand?
- What are the Issues in cloud computing?
- Top Important Cloud Computing Terms
- From Developer to AWS Cloud Specialist – The AWS Certification Learning Paths
- Why and How to Pursue a Career in AWS?
- The Top In-demand cloud skills for 2020
- Edge Computing Vs. Cloud Computing
- Top 10 Reasons to Learn AWS
- Cloud Computing Career Guide
- What does a AWS solution architect do?
- AWS Career Guide
- VMware vSphere best practices
- The AWS Engineer: Job Roles, Salaries And the Career Path
- What Is Microsoft Azure in Cloud Computing?
- How to Become an Azure Developer?
- Citrix Xenserver Vs Vmware vSphere
- Microsoft’s Project Olympus Delivers Cloud Hardware
- The Future of Cloud Computing
- Why Cloud Computing Is Essential to Your Organization?
- Amazon Web Services – WorkMail
- What is AWS?
- AWS Vs OpenStack
- AWS Certification Path
- AWS ElasticSearch
- AWS EC2 Instance Types
- Microsoft Azure Portal
- AWS Vs Azure
- Amazon Web Services WorkSpaces
- What is AWS Management Console?

Microsoft Azure Portal
Last updated on 22nd Sep 2020, Artciles, Blog, Cloud Computing
Azure portal
The Azure portal is a web-based, unified console that provides an alternative to command-line tools. With the Azure portal, you can manage your Azure subscription using a graphical user interface. You can build, manage, and monitor everything from simple web apps to complex cloud deployments. Create custom dashboards for an organized view of resources. Configure accessibility options for an optimal experience.
The Azure portal is designed for resiliency and continuous availability. It has a presence in every Azure datacenter. This configuration makes the Azure portal resilient to individual datacenter failures and avoids network slow-downs by being close to users. The Azure portal updates continuously and requires no downtime for maintenance activities.
Subscribe For Free Demo
Error: Contact form not found.
Azure portal menu
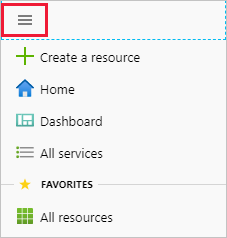
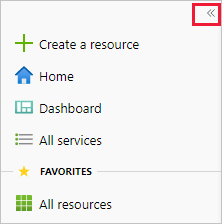
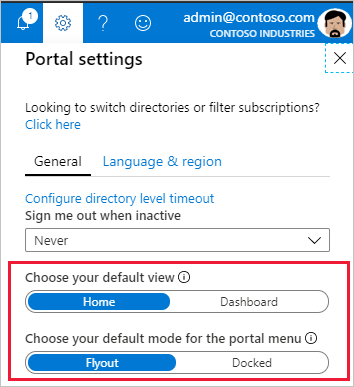
- You can choose the default mode for the portal menu. It can be docked or it can act as a flyout panel.
- When the portal menu is in flyout mode, it’s hidden until you need it. Select the menu icon to open or close the menu.


- If you choose docked mode for the portal menu, it will always be visible. You can collapse the menu to provide more working space.
Azure Home
As a new subscriber to Azure services, the first thing you see after you sign in to the portal is Azure Home. This page compiles resources that help you get the most from your Azure subscription. We have included links to free online courses, documentation, core services, and useful sites for staying current and managing change for your organization. For quick and easy access to work in progress, we also show a list of your most recently visited resources. You can’t customize this page, but you can choose whether to see Azure Home or Azure Dashboard as your default view.
The first time you sign in, there’s a prompt at the top of the page where you can save your preference.

Both the Azure portal menu and the Azure default view can be changed in Portal settings. If you change your selection, the change is immediately applied.

Azure Dashboard
Dashboards provide a focused view of the resources in your subscription that matter most to you. We’ve given you a default dashboard to get you started. You can customize this dashboard to bring the resources you use frequently into a single view. Any changes you make to the default view affect your experience only. However, you can create additional dashboards for your own use or publish your customized dashboards and share them with other users in your organization. For more information, see Create and share dashboards in the Azure portal.
Getting started
- A free trial account can be created on Azure management portal by visiting the following link – manage.windowsazure.com
- The screen that pops up is as shown in the following image. The account can be created using our existing Gmail, Hotmail or Yahoo account.
- Once logged in, you will be redirected to the following screen, where there is a list of services and applications on the left panel.
- When you click on a category, its details are displayed on the screen. You can see the number of applications, virtual machines, mobile services and so on by clicking on the menu item.
To access the management portal:
Step 1 − Go to https://manage.windowsazure.com
Step 2 − Sign in with your Hotmail or live ID. If you don’t have Azure accounts, sign up for one. You will get a free trial and you can explore, learn and create your own applications using Windows Azure.
Since here we have an application already running, you can see a list of them. Your account will be empty for the first time. Left panel categorizes the application and the middle part lists all the applications in the account.
Create a New Application:
Step 1 − Click on the ‘New’ left bottom corner.
Step 2 − Following screen will come up and you can choose what you want to create.
Check Credit and Subscriptions:
Step 1 − Click on ‘Credit’ in the green block at the top of the screen.
Step 2 − Click on ‘View more details’.
- It will take you to the following screen. This screen will show you all the details of your subscription, spending, and data usage.
- As the spending limit is set here, it says ‘Remove Spending Limit’. If the limit would not have been set, it would have said ‘Set Spending Limit’. This way you can set a spending limit for you. Your services will be stopped once you reach the spending limit.
- If you scroll down on the page in the above image, you can see all that is available with your subscription and see the details on the right side.
- You are absolutely in control of your spending. The green block in which the ‘Credit’ button is displayed will change color if you are about to fall short of your credit. This is calculated by your average per day spending and it would tell you in how many days your credit is going to get over.
Add a New Subscription:
Step 1 − Click on your account e-mail id or on the picture at the top right corner.
Step 2 − Click on ‘View my bill’ in the list.
Step 3 − It will take you to the following screen. Click on ‘add subscription’.
Step 4 − Choose the subscription from the list in the following screen.
Azure Preview Portal:
Step 1 − Click on your account email at the top right corner.
Step 2 − Select ‘Switch to Azure Preview Portal’.
Step 3 − The following screen will appear. All the functionalities are the same. ‘Azure Preview Portal’ is built for mobile and tablet screens with a responsive design.

