
- What Is CPQ In Salesforce | A Free Salesforce Tutorial
- Triggers in salesforce
- Salesforce Developer Tutorial
- salesforce lightning
- Salesforce Developer Account and Login
- Governor Limits Salesforce
- salesforce workbench
- Sales Force Cheat Sheet
- Salesforce Objects Tutorial
- Wrapper Class in Salesforce Tutorial
- Batch Apex in Salesforce Tutorial
- Data Types And Field Types in Salesforce Tutorial.
- Salesforce Architecture Tutorial
- Approval Process in Salesforce Tutorial
- Salesforce Tutorial

Approval Process in Salesforce Tutorial
Last updated on 27th Sep 2020, Blog, Salesforce, Tutorials
The approval process in Salesforce is an automated process that approves records for salesforce. As the process is automotive it works on certain criteria. The salesforce approval process may include rejection, recalled, or first-time submission of approval.
This automated process is handled using steps defined by the developer. It may be single-step approval or for more secure it can be multi-steps approval.
What is approval process in Salesforce?
Approval Process in Salesforce are the automated process where every organization uses to approve records. In Salesforce Approval process there are number of steps involved to approve a record in that object or the one records which satisfies the rule criteria.
Common steps for approval in salesforce are:
- 1. Setup -> Create -> Workflow and Approval -> Approval Process
- 2. Select the object for the approval process to be written
- 3. Click on Create New Approval Process
- 4. Select Standard Setup Wizard from drop-down
- 5. Enter the Process name, Unique Name and description for your process
- 6. Specify Entry criteria
This must be defined if you want to work with specific criteria on the field
For example, if you want to apply such criteria that online bill payment can happen only for the bill amount greater than 10,000.
The field is selected as Bill Amount; Operator is greater than values will be 10000.
- Select formula evaluates true to check the syntax of formula and as well as to allow the formula to set criteria.
- You can assign an approval request to different users while writing the approval steps.
- To define initial submission action follow the path below:
New Field Update/Email/Task -> Conditions -> Save
- 1. To define approval steps
- 2. Manager Step -> New Approval Steps -> Enter name -> Repeat for all records -> Select approver manager and save
- 3. CEO Step -> Approval Steps -> Enter name -> Set the criteria -> Save
- 4. For the final approval process, you can use any of the following ways like New Field Update/ Email / Task as per the condition and click on save
- 5. To define Rejection New Field -> Write rejection condition -> Save
Note: To create a default approval process select Jump Start Wizard.
Single-step Approval
- 1. If record matches all the auto-filter criteria approve the record.
Multi-steps Approval
The multi-steps approval process in salesforce is necessary when any of the following scenarios happen
- If a record does not fit for any of the auto-approval criteria already defined
- If record fits for partial auto-approval criteria then send it for approval to the appropriate approver
- If record fits the final approval criteria then send it to the approver
Important Points to be considered before creating Approval Process in Salesforce.
- 1. Entry criteria for Approval Process in Salesforce must be defined.
- 2. Approval request email template must be created.
- 3. We should gather approval request sender details.
- 4. Determine who is the assigned approver and Delegate approver.
- 5. We must know whether the approval process needs a filter logic or not.
- 6. We must create initial submission actions like email alerts, field updates, tasks, outbound message, updating custo approval status field to “In progress”.
- 7. We can set permissions that users can request approval from a wireless device
- 8. And also we can determine that the users can Edit records that are awaiting for approval.
- 9. And finally we have to assign the actions when an approval requests is approved or rejected.
How to create Salesforce approval process?
Now let us consider an example where all invoices which are greater than 10000 rupees the invoice must be approved by the Supervisor. While creating Salesforce Approval Process we there are 8 steps involved.
Creating Salesforce Approval Process.
- Go to Setup | Build | Create | Workflow & Approvals | Approval Process.
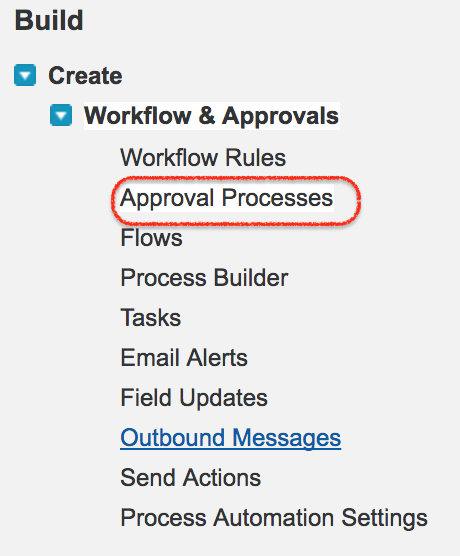
- Click on Approval Processes as shown above.
Subscribe For Free Demo
Error: Contact form not found.
Step 1 : Enter Name and Description for new Approval Process.

- Enter name and description.
- Click on Next Button.
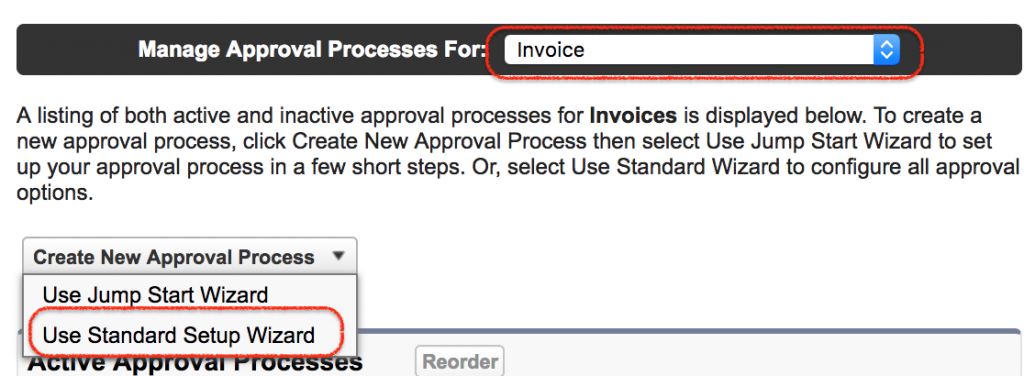
Step 1 :– we have to select the Object. Select Invoice As shown above. To create new approval process we have two process
- Jump Start : Involves few to create new Salesforce Approval Process.
- Standard Setup Wizard : It Involves all configuration options while creating new Salesforce Approval Process.
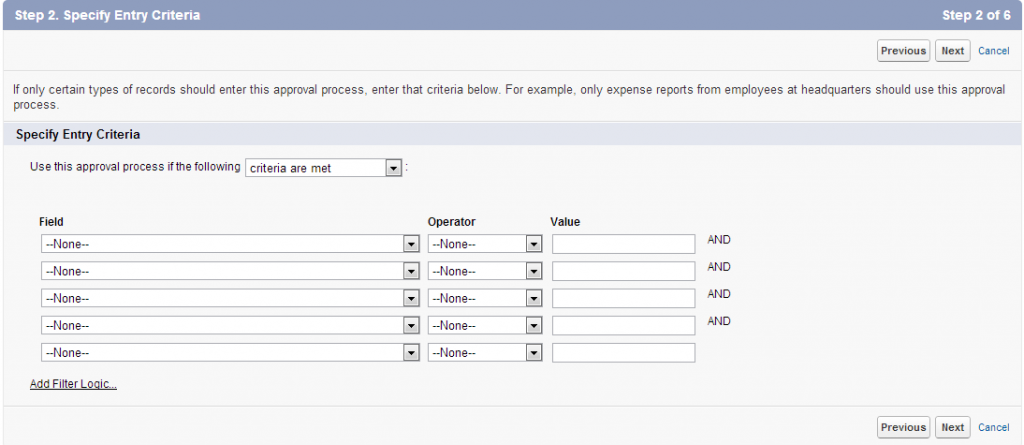
Step 2 :- Specifying Rule Criteria.
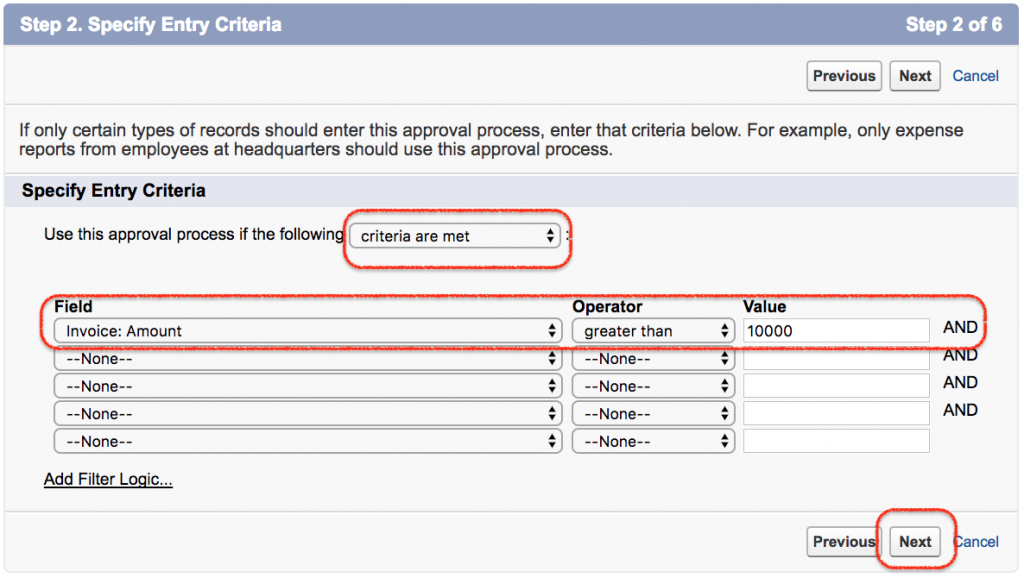
In this Step we have to specify the rule criteria which are the record that are eligible for approval process. As per our requirement we have defined where invoice amount in greater that 10000 the record must be sent to approval process. We can also group multiple entry criteria.
Step 3:- Specifying Approver Field and Record Edibility Properties.
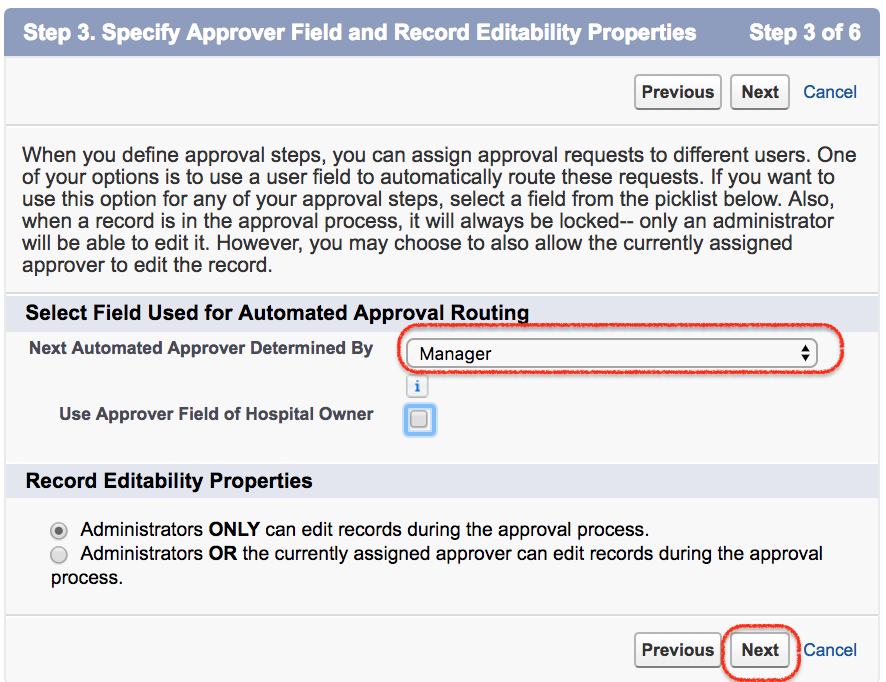
- It is about the approver. Select Manager as the approver and click on Next Button.

Before creating approval process we have to create Email template. An email will be sent to the approver. Select the email template and click on Next button.
Step 5 : Selecting Fields that be displayed on Approver page layout.
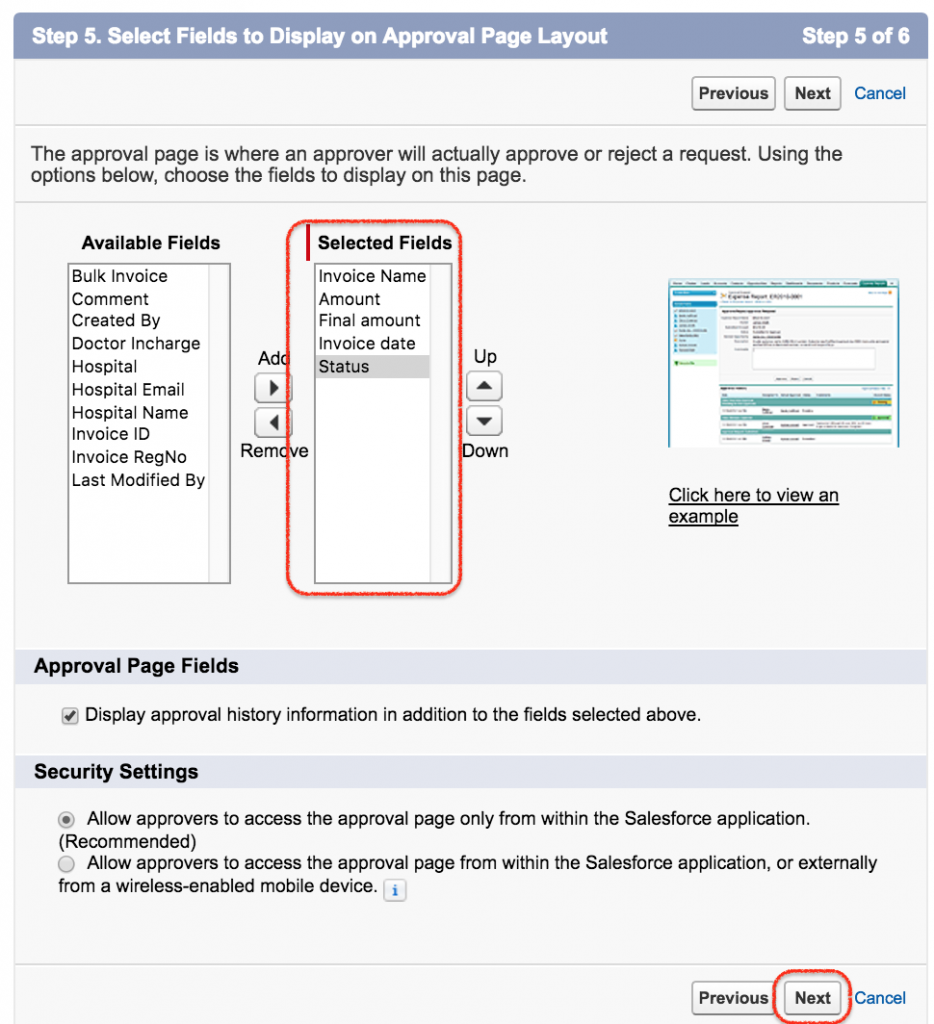
In this step we have to select the fields from available fields to selected fields. Selected fields will be displayed on the approver page layouts. Click on Next button.
Step 6 : Specify Initial Submitter.
In this step we have to define who are eligible to submit the record for approver like Owner, group, Creator or User. Select the submitter type, select page layout, Submission setting and click on Save button.
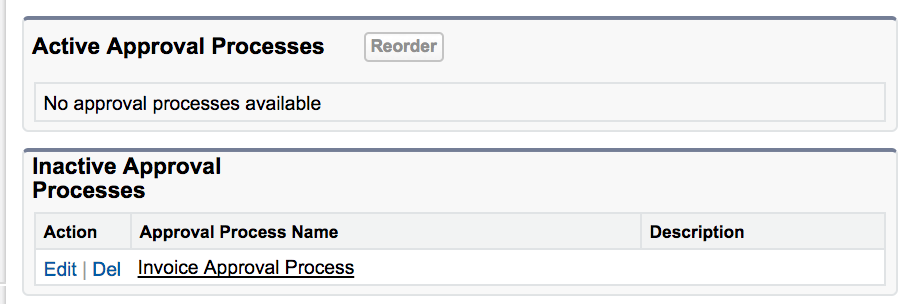
As shown above we have two sections Active Approval Processes and Inactive Approval Processes. The approval Process which we created is not activate so it is available in inactive approval processes. Click on Approval Process name.
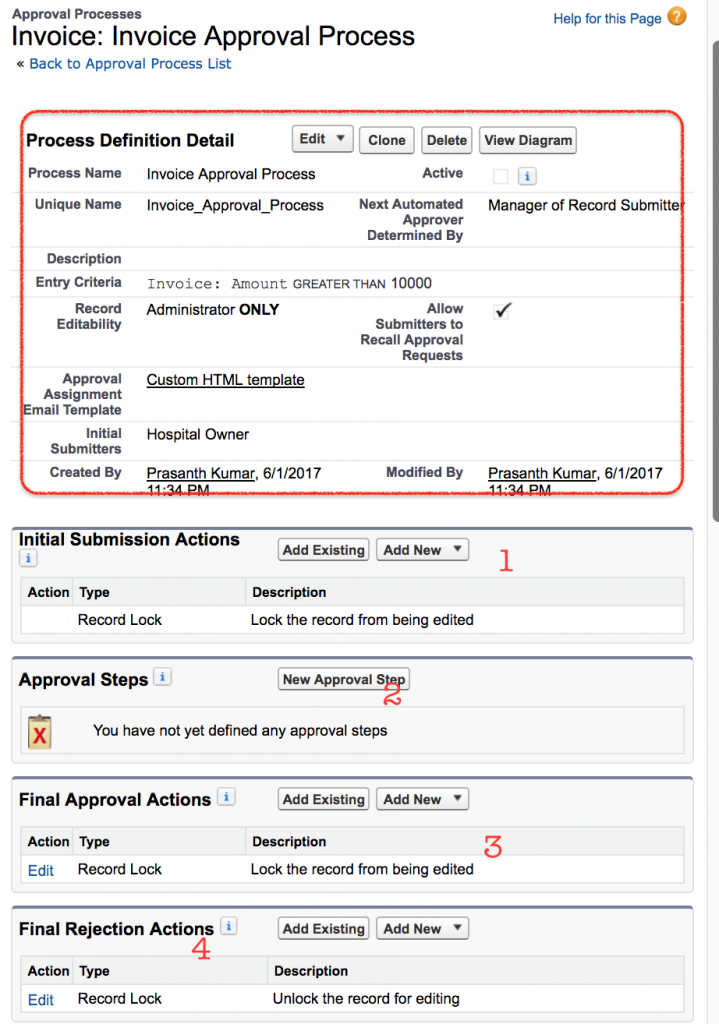
This give the whole details about the approval process. What is the name, Entry criteria, Status, Email Template, Initial Submission actions and So on. Once the Initial Submission action is done the records gets locked by default.
Salesforce approval process Example

1) Enter name, Unique name and Description(Optional).
2) Select criteria are met if you want to set a filter criteria that a record must meet to enter this approval process. For example, if only employees from headquarters should use this approval process to submit expense reports, enter the following filter criteria: “Current User: Office Location Equals Headquarters.”
Enter filter criteria for records that you want to be included in this approval process. Leave the filter blank if you want all records submitted to be included in the approval process.
Salesforce approval process
Select formula evaluates to true if you want a formula to determine what records enter the approval process.
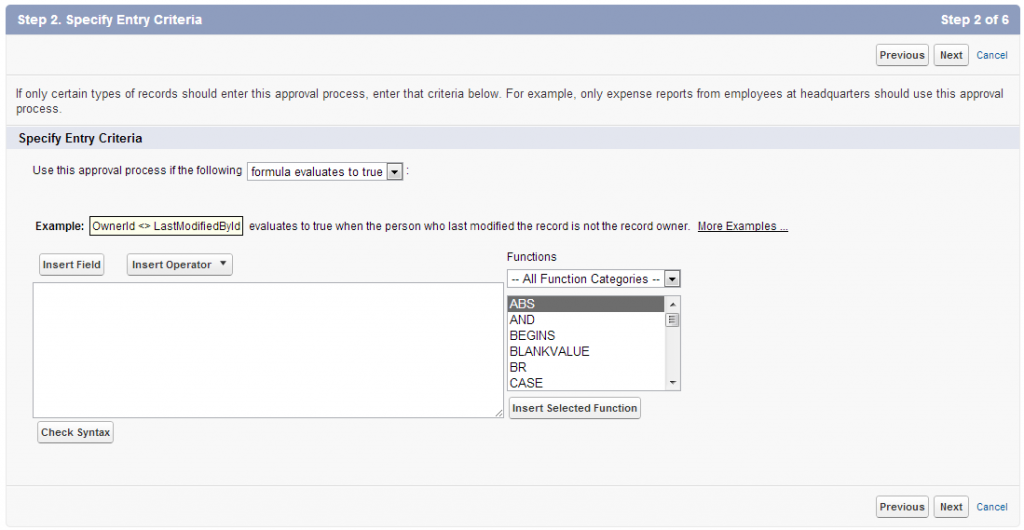
Salesforce approval process
3) When you define approval steps, you can assign approval requests to different users. One of your options is to use a user field to automatically route these requests. If you want to use this option for any of your approval steps, select a field from the pick list below. Also, when a record is in the approval process, it will always be locked– only an administrator will be able to edit it. However, you may choose to also allow the currently assigned approver to edit the record.
4)Define initial submission actions
New field update / email / task -> Conditions -> save.
5)Define approval steps
Manager step -> click on new approval step button -> provide the name -> all record should enter this step -> select approver manually and save.
- 1. Manager step -> click on new approval step button -> provide the name -> all record should enter this step -> select approver manually and save.
- 2. CEO step -> click on new approver step button -> provide the name -> enter criteria and save.
6)Final approval steps
New field update / Task / Email according to the field provide the condition and save .
7)Final Rejection actions
New field -> provide the conditions and save.
- Once the salesforce approval process is activated no more steps can be added.
Initial submission default actions cannot be edited but final approval & rejection default actions can be edited.
8)Responses to “Salesforce approval process”
Conclusion.
In this Salesforce tutorial, we have created Salesforce approval process successfully and also learned about what is Approval Process in Salesforce.com. In our upcoming Salesforce tutorial, we are going to learn about how to configure multiple steps and multiple approvers to the approval process.