
- An Overview of AWS Machine Learning Tutorial
- Mapplet In Informatica | Purpose and Implementation of Mapplets | Expert’s Top Picks | Free Guide Tutorial
- Spring Cloud Tutorial
- Azure IoT Hub Integration Tutorial | For Beginners Learn in 1 Day FREE
- Cloud Native Microservices Tutorial | A Comprehensive Guide
- Azure Stream Analytics | Learn in 1 Day FREE Tutorial
- Azure Data Warehouse | Learn in 1 Day FREE Tutorial
- AWS Lambda Tutorial | A Guide to Creating Your First Function
- Azure Logic Apps Tutorial – A beginners Guide & its Complete Overview
- Azure Service Bus Tutorial | Complete Overview – Just An Hour for FREE
- Introduction to Azure Service Fabric Tutorial | Learn from Scratch
- Amazon CloudWatch Tutorial | Ultimate Guide to Learn [BEST & NEW]
- AWS Data Pipeline Documentation Tutorial | For Beginners Learn in 1 Day FREE
- What is Azure App Service? | A Complete Guide for Beginners
- AWS Key Management Service | All You Need to Know
- Apigee Tutorial | A Comprehensive Guide for Beginners
- Kubernetes Tutorial | Step by Step Guide to Basic
- AWS SQS – Simple Queue Service Tutorial | Quickstart – MUST READ
- AWS Glue Tutorial
- MuleSoft
- Cloud Computing Tutorial
- AWS CloudFormation tutorial
- AWS Amazon S3 Bucket Tutorial
- Kubernetes Cheat Sheet Tutorial
- AWS IAM Tutorial
- Cloud Concepts And Models Tutorial
- Cloud Network Security Tutorial
- Azure Active Directory Tutorial
- NetApp Tutorial
- OpenStack tutorial
- AWS Cheat Sheet Tutorial
- Informatica Transformations Tutorial
- AWS vs AZURE Who is The Right Cloud Platform?
- How to Host your Static Website with AWS Tutorial
- VMware Tutorial
- Edge Computing Tutorial
- Cognitive Cloud Computing Tutorial
- Serverless Computing Tutorial
- Sharepoint Tutorial
- AWS Tutorial
- Microsoft Azure Tutorial
- IOT Tutorial
Azure Logic Apps Tutorial – A beginners Guide & its Complete Overview
Last updated on 10th Aug 2022, Blog, Cloud Computing, Tutorials
Azure Logic Apps:
Azure Logic Apps is a cloud-based Platform-as-a-Service (PaaS) from Microsoft Azure that is used to automate tasks, workflows, and so on. It aids in the development and design of automated workflows capable of integrating services, systems, and applications. The majority of organizations and B2B scenarios use Azure Logic Apps to develop highly scalable integration solutions.Logic Apps is a fully managed iPaaS (integration Platform as a Service) platform that relieves developers of the burden of building hosting, scalability, availability, and management. Logic Apps will automatically scale up to meet demand.
Azure Logic Apps’ Key Components:
Now that we understand what the Azure Logic Apps platform entails, let us look at the various components of Azure Logic Apps:
Workflows:
Workflows are an important component of Azure Logic Apps. A workflow is essentially a series of processes and actions defined as steps. A workflow is started whenever an input is fed into the system via logical connectors (discussed later in this blog). As a result, by defining workflows for business operations, business processes can be automated using Azure Logic Apps.
Connectors:
Logical connectors carry out the actions and processes that occur in Azure Logic Apps. These connectors are built in such a way that they can integrate and work with user data. There are various types of logical connectors. However, they have been divided into two broad categories: predefined connectors and customized connectors. It is also possible in some cases to use ARM templates to define connectors.Instructions for adding connectors to Azure Logic App,To add and use connectors in Azure Logic Apps, follow these simple steps:
- Navigate to the Azure portal and click the “Create a resource” button.
- After selecting the preceding option, a search box will appear on the screen. In the box, type Logic Apps Custom Connector and select it from the drop-down menu.
- After entering the Logic apps custom connector, click the “Create” button.
- Fill in the details for the chosen connector and then click “Review + Create.”
- Check that the information you entered is correct before clicking “Create.”
- In Azure Logic Apps, actions are the steps that are executed when a trigger is triggered. As previously stated, the creation of a trigger initiates a series of actions and processes. Once a trigger is triggered, actions will begin to run sequentially. These actions are actually processes that will be carried out based on predetermined business tasks and user-supplied data. Azure Logic Apps allows the user to select a specific set of actions from the connector repository’s numerous options.
Triggers:
Triggers are the starting point for the entire Azure Logic App workflow. Triggers are linked to actions, workflow, and processes. These Azure Logic Apps components cannot function without the activation of a trigger.Trigger Initiation in Azure Logic Apps. To start triggers in Azure Logic Apps, follow these steps:
- First and foremost, go to the Azure Portal and create a new Logic App.
- In the app, a list will appear. Look for and select the required trigger.
- Now, in a saved Logic App, successfully run a trigger by selecting the “Run Trigger” option in the overview section.
How do Azure Logic Apps work?
The actions and processes defined in the workflow govern how Azure Logic Apps operate. When an event occurs, the workflow is started. For example, consider a hotel booking logic app: whenever a user initiates a booking by selecting a hotel, the workflow begins, guiding the user through the booking process until it is completed. The values are recorded and transferred to the next step at each step to ensure that the procedure runs smoothly.
Developing a Logic App:
To begin with other operations in a Logic App, it is necessary to first understand how it is created. The following are the steps involved in developing a Logic App:
- Navigate to the Azure portal and select the “create a resource” option.
- Now, from the marketplace section, select “Logic Apps.”
- To proceed with the final creation of the Logic App, click on create.
- Enter the requested information, such as credentials.
- Now, select “Review + Create.”
- Finally, navigate to “resource” to access the newly created Logic App.
Authenticating a Logic Application:
Let us now learn how to authenticate a Logic App after we have learned how to create one. Azure Logic Apps uses system-assigned managed identity, which can only be used with one logic app resource, and user-assigned managed identity for authentication. This system-assigned managed identity can be shared across a variety of other resources. Let us now look at how to authenticate a Logic App:
- Navigate to the logic app resource in the Azure portal that you own or created.
- Now, go to the logic app’s settings menu and select the “identity” option.
- Select “On” in the system-assigned section.
- Now, in the “Identity window,” save the identity.
- A confirmation dialogue box will be displayed. Choose “YES.”
Introducing Azure Logic Apps:
The following steps will call a Logic App from an already existing Logic App:
- Select the “New” step and add an action in the step where the other Logic App needs to be invoked.
- The “Choose an action” menu will have a drop-down menu.
- Select the “Built-in” option from the drop-down menu.
- Next, type Logic Apps into the search box.
- After entering Logic Apps, navigate to the “Activities list” and select a Logic Apps workflow.
- Make a Logic App nest within an existing Logic App.
- All Logic Apps that are available for selection will now be displayed.
- Choose a Logic App to call from the list of current Logic Apps.
In an Azure Logic App, make an API connection:
To connect an API in an Azure Logic App, the following steps must be taken:
- Select “Web” from the “All services” menu.
- Choose “API Connections” from the menu on the Azure site.
- Select the “All resources” option from the Azure portal menu.
- Finally, change the “Type filter” setting to “API Connection.
Advantages of Using Azure Logic Apps:
Azure Logic Apps provide some of the most significant advantages in the industry for solving a variety of complex business problems:
Ease of Workflow Definition: Through a user-friendly graphical user interface, Azure Logic Apps make it simple to define the right workflow with actions, processes, and triggers (GUI).
Robust Applications: Azure Logic Apps are critical in providing support integration with enterprise-level applications such as Office 365, Dropbox, and others.
Debugging: Azure Logic Apps provide simple debugging via triggers, workflows, and process running history.
Ease of Automation: The Logic App is automatically fired when the workflows are defined with triggers and the trigger is successfully initiated.
Simple Integration: Azure Logic Apps make it simple to integrate Logic Apps with on-premise solutions.
Development of Azure Logic Apps:
LogicApps offers three different development models.
1. The Azure portal: We can create a logic app in the Azure portal. We can toggle between the designer and code views. For advanced configurations, the Code view comes in handy. Because each LogicApp’s “code-behind” is based on JSON, you can easily choose to create LogicApps using JSON rather than the designer, though this requires intimate knowledge of the LogicApps API.
2. Visual Studio 2015 and Later: To create logic apps, we can use Visual Studio 2015 or later. Some prerequisites must be installed.
Pre-requisites:
- Visual Studio 205 or later is required.
- Azure SDK 2.9.1 or later is required.
- PowerShell in Azure
Visual Studio Extension for LogicApps:As long as these conditions are met, developers can begin developing and deploying LogicApps from Visual Studio by selecting the Azure Resource Group template, followed by the LogicApps template.
3. Design templates: There are numerous predefined templates available for common business cases, such as HTTP Request-Response, which greatly simplifies the development team’s work. Templates are the quickest way to get started with LogicApps’ power.
Triggers for Azure Logic Apps:
Syncing your DropBox, OneDrive, and Google Drive with Microsoft Azure Logic Apps:
1. Dropbox: Dropbox is a cloud storage service that also provides file synchronisation, a private cloud, and client software. A Dropbox Basic account is free and comes with 2 GB of storage space.
2. OneDrive: OneDrive is a file hosting service that enables users to sync files and access them later via a web browser or mobile device. Users can share files publicly or with their contacts; accessing publicly shared files does not require a Microsoft Account. OneDrive provides users with 5 GB of free storage space.
3. Google Drive: Google Drive, previously known as Google Docs, is a file storage and synchronization service developed by Google. It enables users to store files in the cloud, share files, and collaborate on documents, spreadsheets, and presentations.
Triggers for Azure Logic Apps:
A trigger launches or runs a logic app instance. Some connectors include triggers that notify your app when certain events occur. The FTP connector, for example, has the OnUpdatedFile trigger, which launches your logic app when a file is updated.Trigger Types in Azure Logic Apps :
1. Poll triggers: These triggers poll your service on a regular basis to check for new data. When new data becomes available, a new instance of your logic app is launched with the new information as input.
2. Push triggers: These triggers wait for data on an endpoint or an event to occur before starting a new instance of your logic app.
3. Recurrence trigger: This trigger creates an instance of your logic app on a regular basis.
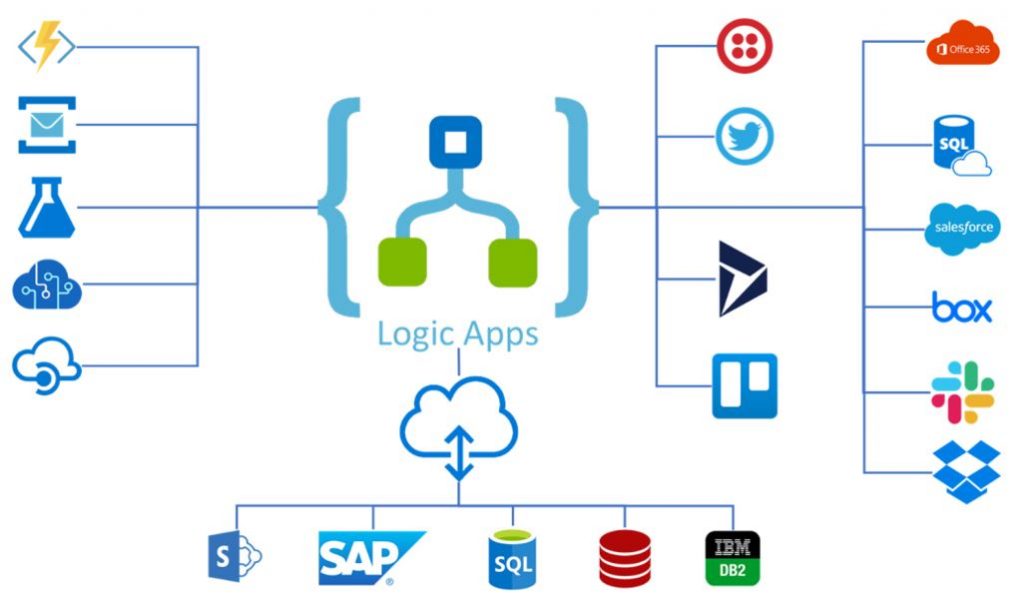
Connectors for Azure Logic Apps:
Connectors are essential when developing logic apps. Connectors allow you to connect to third-party applications to manage and work with data. Connectors allow on-premise applications to be synced with cloud applications.
1. Standard connectors: When you use logic apps, they are automatically available and included. Service Bus, Power BI, Oracle Database, OneDrive, and Dropbox are a few examples. Google Drive, Outlook 365, Twitter, Salesforce, Sharepoint online, and many other services are available.
2. Integration account connectors: Available when an integration account is purchased. You can use these connectors to transform and validate XML, process AS2 / X12 / EDIFACT business-to-business messages, and encode and decode flat files. If you use BizTalk Server, these connectors will help you extend your BizTalk workflows into Azure.BizTalk Server also includes a Logic Apps adapter, which includes receiving from and sending to logic apps.
3. Enterprise connectors: IBM MQ and SAP are examples. Available for an additional fee.
Conclusion:
It is obvious that all organizations require workflows and processes in order to run efficient business operations. Azure Logic Apps is a critical mechanism that assists organizations in designing and running workflows efficiently and effectively.