
- What is AWS Elastic Beanstalk? | A Complete Guide For Beginners
- What is Azure Devops? | A Comprehensive Guide
- What is Devops Engineer? | Roles and Responsibilities
- What is Blue Green Deployment? : The Ultimate Guide | Step-By-Step Process
- Introduction to Docker Images and Containers |A Definitive Guide with Best Practices [ OverView ]
- DevOps Tools for Database Deployment Automation | All you need to know [ OverView ]
- Top AWS DevOps Tools for Cloud Build and Deployment | A Complete Guide with Best Practices
- The Rise of DevOps: What It Is & How It Helps Businesses [OverView]
- Why DevOps and What it Means for Federal Agencies | How its Work [ OverView ]
- What is Chaos Engineering? : The Ultimate Guide | Principles of Chaos Engineering [ OverView ]
- Top Most DevOps Security Tools | The Ultimate Guide with Expert’s Top Picks
- What is Continuous Integration in Jenkins | A Complete Beginners Guide | REAL-TIME Examples
- Best CI/CD Tools Used by Programmers | Everything You Need to Know | Expert’s Top Picks
- Difference between Docker and Virtual Machine | A Definitive Guide and Which Should You Learn?
- Top Features of Docker | Everything You Need to Know [ OverView ]
- What is DevOps? : A Complete Guide with Best Practices
- Docker Alternatives and Their Standout Features [ OverView ]
- What is AWS DevOps ? All you need to know [ OverView ]
- Terraform vs Ansible: Key Differences Among Terraform and Ansible
- Docker vs Kubernetes | Difference You Should Know
- DevOps Build Tools List
- Ansible Vs Kubernetes
- DevOps Engineer Salary, Roles and Responsibilities
- Ansible vs. Puppet
- What is Puppet?
- Agile vs DevOps
- What is Docker Container?
- How to Install Jenkins on Windows?

How to Install Jenkins on Windows?
Last updated on 22nd Sep 2020, Artciles, Blog, DevOps
How to Install Jenkins on Windows?
Jenkins is one of the most popular tools for continuous integration and continuous delivery on any platform. A java application, Jenkins has many plugins for automating almost everything at the infrastructure level. The use of Jenkins has widely increased rapidly due to a rich set of functionalities, which it provides in the form of plugins. In this blog we will show a step by step guide of how to install Jenkins on a Windows platform.
In this section we will install Jenkins by following the step by step process as mentioned below.
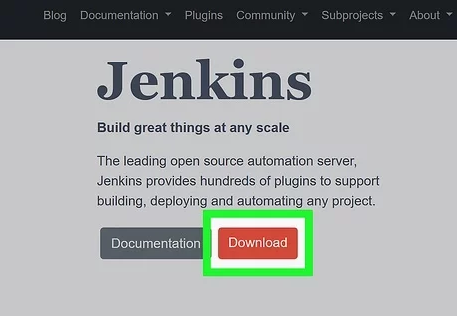
- 1.Go to the Jenkins official website.
- 2. Press the download button
Subscribe For Free Demo
Error: Contact form not found.
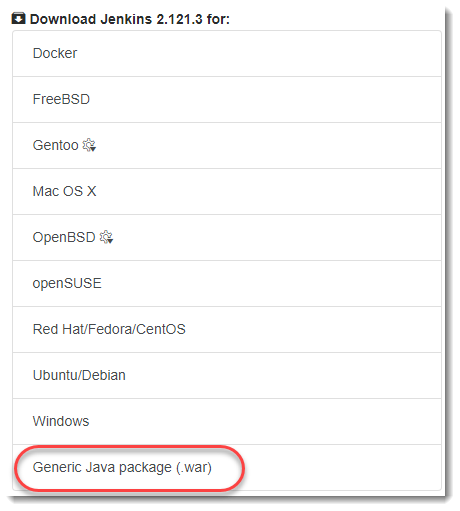
Now you can see a bunch of OS for which you can download Jenkins. You can either download Jenkins according to the OS or just download the war file which is a generic file and shown in the below steps. This will install the Jenkins through Java but you should have Java installed for this. For this tutorial we will be downloading and installing Jenkins through the generic war file.
3.Download the Generic Java Package (war file) located the end of the list
4. You will see the file downloading which is about 71 MB in size
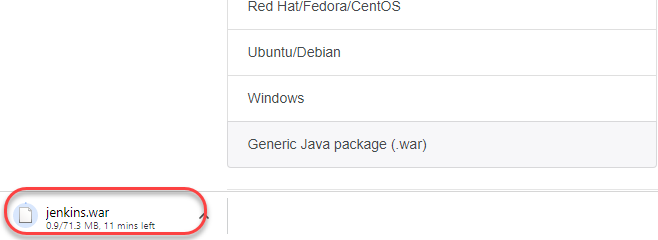
5. Remember the directory in which you have downloaded the file.
6. Go to the shell of your system and navigate to the directory in which you downloaded the file.
7. Type the following command:
java -jar jenkins.war
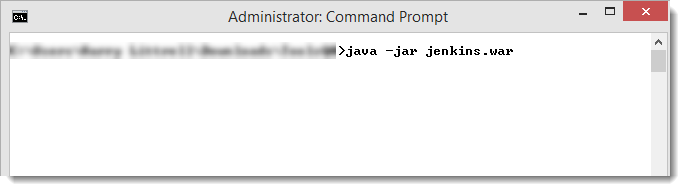
Note: Make sure that you run the above command in the folder where did you install the Jenkins.war.
8. Now you can see that Jenkins has started installing. After installation you will see the password of your Jenkins, which is required in the later steps, so you better copy it.
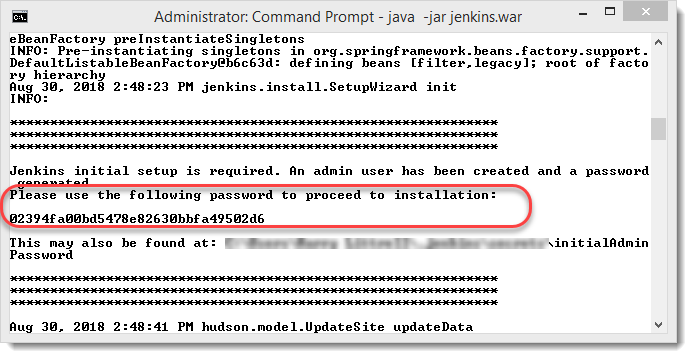
Note: Everyone will have a different password and this is required to enter only once.
9. Open port 8080 in your browser by typing the following in your browser
localhost:8080
10. You will see Jenkins running on your system with it’s first time default page. Paste the same password, copied from above step. Press Enter.
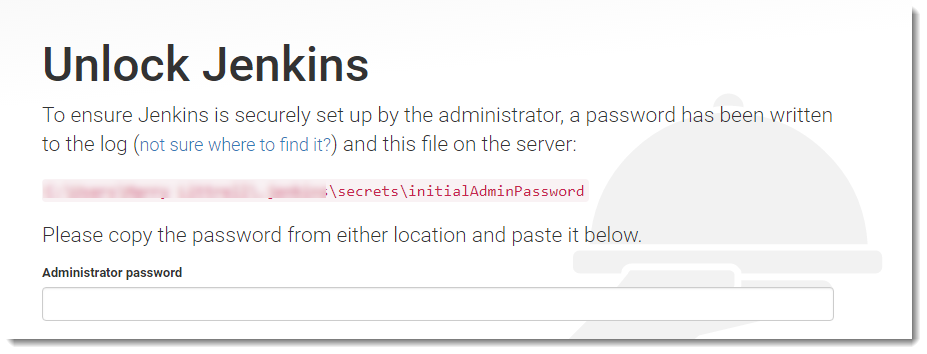
NOTE: If you can’t copy from your shell, you can visit the directory which is shown on the page in pink colour and open the file initialAdminPssword with any text editor and then copy it from there.
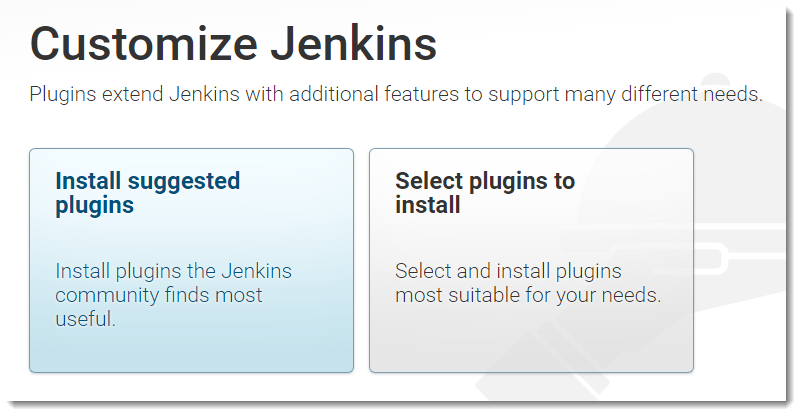
11. You will be redirected to this screen where you are asked about the plugins. Just press Install suggested plugins and let them install.
12. After all the plugins are installed, you will be redirected to the account creation page
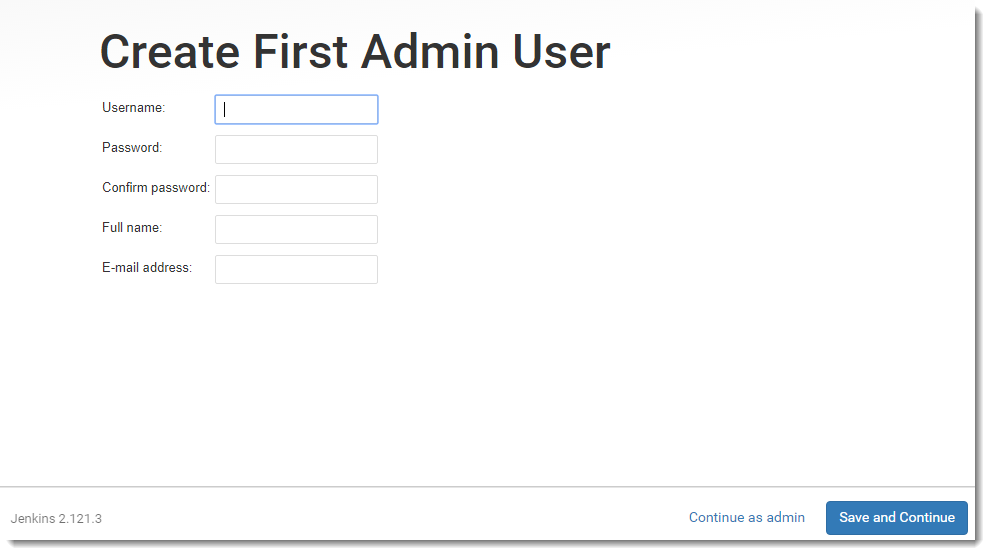
You can Continue as Admin or you can fill the details for further logins. If you Continue as Admin, you would be required the same password that we just entered to initialize Jenkins.
After you press either of the button, you will see that Jenkins has been successfully set up on your system. Now the base work is all set up and we will continue to our next tutorial in which we will try to run a Postman collection using Jenkins.