
- Financial Performance – A Complete Tutorial
- How Six Sigma Principles Can Progress Your Productivity – Tutorial
- Google Analytics Pro Tutorial | Fast Track your Career
- Activity-Based Costing Tutorial | Know about Definition, Process, & Example
- Create a workbook in Excel Tutorial | Learn in 1 Day
- Excel ROUNDUP Formula Tutorial | Learn with Functions & Examples
- Business Analytics with Excel Tutorial | Learn In 1 Day
- SAP Tutorial – Free Guide Tutorial & REAL-TIME Examples
- IBM SPSS Statistics Tutorial: Getting Started with SPSS
- SAP Security Tutorial | Basics & Definition for Beginners
- SAP Simple Finance Tutorial | Ultimate Guide to Learn [Updated]
- SAP FIORI Tutorial | Learn in 1 Day FREE
- Introduction to Business Analytics with R Tutorial | Ultimate Guide to Learn
- Tableau Desktop Tutorial | Step by Step resource guide to learn Tableau
- Implementing SAP BW on SAP HANA | A Complete Guide
- SAP HANA Administration | Free Guide Tutorial & REAL-TIME Examples
- Tableau API Tutorial | Get Started with Tools, REST Basics
- SAP FICO ( Financial Accounting and Controlling ) Tutorial | Complete Guide
- Alteryx Tutorial | Step by Step Guide for Beginners
- Getting started with Amazon Athena Tutorial – Serverless Interactive | The Ultimate Guide
- Introduction to Looker Tutorial – A Complete Guide for Beginners
- Sitecore Tutorials | For Beginners Learn in 1 Day FREE |Ultimate Guide to Learn [UPDATED]
- Adobe Analytics Tutorial – The Ultimate Student Guide
- Splunk For Beginners – Learn Everything About Splunk with Free Online Tutorial
- An Overview of SAP HANA Tutorial: Learn in 1 Day FREE
- Statistical Package for the Social Sciences – SPSS Tutorial: The Ultimate Guide
- Splunk For Beginners – Learn Everything About Splunk with Free Online Tutorial
- Pentaho Tutorial – Best Resources To Learn in 1 Day | CHECK OUT
- Statistical Package for the Social Sciences – SPSS Tutorial: The Ultimate Guide
- An Overview of SAP HANA Tutorial: Learn in 1 Day FREE
- Spotfire Tutorial for Beginners | Quickstart – MUST- READ
- JasperReports Tutorial: Ultimate Guide to Learn [BEST & NEW]
- Charts and Tables – Qlikview Tutorial – Complete Guide
- TIBCO Business Works | Tutorial for Beginners – Learn From Home
- Cognos TM1 Tutorial : Learn Cognos from Experts
- Kibana
- Power BI Desktop Tutorial
- Tableau Tutorial
- SSAS Tutorial
- Creating Tableau Dashboards
- MDX Tutorial
- Tableau Cheat Sheet
- Analytics Tutorial
- Lean Maturity Matrix Tutorial
- MS Excel Tutorial
- Business Analysis Certification Levels & Their Requirements Tutorial
- Solution Assessment and Validation Tutorial
- Lean Six Sigma Tutorial
- Enterprise Analysis Tutorial
- Create Charts and Objects in Excel 2013 Tutorial
- Msbi Tutorial
- MicroStrategy Tutorial
- Advanced SAS Tutorial
- OBIEE Tutorial
- Tableau Server Tutorial
- OBIA Tutorial
- Business Analyst Tutorial
- Cognos Tutorial
- Qlik Sense Tutorial
- SAP-Bussiness Objects Tutorial
- SAS Tutorial
- PowerApps Tutorial

TIBCO Business Works | Tutorial for Beginners – Learn From Home
Last updated on 06th Aug 2022, Blog, Business Analytics, Tutorials
Introduction to TIBCO warfare Tutorial:
Web Service Development in TIBCO is one in {every of} of} the elemental issue that with regards to every TIBCO developer has to do. Group action applications through Internet Service Interfaces is also a standard observed in just about every organization therefore it accommodates SOA standards. Developing SOAP internet Service in TIBCO isn’t a hard job.
TIBCO Designer tools build it straightforward to reveal or consume internet services through a convenient technique whereas not going into the difficulty of writing advanced code. This tutorial will guide you step by step thanks to developing a SOAP internet service in TIBCO designer. The internet service that the area unit is going to} be developing throughout this tutorial can expose one performing employeeDetails. This perform area unit attending to be exposed associate degree exceedingly|in a very} WSDL associate degreed users area unit attending to be able to get all details regarding an employee supported employee code.
Step 1: manufacture New Project
Create a latest project in TIBCO designer. Name it in spite of what you want. I named it as SOAPTest among the instance Create project
Step 2: manufacture Folders for proper Organization
In order to rearrange parts higher, manufacture separate folders for Processes, Connections, Schemas, Services etc as shown below:
Create folders
Step 3: produce JDBC and machine-readable text transfer protocol Connections
Our internet service operation area unit is attending to taking all details regarding employees from Oracle information. Thus we’d wish to create a JDBC association in our Connections folder. Once you’re sure all required information is populous, use the check association button to visualize the JDBC association.
Create jdbc association
We to boot got to manufacture a machine-readable text transfer protocol association among a similar directory which may be used in the termination URL of our internet service.
create machine-readable text transfer protocol association
Step 4: manufacture XML Schema for Input and Output
Our internet service will receive employee Code as input and may return employee details as output. we’d wish to create two schemas (XSD files) for this:
Tibco info Adapter:
Tibco data Adapter is utilized for enabling communication between TIBCO processes and knowledge systems. There unit a pair of kinds of services which is able to be used with a data Adapter:
Publication Service
Adapter Publication service extracts data from the changed rows of a data table and publishes them on acceptable subject names that are then signed by Adapter subscriber technique starter.
Subscription Service
Subscription service of a data Adapter can be opposite to a publication service. Once running as a subscriber, data Adapter listens on a subject matter, receives messages and updates the relevant tables in its associated data.
Adapter service configuration
In the Table Tab of publication service configuration, decide on the table TBL_EMPLOYEE by clicking on the Add Table button.
Adapter service add table:
In the publisher decisions tab, we’ve got chosen Publish By value as Storage Mode and Update as Update Mode. Note that we have a tendency to not manufacture publication tables. It’s created automatically.
Adapter publisher decisions setting:
We don’t need to build any modification in Advanced tab and it need to seem as if this:
Adapter service advanced setting
Now we have a tendency to tend to unit finish configuring our Adapter and making it ready. Now’s the time to maneuver forward for creating a technique for our Adapter service.
TIBCO SSL Certificate: the way to Use Self Signed SSL Certificates in TIBCO for HTTP: SSL (Secure Sockets Layer) may be a commonplace security technology used for establishing associate encrypted links between an online server and a consumer. SSL coding technology works on two key principles–a Public key acquainted to every one and a private key that’s understood alone to the intended recipient.
In TIBCO, security is of a serious concern once integration wholly totally different applications and services. Communication between wholly totally different applications over the network throughout a secure and secure manner is enabled by the use of the certification mechanism of SSL. The alternative decisions accessible to implement security in TIBCO Services is by exploiting LDAP based authentication or simple username, secret based authentication.
In this TIBCO SSL Certificate Step by Step tutorial, able to|I’ll} be able to justify but we are going to use a Self Signed Certificate for SSL communication in TIBCO. however in real time things, you won’t be exploiting self signed certificates; rather you’ll select a CA (Certificate Authority) signed certificate.
Keytool may be a utility provided by JAVA SDK to create your own SSL certificates. Keytool is also found inside your JAVA installation in your machine. In my case; I even have keytool utility accessible at the next path:
- C:\tibco\jre\1.6.0\bin
To generate a key file with every Public and private keys; use following command:
Alias is used to relinquish a name to your key. It has to be distinctive for its purpose. Here it’s ajmal_certificate. keyalg is a coding rule kind. Here it’s RSA. storepass is the key associated with the repository. Here it’s tibco@ajmal validity nominal as 360 suggests that this certificate will keep valid for 360 days.merely give some values for these and a file keystore.jks square measure created which may have every Public and private keys in it.
Once you’ve created a JKS file with a Public-Private key attempt in it, your second step is to extract the final public key from the JKS file and therefore publish it to the world.
To export public key from JKS file, run the next command:
We are going to give this certificate file to any shopper administrative unit that wishes to talk with our server where we’ll have the key placed.
Using TIBCO Designer turned out to be a novel project (I named it SSLServer). inside the project, turn out a novel Identity (available commonly Palette).
For Identity configuration, select Identity, get into the type and browse for the JKS to get into the address. make sure that you simply} just add 3 slashes inside the file name otherwise you’ll get a misestimation.
In the File kind select JKS and provide the key. secret got to be the same that you simply} just used whereas creating the JKS file.
Sure SSL for it. In HTTP association configuration, check Use SSL risk. Then click on the SSL button and select the identity.
TIBCO EMS: a way to Send And Receive JMS Messages in Queues:
In this TIBCO EMS beginners step by step tutorial, you will learn the thanks to send and receive JMS queue messages in TIBCO. TIBCO EMS (Enterprise electronic communication|electronic communication} Service) might be a traditional electronic messaging platform that simplifies and accelerates the blending and management of data distribution in superior, enterprise environments – facultative period decision-making and event-driven execution of business operations. TIBCO EMS is actually a customization of Java electronic communication Service (JMS) by TIBCO. TIBCO EMS is one modish approach used for application integrations at enterprise level due to its responsibility and efficiency. Just in case of EMS based electronic communication in TIBCO, a centralized EMS server is utilized where queues and topics unit of measurement are maintained for storing and delivering EMS Messages. But does TIBCO EMS electronic communication work? you’ll learn this by inquiring following straightforward and easy steps:
Step 1: begin EMS Server
Attend begin and open Run utility.
Step 2: manufacture JMS affiliation in TIBCO
For the act with EMS Server, we wish to make a JMS affiliation first. manufacture a fresh JMS affiliation by inquiring Add Resources–>JMS–JMS affiliation. ensure that JNDI Context URL has protocol prefix before host and port details.
Step 3: manufacture JMS Message Sender and JMS Message Receiver Processes
We need to make one methodology for exploiting JMS messages to a queue at EMS Server and another methodology that is in a position to be receiving this message from the queue.
Step 4: take a glance at TIBCO EMS Queue Message exploit and Receiving processes
Create a fresh methodology instance of SendJMSMessage by clicking on the manufacture employment icon on tester. you’ll see that SendJMSMessage methodology runs and additionally ReceiveJMSMessage methodology gets dead.
TIBCO File Adapter is used to change flow of information between files and TIBCO Enterprise Service Bus. File Adapters supply publication and subscription services that unit used to get the information from the file or to write the information to the file severally. During this step by step tutorial on File Adapters, you’ll learn the approach. You’ll be ready to use TIBCO File Adapter publication service to receive data from the pc file and use it at intervals using the TIBCO designer technique.
Step 1: Add File Adapter Configuration at intervals the project
First we would like to feature File Adapter configuration at intervals in the project.
Step 2: Add Publication Service in File Adapter and tack it
Double Click on the File Adapter configuration that you simply} just further in the 1st step. attend Adapter Services folder and add an innovative publication service from the File Adapter Palette.
In the configuration tab of Publication service, we have a tendency to tend to stand live choosing Rendezvous as transport. As we’d like Adapter service to be triggered for every new record at intervals the file, we have a tendency to decide Record Transfer at intervals the Transfer mode. At intervals the Life Cycle prefers repetition as we have a tendency to dislike the Adapter to urge triggered simply once.
I have chosen the Polling Interval to be thirty seconds throughout this instance scenario. prefer Input Directory by exploitation browse risk. This input directory will contain the file that we have a tendency to stand for live configuring publication service.
As we’d prefer to use File Adapter service for a specific file only, in Recognition technique prefer By File Name. File Name field will contain the name of the file that we’d prefer to use as input for Adapter service.
Step 3: manufacture a TIBCO technique with Adapter Subscriber to Receive data from File Adapter Publication Service
In this step, we’ll manufacture a TIBCO Designer technique that will be ready to receive the information from the file Adapter publication service and might produce the information accessible to the tactic. In real things, data must be used during an approach at intervals the tactic once receives through Adapter Subscriber but throughout this instance case, we’ll merely receive the information and end the tactic.
Create an innovative technique and add Adapter Subscriber Activity. As this activity may be a way starter, it’ll replace the default begin activity from the tactic.
In the Configuration tab of the Adapter Subscriber, prefer the File Adapter Publication Service that we have a tendency to tend to created in previous step within the Transport tab, we would like to verify that each one our transport configurations along with the subject unit matching with the Transport configuration of our Adapter Publication Service (which was designed in Step 2).
Step 4: take a glance at File Adapter Publication Service
For testing the Adapter primarily based applications like this, we would like to run two testers. First we would like to run an Adapter Tester, therefore a designer tester.
Go to tools and click on “ Show Adapter Tester. an innovative window will open throughout that you’ve need to decide the file Adapter and additionally specify an operational directory.
Example state of affairs for TIBCO Exception Handling Tutorial:
Following my principle of “Simple is better”, I even have chosen a simple scenario for this tutorial. Let’s suppose we have a tendency to want to possess an Associate in Nursing application that takes an Associate in Nursing employee name through a prescript request and for that name, it’s for Associate in Nursing xml, which is an available native system and stores the xml info into a info table.
We want to handle achievable exceptions at intervals in the same scenario so that the user gets correct response over the prescript once feat request to TIBCO methodology. Below square measure the steps for TIBCO Exception Handling Tutorial:
Step 1: turn out {a methodology|a way|a technique} with prescript Receiver as method Starter
The process that I even have created for this tutorial takes the prescript Parameter “name” as input via POST methodology as shown at intervals in the screenshot below. This methodology will have following activities:
- HTTP Receiver to act as a methodology starter to induce user requests on the desired association (I have created a prescript with respect to host as localhost and port as 6700 for this example).
- Read File activity to scan xml info from a file.
- JDBC Update activity to store the file content in a {very} very info table.
- Catch activity to catch exceptions at intervals in the code.
- Send prescript Response activity to come back back back response to the requesting offer (browser in our case).
Step 2: assemble scan File Activity
In this example, we have to scan files from the folder E:\ajmal\TestData. notwithstanding, the user sends solely} only parameter in the prescript request, square measure planning to be accustomed to get file from the file directory. E.g. in my native file directory, I even have created an XML file with the name abbasi.xml.
Step 3: assemble JDBC Update Activity
After reading content from the XML file, it’ll be kept into an info table in our example. For this we’d wish to assemble JDBC Update activity
Step 4: assemble Catch Activity to Catch FileNotFound Exception
Just to convey you an idea of how to handle a specific kind of exception, I even have used Catch activity at interval clusters that is ready to handle “FileNotFoundException. This exception will arise once user sends a name in prescript request that file doesn’t exist at intervals the given path (E:\ajmal\TestData\)
Step 5: assemble Send prescript Response activity
In the example, there are three things that we’d wish to send response back for prescript request:
When operation gets lucky
When Associate in Nursing exception is thrown and is caught properly
When exception is thrown but not handled expressly
Success condition that we have a tendency to use to check if operation is lucky square measure planning to be the value of $Error/ErrorReport/MsgCode variable. If this variable is null it means there was no error at intervals in the strategy.
TIBCO SOAP JMS Tutorial: the way to Develop JMS primarily based net Service in TIBCO BW:
In case of JMS primarily based SOAP web services, JMS queues are used to store messages sent over JMS transport. JMS queues are maintained on a JMS Server. For SOAP JMS web services in TIBCO, it’s necessary to have TIBCO setup at every shopper and server aspect. On the alternative hand, for rule primarily based SOAP web services, there’s no such demand in the shopper aspect.In this TIBCO SOAP JMS tutorial, we’ll turn out an internet service in TIBCO which can receive age as Input and it’ll return eligibility standing as response. We tend to keep internet service logic as simple as possible here as the purpose is to explore all the steps involved in developing JMS primarily based SOAP service and not methodology implementation details.
Step 1: turn out JMS association
For a JMS primarily based SOAP web service, the first issue that we’d prefer to try to do is to form a JMS association to a JMS queue. turn out a JMS association in your project by reaching to Add Resources–>JMS–>JMS association.
Step 2: turn out Schemas for JSM SOAP web Service input and output
Our web service will receive only 1 input that is ready to be the age of somebody. to form XSD for this, choose XML Schema from XML Palette.
Step 3: turn out WSDL in TIBCO Designer for SOAP JMS Service
We square measure reaching to follow the “contract 1st” approach for creating web service throughout that we’ll turn out a WSDL 1st so move towards service implementation.
Step 4: turn out web Service from WSDL in TIBCO
In order to form web service from the WSDL, right click on the WSDL among the Project window and attend Tools or multi-User–>Generate web Service–>From WSDL
Step 5: Implement TIBCO warfare methodology for web Service
Our methodology created by TIBCO Designer square measure progressed to be simple throughout this case. it’ll have exclusively a plotter activity where we’ll set the message to be sent as output.
Step 6: check TIBCO JMS SOAP web Service exploitation Designer Tester
Our last step throughout this TIBCO web Services tutorial is to examine the service that we’ve created. For this, we’d prefer to create a SOAP shopper methodology in TIBCO Designer first.
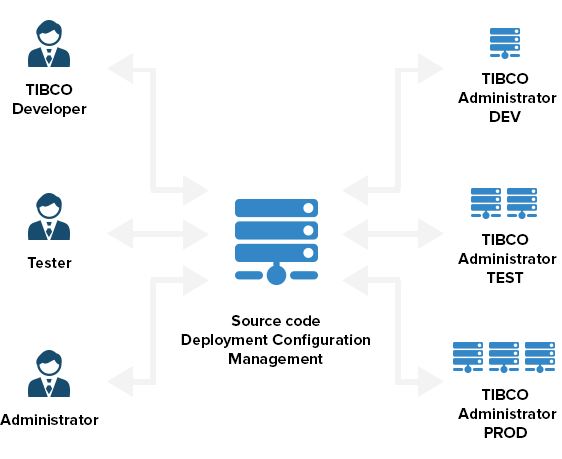
TIBCO Domain Utility: the way to produce a replacement Administrator Domain–Step By Step Tutorial:
TIBCO Domain Utility is used to form new administrator domains or manage existing domains. Throughout this tutorial, I’ll teach you step by step, some ways to provide a replacement administration domain in TIBCO practice Domain Utility.
Step 1: opt for a category and Task in Domain Utility:
Go to start–>TIBCO–>Domain Utility and then open it. at intervals the domain utility, opt for Domain Configuration at intervals the category and build a replacement Administration Domain at intervals the task list
Step 2: offer name and totally different associated details:
Write a name for a domain that you {just} just would like. in addition specify Project directory, Machine name, Hawk cluster and secret writing. In my case, I even have merely given the name and unbroken all others as default
Step 3: Specify prescript Port, closing Port and shutting String:
In this step you’ll be asked to relinquish a port selection for prescript, closing and a closing string. you’ll be ready to use any available ports for this. My settings for these fields
Step 4: provide body Credentials:
In this step, choose a username and word that you {just} just need to use for your new domain
Step 5: provide information configuration Information:
In this step you provide all necessary information which may be accustomed to connect with the data. In my case I even have Oracle atomic number 54 information placed in with SID as atomic number 54 running on port 1521 in my localhost.
Step 6: check information connection:
After giving all required inputs in step 5, press check affiliation Button to verify that property to the data is getting successful. As you’ll be ready to see in below screenshot, affiliation has successfully established with the data.
Step 7: guarantee all is good to travel before domain creation:
Now you’ll see a window with all the tiny print that you {just} just provided in previous steps. Verify that everything is okay and if sensible to travel, merely click next button
Step 8: successful Creation of domain notification:
Now you’ll get a replacement window stating that the domain has been designed successfully in TIBCO administrator. you’ll be asked to begin out administrator and HAWK agent NGO services for the new created domain
Develop REST net Service in TIBCO Step By Step Tutorial:
TIBCO warfare quiet internet Service Implementation Scenario:For this tutorial example, I’m going to take a straightforward state of affairs to clarify to you the steps for creating quiet service in TIBCO warfare. This service square measure reached to be accustomed to question Account Details from an information table supported Account ID. For simplicity, the buyer methodology square measure reaching to be inflicting merely a tricky coded AccountID that, our service will fetch the account details from the information and may remit as a service response in XML format.. If you prefer to follow my video tutorial instead, on TutorialsPedia YouTube Channel, you’ll be ready to watch the video below where I even have implemented a singular state of affairs of User Management quiet internet service with POST and acquire verbs.
Step 1: manufacture affiliation Shared Resources
Our quiet TIBCO internet Service will use protocol affiliation as a transport. so we would like to create a protocol affiliation in our warfare Project. Also, we would like to create a JDBC affiliation as we’ll be connecting to ORACLE information to fetch Account details from a table.
Step 2: manufacture XML Schema to be used as quiet Service Input and output
Our second step throughout this tutorial is to create a XML Schema (XSD file) which can be used for Request and Response in our TIBCO quiet Service Implementation. For our account question example state of affairs, Schema will contain alone AccountID among the request whereas response will contain AccountBeneficiary and AccountBalance.
Step 3: manufacture Business Logic Implementation methodology
In this step, we have a tendency to tend to unit of measurement going to manufacture a technique which may have our service business logic implemented. Our business logic throughout this instance case is extraordinarily straightforward. we have a tendency to tend to unit of measurement merely going to use the schema that we have a tendency to tend to created in on prime of step as Input and Output in our methodology and may use JDBC question Activity to question account details from the information therefore account details unit of measurement sent as output from the tactic.
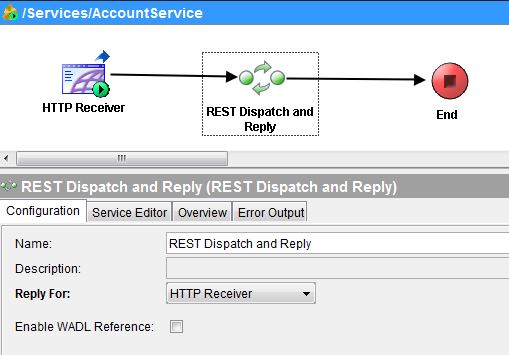
Step 4: manufacture quiet Service pattern REST Dispatch and Reply activity
In this step, we’ll manufacture a service by pattern REST Dispatch and Reply activity from the rest & JSON Palette. pattern REST Dispatch and Reply activity, we are going to expose a warfare methodology as a quiet service. The warfare methodology that we have a tendency to create in Step 3 square measure reaching to be utilized during this case as a quiet service implementation methodology.
Step 5: Use Invoke REST API activity to consume quiet TIBCO internet Service
To consume quiet Service, I even have created a replacement methodology and dragged Invoke REST API activity from REST & JSON Palette in it. among the configuration tab of Invoke REST API activity, specify the Resource URI. This URI got to the purpose of the resource that was adjective to our service in the previous step (bas and Resource URL).
Step 6: check TIBCO quiet internet Service pattern TIBCO Designer
Validate the project to make sure that there aren’t any errors. Once valid successfully, load service additionally as client methodology among the designer tester. presently manufacture a replacement job among the designer tester for the buyer methodology (AccountInformationRequest process).
TIBCO JDBC decision Procedure: the way to decision hold on Procedures:
TIBCO JDBC call Procedure activity from JDBC Palette in TIBCO BW is utilized to call a hold on Procedure in an exceedingly} very data to perform any kind of actions. throughout this tutorial, ready to|I’ll} be able to build a case for the way to use JDBC call Procedure activity to call a data procedure then use the result data among the tactics.
Step 1: turn out a data association
The first thing that we wish to do for any project involving data activities is creation of a data association. attend JDBC Palette and choose data association. Then specify the association configurations. In my case, i’m connecting to Oracle data
Step 2: turn out designer technique to call a hold on procedure
Before creating a designer technique which can use JDBC called Procedure activity to execute a hold on procedure, we have a tendency to initially have to be compelled to turn out a data procedure. I even have already created a simple PROCEDURE in my data
Step 3: take a glance at JDBC call Procedure TIBCO technique
Now our technique is completely designed. Validate the tactic to create certainty that there’s no error. Once valid successfully, load the tactic in the designer tester. currently that we’ve got a PROCEDURE created {and data|and knowledge|and data} created on the market among the many information tables, we have a tendency to be ready to move forward for creation of a way.Create a spanking new technique in designer and add a JDBC call Procedure Activity among the tactic. among the configuration tab of JDBC call Procedure activity, specify JDBC association, choose acceptable Schema and thus the procedure name (choose the procedure that we have a tendency to tend to created above).
How to decision Java category strategies in TIBCO By Adding JAR File: Step By Step Tutorial:
In this Step by Step Tutorial, i’m reaching to build a case for but we have a tendency to square measure ready to add our custom JAVA Code as a JAR get in our TIBCO project then how to call Java class ways that mistreatment Java methodology activity on the market in Java Palette.
Step 1: Write Java class and build Its JAR file
The first issue that we would like to undertake is to write a Java class which might be then added to a JAR File. A JAVA class that we might prefer to use among the sort of a JAR in our TIBCO project ought to implement a Serializable interface.
- import java.io.Serializable;
- public class Student implements Serializable
- public static void main(String[] args)
- }
- Now you’ll compile the class and build Its JAR file mistreatment of the below commands. (I used Netbeans IDE that automatically created the JAR file once I designed the project).
To compile Student.java file to make a .class file, write the following command among the electronic communication. javac Student.java
This will turn out Student.Class gets in an exceedingly similar directory where you have got got Student.java file.
Now therefore on type the JAR file, write the following command among the command prompt:
jar cvf Student.jar Student.Class
This will turn out a jar file named Student.jar among a similar directory.
Please note that if you turn out a JAR file with a higher Java Version and your TIBCO installation includes a lower JAVA version, class and its ways that of the JAR file won’t appear in your TIBCO project. make sure that your jar is made with the same JAVA version or a lower version.
Note: If you’re mistreating Netbeans IDE, the JAR file that gets created automatically when you build the project square measure among the dist folder of the project.
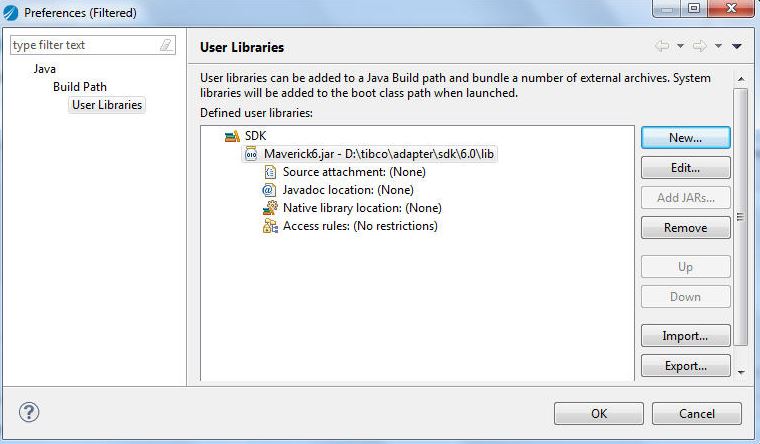
Step 2: Add JAR to the TIBCO war Project
Once we’ve created a JAR File, we would like to feature it in our TIBCO project. among the TIBCO designer project, add a latest AliasLibrary from the ultimate Palette.
In the Aliases Tab of this activity, browse and add Student.
Step 3:Decision Java methodology from a jar file mistreatment TIBCO Java methodology activity
Create a TIBCO Designer methodology and add Java methodology activity from the Java Palette. among the configuration of this activity, choose the AliasLibrary. Then use the class browser alternative before the sophistication field so that each one the JARs unit of measurement is shown. As you’ll see among the screenshot below; Student.jar is in addition on the market which we’ll choose Its class methods:
Tibco selects methodology from a class in a jar. when selecting the class and Its methodology, complete configuration of Java methodology
As the getAge() methodology of our java class desires no input parameter, we have a tendency to not have to be compelled to attend the Input tab of Java methodology activity throughout this case.
Simply validate the strategy and once it’s valid successfully, proceed to the next step, among that we have a tendency to square measure aiming to take a glance at but we have a tendency to square measure ready to call and run java class methodology of a jar file from our TIBCO method.
Step 4: Run Java class methodology from a JAR file mistreatment TIBCO Java methodology Activity
Load the strategy in the designer tester and run it. As you’ll see among the screenshot below, code has run successfully andour java methodology has came the result supported the implementation among the java class
Conclusion:
Tibco biological warfare is an Enterprise Application Integration mechanism for looking at and deploying ways that and maintaining servers and utilization that facilitate associated protocols, at the side of HTTP/S, JDBC, SMTP, at constant time XML Java, and web Services. robust protest approach and failure unit of measurement inward throughout the configuration, trial, and preparation. It presents fault-tolerance via permitting distribution of jobs and prepacked Adapter code for combining appeals into all-time low. We have a tendency to tend to write TIBCO Business Work to spice up your business and be as manageable and as productive as gettable. With us, you notice the solid support you would like to maneuver at the speed of tomorrow.
In Tibco biological warfare work, members gain necessary skills required to figure out integration challenges applying for TIBCO Active Matrix Business Works (BW) program. The members conjointly can study but Active Matrix Business Works permits businesses to instantly and expeditiously integrate deeply distributed on-premises and data sources and cloud applications, mercantilism partners, mobile apps, IoT devices, and social networks. Once this work is over, the participants would be ready to deploy, create, and monitor fully totally different solutions in TIBCO.