
- Difference between Waterfall approach and Agile approach
- CCIE Certification Cost in India
- What is IOT? | Know about IOT Application
- How to install Jenkins on Ubuntu? : A Complete Guide
- What is AWS Instance Types? : A Complete Guide
- VMware Site Recovery Manager : Know all about it
- What is Big Engineering? | Know about the salary
- What is Data Model in Salesforce ?
- Splunk architecture| Know from the basics [ OverView ]
- What is Azure Arc? | Integration Guide | A Complete Guide with Best Practices
- Introduction To Docker Networking: Advantages and Working | Everything You Need to Know
- Introduction to Azure ASR-enabled servers | All you need to know [ OverView ]
- Create Alarms in Amazon CloudWatch | Integration Guide | A Complete Guide with Best Practices
- What’s AWS VPC? Amazon Virtual Private Cloud Explained | A Complete Guide with Best Practices
- What Makes the Difference between Containers Vs Virtual Machines | All you need to know [ OverView ]
- What is a CDN? | How Do Content Delivery Networks Work | A Complete Guide with Best Practices
- Top Real World Applications of Cloud Computing | A Complete Guide with Best Practices
- What to Expect AWS Reinvent Reinforces the Growth of Cloud Computing|All you need to know [ OverView ]
- What is Cloud Computing Technology with SalesForce Integration | How its Work [ OverView ]
- Kubernetes vs Docker Swarm | What’s the Difference and Which Should You Learn?
- Big Data vs Data Warehouse | Know Their Differences and Which Should You Learn?
- Public Cloud vs Private Cloud | Know Their Differences and Which Should You Learn?
- Red Hat Certification Path: A Complete Guide For Beginners with Best Practices
- An Overview of AWS SDK and Toolkit | A Complete Guide with Best Practices
- An Overview of MuleSoft Anypoint | Benefits and Special Features | A Definitive Guide with Best Practices
- What is Amazon Elastic Load Balancer? : Benefits and Special Features with REAL-TIME Examples
- What is AWS Console ? : A Complete Guide with Best Practices
- Microsoft Azure Application Gateway | Step-By-Step Process with REAL-TIME Examples
- A Definitive Guide for Azure Automation | Benefits and Special Features
- Azure ExpressRoute | Everything You Need to Know | Expert’s Top Picks
- What is Hybrid Cloud? | Everything You Need to Know | Expert’s Top Picks
- A Complete Citrix Certification Path | A Complete Guide For Beginners [ OverView ]
- What is Azure Active Directory B2C ? : Step-By-Step Process with REAL-TIME Examples
- What is Azure DNS ? Azure DNS – Azure Domain Name System | REAL-TIME Examples
- Top AWS Statistics | Everything You Need to Know | Expert’s Top Picks
- Docker Swarm Architecture | Everything You Need to Know [ OverView ]
- What is Dell Boomi? | Everything You Need to Know [ OverView ]
- Cloud Architect Salary in India | All you need to know [ For Freshers and Experience ]
- What Is Multitenancy ? : Characteristics , Features , Benefits | All you need to know [ OverView ]
- What Is the Recommended List of AWS Whitepapers? | Expert’s Top Picks
- OSCP vs CEH | Difference You Should Know
- Openshift vs Kubernetes | Difference You Should Know
- AWS Cloud Practitioner and Required Skills | Expert’s Top Picks
- CRISC Certification and Benefits | A Complete Guide with Best Practices
- Kali vs Parrot | Difference You Should Know
- How to Install Docker on Ubuntu | Comprehensive Guide
- AWS Certification Cost and Types of Exams [ Job & Future ]
- What is the Average AWS Solutions Architect Salary?
- Reasons to Take up A Cloud Computing Certification
- What is Cloud Databases
- What is Cloud Computing Architecture?
- AWS vs Azure vs Google Cloud
- Top AWS Services
- Advantages and Disadvantages of Cloud Computing
- Cloud Computing 2020: An Analysis Of Cisco’s Cloud Index Survey, 2016
- What Are The Fundamental Microsoft Cloud Services That Are In Demand?
- What are the Issues in cloud computing?
- Top Important Cloud Computing Terms
- From Developer to AWS Cloud Specialist – The AWS Certification Learning Paths
- Why and How to Pursue a Career in AWS?
- The Top In-demand cloud skills for 2020
- Edge Computing Vs. Cloud Computing
- Top 10 Reasons to Learn AWS
- Cloud Computing Career Guide
- What does a AWS solution architect do?
- AWS Career Guide
- VMware vSphere best practices
- The AWS Engineer: Job Roles, Salaries And the Career Path
- What Is Microsoft Azure in Cloud Computing?
- How to Become an Azure Developer?
- Citrix Xenserver Vs Vmware vSphere
- Microsoft’s Project Olympus Delivers Cloud Hardware
- The Future of Cloud Computing
- Why Cloud Computing Is Essential to Your Organization?
- Amazon Web Services – WorkMail
- What is AWS?
- AWS Vs OpenStack
- AWS Certification Path
- AWS ElasticSearch
- AWS EC2 Instance Types
- Microsoft Azure Portal
- AWS Vs Azure
- Amazon Web Services WorkSpaces
- What is AWS Management Console?
How to Install Docker on Ubuntu | Comprehensive Guide
Last updated on 27th Oct 2022, Artciles, Blog, Cloud Computing
- In this article you will learn:
- 1.Introduction.
- 2.Installation of Ubuntu on Oracle Virtual Box.
- 3.Ubuntu prerequisites for Docker.
- 4.Installation of Docker on Ubuntu (Method 1).
- 5.Install Docker from the Authoritative Repository (Method 2).
- 6.Uninstallation Method.
- 7.Conclusion.
Introduction:
Docker is a platform that programs the application and all of its dependencies in the field so that the application functions effortlessly. The container enables the application to operate its resources remotely, similar to virtual machines, but in a more transportable manner.
Installation of Ubuntu on Oracle Virtual Box:
Oracle Virtual Box can be utilized if you wish to run Ubuntu 20.04 without having to switch from the Windows operating system.Oracle’s Virtual Box is free and open-source virtualization software. It facilitates the installation of several operating systems on digital computers. It is recommended that the device have a minimum of 4 GB of RAM for optimal performance from the digital running gadget.
Ubuntu prerequisites for Docker:
This academic is intended for persons who are interested in learning about Docker as a field service.System Requirements: Ubuntu 20.04 64-bit working system. (If Linux OS is not always installed, Docker can be run via Virtual Box; PFB the instructions)A user account with sudo permissions.A Docker Hub account used to pull or push images from Hub.The procedures for installing Ubuntu on Oracle Virtual box:
- Navigate to the Oracle Virtual Box website, download the.exe file, and acquire the most recent stable version.
- Upon completion of the digital field download, we will travel to and download the Ubuntu disc image (.iso file) by clicking the download button.
- Once the Ubuntu.iso file download is complete, open the digital field and click “New” at the very top.
- Enter the details of your digital system by specifying its name and type as “Linux” and its version as Ubuntu (sixty four bit).
- Select the memory (RAM) to be allocated to the virtual system, and then click Next. (I have actually chosen 3000 MB).
- After allocating RAM, select Create a digital disc now. This serves as the hard disk of the Linux-based digital gadget. It is the location where the digital device stores its files.
- We must now select the virtual hard disk.
- We can choose either “Dynamically allocated” or “Fixed length” while creating the digital hard disc.
- Finally, we must specify the length of our Ubuntu operating system. The recommended length is 10 GB, although it can be increased if necessary.
- Ubuntu OS is ready to be installed in Virtual Box, but before starting the Virtual system, we must make a few configuration tweaks. Click the garage link beneath the setting.
- Select Empty beneath the Controller IDE. Navigate to the Attributes section and ignore the Optical Drive option.
- Choose the.iso file from the location where it was saved. Once selected, click on OK, and then start the virtual container by clicking on Start in the top menu.
- Select adequate and start the machine.
- Continue with “Install Ubuntu”.
- In the “Updates and other software” section, select “Normal installation” and the two options under “Other options” and continue.
- Select Erase disc under Installation type and deploy Ubuntu.
- Choose your contemporary environment and create your profile. Continue by clicking Continue.
- It will take an extra 10 to 15 minutes to complete the installation.
- Once the installation is complete, restart the digital system.
- We have been executed with a pre-request and may now continue using Ubuntu.

Installation of Docker on Ubuntu (Method 1):
Install Docker Using Ubuntu’s Default Repositories:
- One of the best methods is to install Docker from the default Ubuntu 20.04 repositories; however, it is possible that the default Ubuntu repositories have not been updated to the most recent version of Docker. It arises because, in some cases, Docker does not support that specific Ubuntu version. Therefore, it is possible that the default Ubuntu repositories are no longer current with the most recent version.
- Connect to Virtual Box. Execute “docker” as a command to determine if it was previously installed.
- To install Docker on an Ubuntu system, replace the existing packages. It requires a password. Enter it and allow the system to complete the adjustments.
- Use the following command to install Docker from the default Ubuntu repositories: sudo apt set up docker.io
- To test the attached model, use the docker –model command.
- Since it was noted previously, it has connected the 19.03.8 model of docker, but the current model is 20.04.
Install Docker from the Authoritative Repository (Method 2):
For installing docker on Ubuntu 20.04 with the latest version, we will proceed by enabling the Docker repository, uploading the repository’s GPG key, and finally installing the package:
- To install Docker on Ubuntu, replace the existing list of apps. It requires a password. Enter it and allow the device to complete the upgrade process.
- We wish to install the required software for the HTTPS repository upload.
- Import the GPG key of the repository using the following curl command:
- Install the Docker APT repository on the machine.
- Replace the bundle database with Docker packages once more.
- Finally, Docker deployment using the command below.
- To examine the established model, please see below.
- To begin, enable and check the status of Docker using the command below.
- To examine machine-wide Docker installation data, we utilize the “docker info” tool. This information includes the kernel version, number of bins, and specific images.
Uninstallation Method:
To delete images, containers, volumes, or user-created configuration files, use the following instructions:
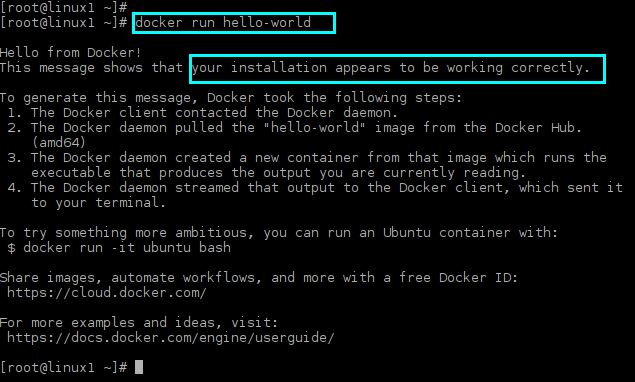
Executing Docker Images and Evaluating the Procedure:
To determine whether you can access and download images from Docker Hub, execute the following command:
In the event that errors are discovered after walking through the Docker run command, you can correct them using the methods below; otherwise, proceed to the next stage of examining the image.
Conclusion:
If you found this Install Docker on Ubuntu blog to be relevant and helpful, you should check out Learnovita’s Docker-Training workshop, where you can learn all the basic and advanced concepts of Docker.