
IBM WebSphere Application Server Tutorial
Last updated on 25th Sep 2020, Blog, IBM, Tutorials
IBM WebSphere Application Server (WAS) for iSeries is an e-business application deployment environment. Built on open-standards technology, it is IBM’s Java-based Web application server that helps you deploy and manage Web applications, ranging from simple Web sites to powerful e-business solutions.
WAS provides runtime interfaces and APIs for server-side Java components, which are based on Sun Microsystems specifications. The following Java components allow you to build complex Web applications, such as e-commerce Web sites:
- Servlets–Java servlets extend Web servers, providing an easy-to-use replacement for Common Gateway Interface (CGI). Basically, servlets are dynamically loaded modules that handle requests from a Web server. They run on the server side within the Java Virtual Machine (JVM) and do not depend on browser compatibility. Servlets can access databases and perform programmatic functions.
- JavaServer Pages (JSPs)–JSPs are used to present data to the end user. JSP tags are used in conjunction with HTML tags to produce dynamic Web pages. The information presented on these pages is retrieved by a servlet.
- Enterprise JavaBeans (EJBs)–EJBs are used to model complex data in a transaction-based environment. There are two types of EJBs: entity beans and session beans. Entity beans can model part or all of a database. They also synchronize with the database so that changes in the DB affect the EJB and vice versa. Session beans model less-persistent data and typically will not survive a server failure. The lifetime of a session bean is that of its client.
- Web services–Web services are self-contained, modular applications that can be described, published, located, and invoked over a network. Web services reflect a new service-oriented approach to programming, based on the idea of building applications by discovering and implementing network-available services or by invoking available applications to accomplish some task.
- JavaMail–The JavaMail APIs model an email system. The APIs provide a platform- and protocol-independent framework to build Java-based email client applications.
- Java Message Service (JMS)–JMS supports message-based applications in the Java programming language, allowing for asynchronous exchange of data and events throughout a network. JMS provides an enterprise messaging API. On the iSeries platform, the only supported messaging product is WebSphere MQ (formerly known as MQSeries).
The WAS security system allows you to control access to WebSphere resources (such as servlets, JSP files, HTML files, and EJBs). The security system also provides the infrastructure that ensures that the security choices you have made are enforced.
WAS also includes APIs for manipulating Extensible Markup Language (XML) documents and utilities for administering the product. You can add these XML APIs to your server-side Java components to generate, validate, parse, and present XML documents. The utilities include a Java-based administrative console, a Web-based console, a command-line interface, and a function that allows you to import and export administrative data as XML documents.
WebSphere Development Environment
There are a variety of tools available to use, in conjunction with WAS, for developing server-side Java components. The table below identifies the WebSphere Development Studio for iSeries product levels that you can use to develop applications for the corresponding version of WAS.
| WAS Version | WebSphere Development Studio for iSeries Product Packages | ||
|---|---|---|---|
| WAS 3.5 | WebSphere Development Tools for iSeries V5.1 | ||
| WAS 4.0 | WebSphere Development Studio for iSeries V4.0 | WebSphere Development Studio Client for iSeries V4.0 | |
| WAS 5.0 | WebSphere Development Studio Client for iSeries V5.0 | WebSphere Development Studio Client Advanced Edition for iSeries V5.0 |
IBM WebSphere Development Studio for iSeries V4.0 is an application development package containing all of the key iSeries development tools (both host and workstation components). With this package you can do the following:
- Use the IBM WebFacing Tool to convert existing 5250 interfaces to Web interfaces with minimal changes to the host application.
- Use the generated default servlets, Beans, and database-access logic to customize your code or create new business logic with Java development tools.
- Write business logic for new e-business applications in ILE RPG or ILE COBOL with interoperability enhancements for Java.
WebSphere Development Tools for iSeries V5.1 is the predecessor to IBM WebSphere Development Studio Client for iSeries V4.0 (Development Studio Client). It consolidates key iSeries workstation development tools into a single package and is included with WebSphere Development Studio for iSeries.
IBM WebSphere Development Studio Client for iSeries V4.0 consolidates the key workstation development tools for traditional and e-business application development to the Eclipse-based Integrated Development Environment (IDE), WebSphere Studio Workbench. Version 5.0 delivers improved infrastructure for tools associated with the Eclipse Workbench V2. The new IDE provides tool integration and interoperability. Many key iSeries tool vendors have integrated their solutions into this new IDE. You get these things with this package:
- Java development tools
- A Web development environment
- XML tools
- Web services
- Database support
- Remote System Explorer
- IBM WebFacing Tool
- IBM CoOperative Development Environment (CODE)
- IBM VisualAge RPG
IBM WebSphere Development Studio Client Advanced Edition for iSeries V5.0 is the next generation of advanced workstation development tools to create iSeries e-business applications that leverage the execution capabilities of WAS V5.0. It consolidates the standard set of application tools for iSeries server and e-business development into one comprehensive and integrated iSeries product.
Both the Standard client and the Advanced client include the following:
- The ability to plug in third-party tools based on the Eclipse platform to extend the Remote System Explorer and iSeries projects
- Deployment to IBM WAS for iSeries, V5.0 Advanced and Express
- Enhanced style sheet for the IBM WebFacing Tool
- Additional PDM functions in Remote System Explorer
- WebFacing Tool customization with Web development tools for iSeries, including integration with Data and Flow
- Web Services client test environment
- New distributed debugger, so you can debug and run Java programs exported to the iSeries host using the iSeries Projects perspective
- The Profiling perspective to trace and determine performance issues for iSeries Java programs
- Updates to Page Designer
- The Data perspective
- Documentation in the Help perspective that now opens in a separate window so that you can resize and reposition it to appear beside the user interface while you work
In addition, Advanced includes these:
- Support for J2EE V1.3, EJB V2.0, Servlets V2.3, and JSP 1.2 specification
- Concurrent support for WAS V4.0 (J2EE 1.2) and WAS V5.0 (J2EE 1.3)
- EJB-to-RDB mapping that provides the model, runtime environment, and interface for editing the mapping between EJBs and relational database tables
- Support for EJB Query language, Container Managed Persistence (CMP 2.0), and message-driven JavaBeans
- Editors for deployment descriptors (ejb-jar.xml and application.xml)
- A built-in test environment where you can test J2EE artifacts and configure other local or remote servers for integrated testing and debugging of J2EE applications, providing support for Apache Tomcat and the WAS V4.0 and V5.0 runtime environments
- A new iFrame portlet that provides an interface to wrap an existing Web application for use on a portal
- Custom tags and runtime extensions for the WebFacing Tool
- Support for viewing and printing spooled files
- Struts-compliant code generated by the WebFacing Tool conversion process
- Support for the iRAD Struts builder and Struts development tools
To program server-side Java components for WAS, you should be familiar with Java programming, server-side Java programming, and object-oriented design. Familiarity with database programming, Hypertext Transfer Protocol (HTTP), HTTP server configuration, and HTML page creation is also helpful.
Subscribe For Free Demo
Error: Contact form not found.
WebSphere Architecture Overview
The next view to be presented is that of the WebSphere Application Server product architecture. In a nutshell, the WebSphere Application Server product is an implementation of the J2EE set of specifications with some added functionality only found in this IBM product. Therefore, as opposed to the previous section, this view is unique to WebSphere.
Consequently, this section briefly presents the salient components of the J2EE technologies and their relation to each other from the functional and architectural point of view. Furthermore, emphasis will be placed on aspects that affect or may be affected by security considerations.
WebSphere Application Server simplified architecture
The following diagram depicts a simplified version of the WebSphere Application Server architecture. It presents the application server in the context of a WebSphere node. The application server is the implementation of a JVM. The JVM is made up of various components and at the same time, the JVM interacts with several external components that make up the WebSphere node. So, the diagram presents two major components of a WebSphere environment. On the one hand, the JVM is represented by the parallelogram (purple ) labeled Application Server. On the other hand, a larger parallelogram (teal) labeled node represents the WebSphere node.
Keep in mind that the simplification to the architecture has been done to concentrate on how it relates to application hosting in a secure environment.
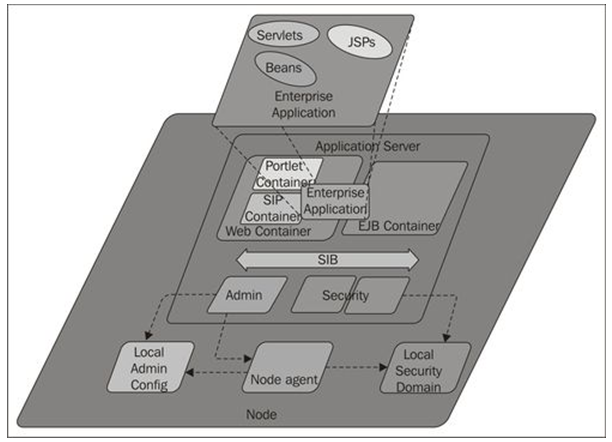
WebSphere node component
The node component of this simplified architecture occupies itself with administrative and thus security aspects between the WebSphere environment and the infrastructure. In the previous diagram, three components can be observed. The first component is the node agent; represented by the small parallelogram labeled Node agent. Notice that the node agent in itself is implemented by a specialized JVM, containing the components required to efficiently perform administrative tasks, which will include security related tasks. The node agent will interact with WebSphere environment administrative components externals to the node (and not included in the diagram). The chief among those external WebSphere components is the Deployment Manager. One of the responsibilities of the node agent as it pertains to the node and thus, to the application server JVM, is to maintain updated and valid copies of the node configuration repository. Such a repository may include information dealing with security domain information, either inherited from the WebSphere cell global security or customized for the node, represented by the parallelogram (black) labeled Local Security Domain.
WebSphere JVM component
The second major component of this simplified architecture is the implementation of a JVM. It is represented in the diagram by a large parallelogram (purple) labeled Application Server. A WebSphere JVM is made of, among other components, several containers such as the Web and EJB containers. Containers, on top of hosting instantiations of Java classes such as servlets and beans, that is, offering the runtime environment for those classes to execute, deal with security aspects of the execution. For instance, a Web Container may, given the appropriate settings, oversee that hosted resources only execute if the principal making the request has the required proof that entitles such principal of receiving the result of said request.
In addition to containers, a WebSphere JVM may also instantiate a service integration bus (SIB) if a hosted application makes use of the JVM messaging engine. In the diagram, the arrow (brown) labeled SIB represents the bus. Finally, the other JVM components included in this simplified architecture are the administrative component and the JVM security mechanism. This mechanism will interact with the containers to ensure that security is propagated to the classes executing in the said containers.
From this discussion, it can be extrapolated that each vendor has certain leniency as to the actual implementation of Sun’s JVM. IBM is not an exception to this practice. If you wish to find out more about the particulars of the IBM JVM implementation for WebSphere please refer to the Information Center article “Specifications and API” (HTTP://PUBLIB.BOULDER.IBM.COM/INFOCENTER/WASINFO/V7R0/INDEX.JSP?TOPIC=/COM.IBM.WEBSPHERE.ND.DOC/INFO/AE/AE/ROVR_SPECS.HTML). In that article you will find out which Java specifications and application programming interfaces are implemented as well as the version each implements. This information is presented in a neat table that helps you compare each specification and API version to earlier editions of the WebSphere Application Server product (that is, 5.1, 6.0 and 6.1).
Using the WebSphere architecture view
The main benefit of analyzing your WebSphere environment using this view is that it will provide you with the vocabulary to better understand the needs of application developers and architects and, equally important, to communicate back to them the special features the WebSphere environment may offer them as well as any possible restrictions imposed by security or other infrastructure characteristics.
An additional benefit provided by this view is that it offers alternatives to troubleshooting application related issues, as you will become more familiar with which JVM components are being used as the runtime environment for a given enterprise application.
WebSphere technology stack view
Finally, the third view covered in this chapter is that of the WebSphere environment technology stack. In other words, this view presents which technologies from the operating system to the WebSphere Application product are involved, highlighting the aspects related to security. This view is broken down into three categories, which are described in the following paragraphs. The stack and its categories are depicted in the diagram shown in the next sub-section.
OS platform security
At the bottom of the stack there are the primitive technologies. The term primitive in this context does not carry the meaning of backward, but rather that of foundation technologies. In the following diagram, the rectangular (bright green) area located at the bottom of the stack represents the OS platform layer.
In this layer, the presence of the underlying operating system can be observed. In the end, it is the responsibility of the OS to provide the low-level resources needed by the WebSphere environment. Furthermore, it is also its responsibility to enforce any security policies required on such resources. Two of the more prominent OS components as they relate to a WebSphere environment are the file system and the networking infrastructure. Both the file systems and the networking infrastructure are handlers of special resources.
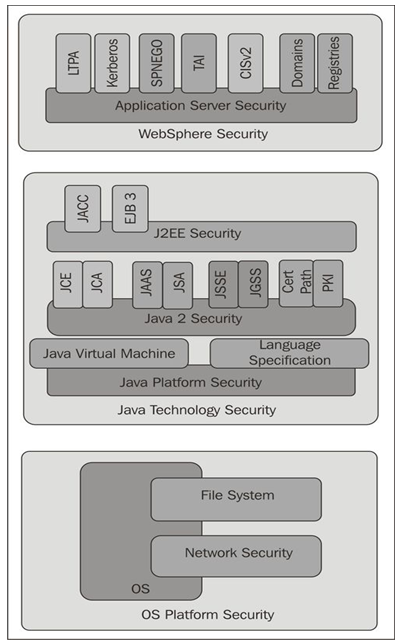
Java technology security
The next layer in this architecture is that of the Java technology. This layer comprehends the core Java technologies and APIs used within the WebSphere environment. In the previous diagram, the layer is represented by the rectangle (teal) in the middle of the stack.
The layer is further broken down into three distinct groups among the Java stack. At the bottom sit the foundational bricks. The Java Virtual Machine and the Java Language Specification. The JVM is the enabler whereas the Language Specification lays down basic and general rules that must obeyed by the entities that will populate the JVM.
The middle brick of this layer is that of Java 2 Security. It includes more sophisticated rules that will enable entities in the JVM to achieve more complex behaviors in harmony with the rest of the inhabitants.
Finally, at the top of this layer there is the J2EE Security brick. It brings additional enablers to the JVM and rules that must be followed by the entities that populate these remote areas of the Java galaxy.
WebSphere security
At the top of the technology stack, sits the WebSphere security layer. It builds up on the previous layers and brings on board open and proprietary security bricks to supplement the Java foundation.
In other words, the WebSphere high-level security layer offers conduits using a number of technologies such as LTPA, Kerberos, and so on, that make the WebSphere environment more robust. This layer is represented in the previous diagram by the rectangle (maroon) located at the top.
In general, the number of technologies supported by this layer as well as the implementation version of such technologies is one of the aspects that make up each new WebSphere release.
When using WebSphere Application Server Community Edition there may be several XML files that you need to create as part of deploying an application. WAS-CE has the concept of “deployment plans” which describe how to deploy a Java Enterprise application to WAS-CE. Since these files may be complex any errors in syntax can cause wasted time and effort trying to deploy an application to WAS-CE.
WAS-CE is a combination of several open source projects into a Java EE 5 compatible Java Application Server. The most notable project included in WebSphere Community Edition is the Apache Geronimo Project. WebSphere Community Edition is FREE to download and use, even in production systems. IBM provides several different support options, including fee-based support options.
Install Java
The first step to configuring an environment for WAS-CE is to install a Java environment. This section will provide steps to install the IBM Java installation provided with the WAS-CE download. You would follow similar instructions for other Java installations.
After starting the installation program and being presented with the normal screens for license acceptance and installation location, the IBM Java installation will present an option for which type of installation to perform. For this demonstration we will select the “Custom” installation to show and discuss various options.
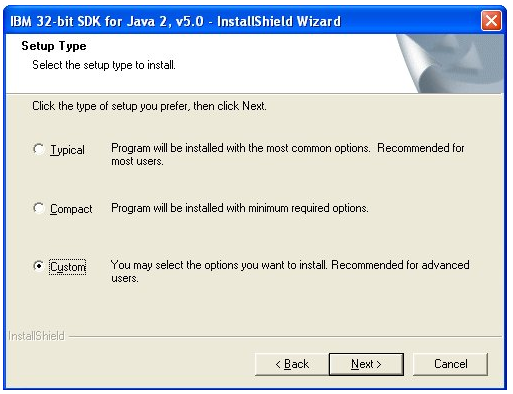
One feature that you should leave selected is the installation of the “SDK”. This will provide various tools that WAS-CE may need to run tools and commands. Installing source code is optional.
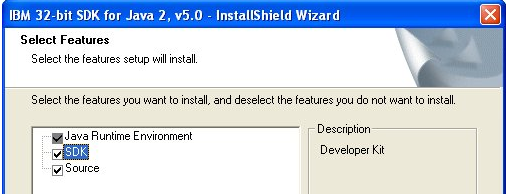
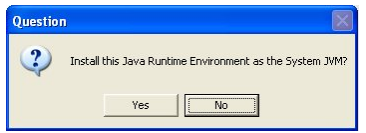
The next option of interest is the option to install a “System JVM”. This would configure your system to automatically recognize and run Java programs using this Java installation. We will select “No” for this option and setup the system to recognize Java commands in a way that has less impact on the system and other Java programs.
After configuring these options you can finish running the installation program by clicking through the remaining screens. If you are presented with a screen asking about browser plug-ins you may again wish to choose these options based on whether your system already has Java installed and if this version will conflict with any Java Applets that run in your web browser.
Install WebSphere Community Edition
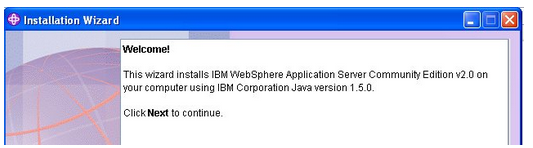
Now that you have a Java installation we will install the WebSphere Application Server Community Edition package.
The size of the setup program may be different depending on what type of download you used but the name should always be similar, something like ‘wasce_setup-2.0.0.1-win.exe’.
When you start the setup program it will search for a Java version to install the server with. Check the following screen to be sure the correct version of Java is found that you wish to run with WAS-CE.
Note: If the installation does not find a Java installation or finds the wrong one you may need to change the value of your Windows PATH environment variable. If you used the default directory for the IBM JVM you would add something like ‘C:\Program Files\IBM\Java50\bin’ to the PATH. You can run a ‘java -version’ command from a command prompt to see the default Java installation that is located on the PATH.
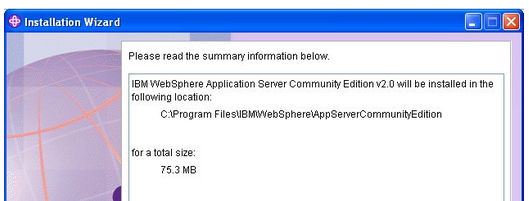
Go through the normal screens of license acceptance and installation location until you come to the installation summary screen. Press the Install button to install WAS-CE.
Press the Finish button when the installation is complete.
Check WAS-CE Installation
Before configuring anything else it will be good to check that you can start and stop the WAS-CE server and troubleshoot any installation problems.
- From the Windows Start menu select ‘Programs -> IBM WebSphere -> Application Server Community Edition -> Start the server’.
A separate command prompt window should open and begin starting the server. If you get a prompt from a firewall application select to ‘unblock’ the server. Once the server is finished starting you should see the output shown below.
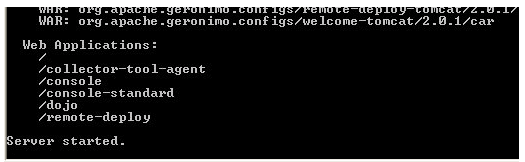
Leave this command prompt open as it is running the server.
These core tutorials will help you to learn
the fundamentals of IBM WebSphere.
- From the Windows Start menu select ‘Programs -> IBM WebSphere -> Application Server Community Edition -> Administrative console’.
At this point you will most likely get a prompt about the “certificate” of the server. This is because the server is trying to establish a secure connection but you do not recognize the validity of the certificate. Go ahead and accept the certificate to proceed to the administrative console.
Login to the administrative console using the default username of ‘system’ and default password of ‘manager’. You should be presented with the main page of the administrative console as shown below.
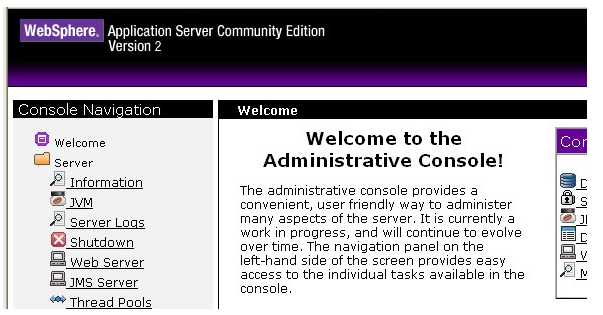
Once you have verified you can access the administrative console close the web browser.
From the Windows Start menu select ‘Programs -> IBM WebSphere -> Application Server Community Edition -> Stop the server’. Enter the username of ‘system’ and the password of ‘manager’ to shutdown the server. The command prompt running the server should close automatically after several seconds.
Install and Configure Eclipse WTP
In this section you will install and configure your Eclipse WTP environment. You will setup a shortcut that allows you to avoid altering the configuration of things like the PATH variable just to run Eclipse.
If you downloaded the “All-in One” Eclipse WTP bundle you have a Zip file with all of the files required for Eclipse and the Eclipse WTP extensions. If you downloaded a different file or have a pre-existing installation of Eclipse you would have to follow other instructions to configure this.
To install the “All-in-One” package all you have to do is unzip the downloaded file to any location. This can be any location you desire although it is generally best to stay away from long file paths to the root of the Eclipse directory to avoid long path names within the subdirectories of Eclipse.
In this article we will extract Eclipse directly to the C: drive. This will create the ‘C:\eclipse’ directory which is the root of the Eclipse installation.
To run Eclipse all you have to do is run the ‘eclipse.exe’ application on a system configured to run Java programs. Since we avoided installing a “System JVM” we will create a shortcut with an option to point Eclipse to the Java installation, a setup that has much less potential for conflict with other programs.
Open a Windows Explorer window and navigate to the directory where you unzipped Eclipse.
Right click on the ‘eclipse.exe’ application and select ‘Send To -> Desktop (create shortcut)’. Minimize all the windows so you can see the shortcut on the Desktop.
Right click on the new shortcut and select ‘Properties’.
On the shortcut properties add a space after the current target and place the following option on the end. This will be slightly different depending on your Java installation folder.
- -vm “C:\Program Files\IBM\Java50\bin\javaw.exe”
The final value of the ‘Target’ property should be something like:
- C:\eclipse\eclipse.exe -vm “C:\Program Files\IBM\Java50\bin\javaw.exe”
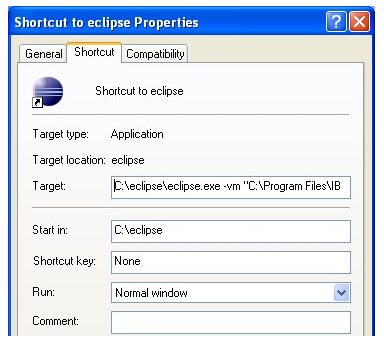
You can also go to the ‘General’ tab and rename the shortcut if you want. When you settings appear as above press the OK button to accept the properties.
Update Eclipse WTP with WAS-CE Server Adapter
If you will be developing applications using Eclipse it will be useful to be able to easily deploy and test these applications on the WAS-CE server. IBM provides an Eclipse plug-in, called the WAS-CE “Server adapter” that can help you do this. This section will show you how to install and configure this adapter to connect Eclipse and WAS-CE.
Double-click on the shortcut you configured in the last section to start Eclipse WTP.
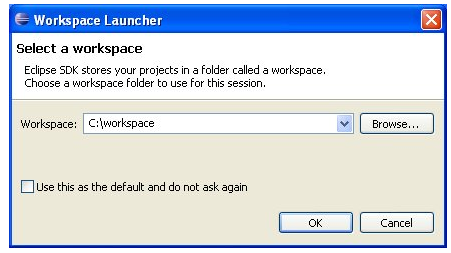
When a dialog appears asking for a workspace enter a directory that you want to use for a workspace and click the OK button.
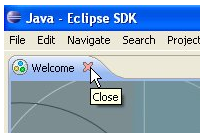
Once Eclipse opens close the Welcome screen by clicking the ‘X’ in the tab near the top left.
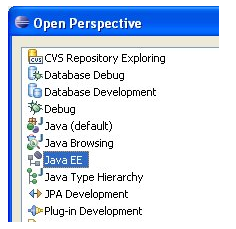
- Select ‘Window -> Open Perspective -> Other…’
On the “Open Perspective” dialog select Java EE and press the OK button.
Along the bottom group of tabbed views, select the tab for Servers.

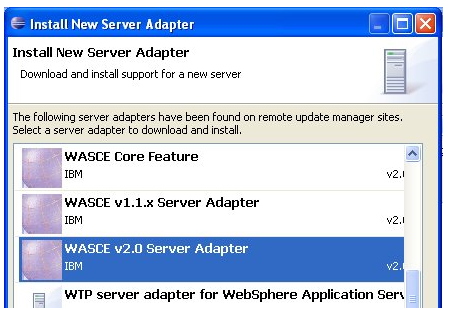
Wait a minute while the list is populated and then select “WASCE v2.0 Server Adapter” from the list and click the Next button.
Note: If you need to configure proxy information to connect to the internet to download the WAS-CE server adapter you can do this by selecting ‘Window -> Preferences’. Go to the ‘General -> Network Connections’ section to enter information on how to connect using your proxy server.
Accept the license terms and press the Finish button. Confirm that you wish to download and install the WASCE v2.0 server adapter.
After several minutes of downloading and installing the update Eclipse will restart. Enter the location of the workspace if needed.
You should still see the ‘Servers’ view in the ‘Java EE’ perspective. Right-click in the open area of the Servers view and select ‘New -> Server’.
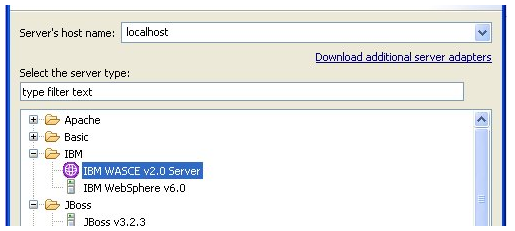
Expand the ‘IBM’ group and select the ‘IBM WASCE v2.0 Server’ option. Press the Next button.
On the next screen use the Browse button to find the installation directory of WAS-CE. If you used the default installation directory this would be:
- C:\Program Files\IBM\WebSphere\AppServerCommunityEdition
Click the Next button once the installation directory is noted.
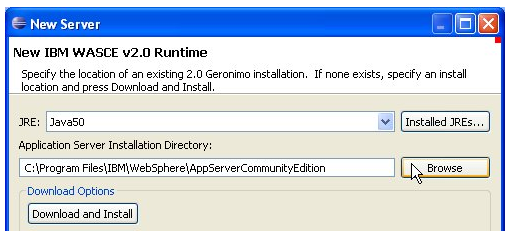
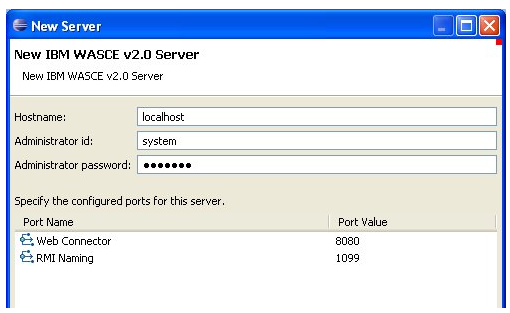
On the next screen you can change some of the details for the server configuration. Since we used the standard configuration these details are fine and you can press the Next button.
The final screen can be used to deploy projects to the server. Since you do not have any if you use a new workspace you can simply click the Finish button to create the server definition.
Now that your server definition has been added to the Servers view you can use the toolbar buttons of the view to start/stop the server.

Note: The first time you start the server you may need to “unblock” the server process if a firewall is active.
Once you start the server various messages will appear in the Console view.
Once the server is started you can right click the server in the Servers view and select ‘Launch WASCE Console’ to open the administrative console in a browser inside of Eclipse.
If you need to change the properties of the server, like the username and password or ports, you can right click the server and select Open to open an editor to change the server definition.
Using the technology stack view
One of the main benefits of the technology stack view is that it helps WebSphere practitioners involved in various roles to map the various technologies included in this stack to the functional blocks that make up the other two views. Some practitioners will benefit by selecting the most appropriate subset among the classes offered by the WebSphere environment to implement a required functionality. Other practitioners will benefit by integrating into the WebSphere environment the best infrastructure component that will help to enable a piece of functionality required by a hosted application.