
- Microsoft Excel | A Complete Beginners Guide | REAL-TIME Examples
- What is Ms Excel Ribbon?
- Why You Should Do Microsoft Project Certification?
- Hidden Features in MS Excel 2013
- How to Become a Certified Microsoft Excel Professional
- Tips to Improve Your Basic Microsoft Excel Skills
- Microsoft Azure Certification Path

Microsoft Excel | A Complete Beginners Guide | REAL-TIME Examples
Last updated on 28th Jan 2023, Artciles, Blog, Microsoft
- In this article you will get
- Introduction
- How to use the worksheet?
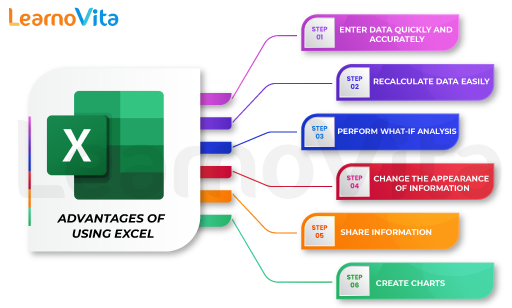
- Advantages
- Disadvantages
- Installation
- Publish
Introduction
When you open an Excel worksheet, you’re presented with the Excel window. You class your data into the window and you use the window to tell Excel what to do. In this section, I’ll explain the corridor of the Excel window.A Quick Access Toolbar In the upper- left corner of the window is the Quick Access toolbar, occasionally pertained to as the QAT. The Quick Access Toolbar provides commands you constantly use.
As you open fresh new workbooks, Excel names them successionally. Use it to display the following menu options bus- hide Ribbon, Show Tabs, and Show Tabs and Commands. To learn further about these options, see the section The Excel Ribbon.To restore Excel, click the Excel icon on the Windows Taskbar.FOR Restore Down The Restore Down button is located next to the Minimize button.
It closes the active workbook. When you click the Close button, if you haven’t preliminarily saved your workbook or if you have made changes to your workbook since you last saved, a dialog box opens.However, the Close button also closes Excel, If the workbook you’re closing is the only workbook open.
To learn further about the Ribbon, see the section The ExcelRibbon.I Formula Bar Optionally, the Formula Bar is set up below the Ribbon. Use the Formula Bar to enter and edit data.However, follow the way listed then:
- If your formula bar isn’t visible.
- Display the formula bar.
- Choose the view tab.
- Click the formula bar in the show group.
- Excel displays the formula bar.
To move over and down your worksheet, click and drag the icon on the perpendicular scroll bar over and down.Status Bar The Status bar appears at the veritably nethermost of the window and provides information similar as the sum, the average, and the count of named figures. You can change what displays on the Status bar by right- clicking on the Status bar and opting the options you want from the Customize Status Bar menu.
You click a named menu item to unselect it.This is where you enter your data. Each worksheet contains columns and rows. The columns are scribbled starting with A to Z and then continuing wif AA, AB, AC, and so on. The rows are numbered starting wif one. Only your computer memory and your system coffers limit the number of columns and rows you can have in a worksheet.
How to use the worksheet?
M Cells Worksheets are divided into cells. You relate to cells by their cell address.Dragging the slider to the left zooms out, makes your workbook lower, and allows you to see further of your workbook. Dragging the slider to the right thrums in, makes your workbook larger, and reduces the quantum of your workbook you can see. The Zoom slider appears on the Status bar if Zoom Slider is named on the Status bar menu. The chance of drone appears to the right of the drone slider, if Zoom is named on the Status bar menu.
Advantages
1.Transferred through emails:
Excel can be transferred through dispatch and viewed by utmost smartphones which makes it more accessible.
2.Part of Microsoft office:
Excel is a part of the Microsoft office which comes with the utmost PC, so there’s no need to buy or install it.
3.An All in one program:
Excel is an each in one programme and doesn’t need the addition of fiscal subsets.
4.Vacuity of training programs and training courses:
There’s training programs and indeed training courses to make druggies more familiar with Excel.
5.Secure:
Excel lines can be word defended for redundant security. A stoner can produce a word through Visual Basic programming or directly within the Excel train.( 1)
6.Easy connection to OLAP:
Excel is able to connect directly to OLAP databases and can be integrated in Pivot Tables.
Disadvantages
1.Contagions:
Contagions can be attached to an Excel train through macros. Macros are mini programs that are written into an Excel spread distance.
2.Slow prosecution:
Using only one train can make the train size veritably big and as a result the program might run sluggishly.
3.Loss of data:
So you might have to break it into lower lines, by doing so there is an increased threat in Excel data being lost.
4.Hard to use:
Although there are training programs, it’s still hard to use and some druggies might not get the hang of it.
Installation
Removing old:
- Before starting the download of Microsoft office professional plus 2013, you must uninstall any old or trial performances you may still have installed on your machine. Remove the following operations.
- Old or trial performances of Microsoft Office Professional Plus 2013.
- Comity Pack for Office 2010.
- Any new performances that you have tried to download and install unsuccessfully.
To remove uninstall an operation:
- Go to the control panel.
- Add/ Remove Programs.
- Uninstall a program.
- Detect the operation you want to remove.
- Double- click the operation name.
Follow the instructions for removing the operation.
Downloading pending windows updates:
Your current operating system( zilches) must be up- to- date with Windows Updates before you can install the new software.
To download pending Windows updates:
- Click the launch button.
- Click all programs.
- Click the windows update link.
- Download any pending updates.
32- Bit Versus 64- Bit:
Both 32- bit and 64- bit options are available, but we recommend installing the 32- bit interpretation anyhow of your zilches because the 32- bit option has smaller comity issues.
Installation instructions:
Produce a new workbook:
Excel documents are called workbooks. Each workbook contains one or further wastes, generally called spreadsheets. You can add as numerous wastes as you want to a workbook, or you can produce new workbooks to keep your data separate.When you start excel for the first time( see the ensuing picture) you can open the workbook over then or start with a template.
Input your data:
- Click an empty cell.
- For illustration, cell B2 on the below distance.
- Type textbook or a number in the cell.
- Press Enter or Tab to move to the coming cell.
- Note Cells are substantiated by their position in the row and column on the distance.
Produce a simple formula:
Adding figures is just one of the effects you can do, but Excel can do other arithmetic formulas too. Then are some simple formulas to add, abate, multiply or divide your figures.
- Move the mouse in a cell and type an equal sign( =) .
- Type a combination of figures and computation drivers, like the else sign() for addition, the disadvantage sign(-) for deduction, the asterisk( *) for addition, or the forward rent(/) for the division.
- For illustration = ( 6 6 * 2)/ 3
- To execute the below formula Press Enter.
- Note to stay on the active cell Press Ctrl Enter.
Apply a number format:
To distinguish between different types of figures, add a format, like currency, probabilities, or dates.
- Select the cells that have figures you want to format.
- Click Home tab –> General.
- Pick a number format.
- To write a bit number, select “ bit ”. There’s a sample worksheet with some bit numbers.
Add your data use AutoSum:
- When you ’ve entered figures in your distance, you can add them up to use a fast way that’s AutoSum.
- AutoSum adds up the figures and shows the result in the cell you named.
- Press Enter to get the desired result.
Put your data in a table:
- You can store a huge quantum of data in a table.
- That lets you snappily filter or sort your data for starters.
- Select your data by clicking the first cell and dragging to the cell in your data.
- To use the keyboard, hold down Shift while you press the arrow keys to elect your data.
- After clicking Quick Analysis we get the following menu and also click on the table button.
- To filter data, uncheck the Select All box to clear all check marks, and also check the boxes of the data you want to show in your table.
- To sort the data, click kind A to Z or kind Z toA.
- Show totals for your figures.
- Select the cells which contain figures which you want to add or count.
- Click the Quick Analysis button in the right- nethermost corner of the selection area.
- Also click the Total button or move your cursor across the Total button to see the computation results for the data.
Add meaning to your data:
- Select the data you want for your assaying.
- Click the Quick Analysis button image that appears in the right- nethermost corner of your selection.
- Now pick a color from color scale and click Sparklines and move the mouse pointer on the options and get an instant exercise, shown below.
Show your data in a map:
- You can use your data to convert into a map by using Quick Analysis tool for better visual donation in just a few clicks.
- Click on Quick Analysis tool also click on Chart and move your mouse pointer on the recommended map and see which bone is your choice.
- Click on your choice and the map will appear in your data distance as shown below.
Save:
To save a train you can use the save button from the Quick Access Toolbar or press CtrlS. You can save the train in another way. Click train —> Save and the following screen will appear.If you’re saving the workbook for the first time the Save As window will appear and you can choose the delete showing a brochure for saving your workbook else you can browse the brochure where you want to save as shown in the below picture. also in the train name box type the name of the train and click on Save button.
Publish
- Click the train –> also click publish or press Ctrl P from the keyboard the exercise window will appear.
- Publish exercise always appears in black and white format, it depends on the printer setting.
- Runner setting and printing setting can be changed by using other setting options.
- Then click publish to publish the runner.
Once you have used the below- mentioned features to organize your data, you can partake in your work with associates and musketeers in real time, which is yet another fascinating aspect of MS Excel 2013. Using the Excel WebApp, lines can be participated and worked upon by others through SkyDrive. Note that if 2 people try to perform the same action on one train contemporaneously, you can witness some problems.