
- TypeScript Vs JavaScript Tutorial | Learn the Difference
- Web Components in Ionic Framework Tutorial – A Perfect Guide to Refer
- TypeScript Tutorial | A Step-By-Step Guide to Learn
- Creating and Publishing an Android Library | A Concise Tutorial
- How to Link a Style Sheet (CSS) File to Your HTML File | A Defined Tutorial
- HTML Video Tag Tutorial | Learn to Embed Video in Your HTML
- How To Create a Header – HTML Tutorial | The Ultimate Guide
- HTML Lists Tag Tutorial : Step-by-Step Guide for Beginners
- HTML Entity Tutorial | Learn Complete list of HTML Entities
- HTML Input Tutorial | Learn the Forms & Input Tags
- HTML Textbox Tutorial | A Comprehensive Guide
- HTML vs HTML5 Tutorial | Know the Difference
- Know the Difference between HTML vs CSS Tutorial | Complete Guide [STEP-IN]
- Create a Top Navigation Bar using HTML Tutorial | Learning Path – Complete Guide
- HTML – Image Tag Tutorial | The Ultimate Guide for Beginners
- HTML iframe Tutorial | Learn All about Tags and Element
- HTML Semantics – Free Tutorial to learn HTML
- HTML Mailto Attribute Tutorial | A Complete Guide
- Angular Tutorial | A Complete Guide To HTTP & Routing In Angular
- Introduction to HTML Line Breaks Tutorial | Complete Guide
- How to Redirect a Web Page in HTML | Learn in 1 Day FREE Tutorial
- Introduction To HTML Games | Build a Game with HTML Tutorial
- How to Create a Dropdown in Html | The Complete Guide Tutorial For Free
- Creating HTML Table Tutorial | Ultimate Guide to Learn
- How to Create Image Slider in HTML Tutorial | Ultimate Guide
- HTML Symbols Tutorial | For Beginners Learn in 1 Day FREE
- HTML Canvas Tutorial – Learn the Shape, Circle, Gradients
- A Complete Guide | UI Developer (Skills & Resources)
- jQuery Tutorial
- Advanced JavaScript Tutorial
- Angular Js Dom Tutorial
- Angular 7 Tutorial
- AngularJS Installation
- JavaScript Tutorial
- React Redux Tutorial
- AngularJS – Custom Directives Tutorial
- REACT JS Tutorial
- ANGULAR Tutorial
- Augmented Reality And Virtual Reality Tutorial
- Full Stack Development Tutorial
- ANGULAR 8 Tutorial

React Redux Tutorial
Last updated on 26th Sep 2020, Blog, Tutorials, Website Development
What is Redux?
Redux is a state container for JavaScript applications. Normally with React, you manage state at a component level, and pass state around via props. With Redux, the entire state of your application is managed in one immutable object. Every update to the Redux state results in a copy of sections of the state, plus the new change.
Why should I use Redux?
- Easily manage global state – access or update any part of the state from any Redux-connected component
- Easily keep track of changes with Redux DevTools – any action or state change is tracked and easy to follow with Redux. The fact that the entire state of the application is tracked with each change means you can easily do time-travel debugging to move back and forth between changes.
The downside to Redux is that there’s a lot of initial boilerplate to set up and maintain (especially if you use plain Redux without Redux Toolkit). A smaller application may not need Redux and may instead benefit from simply using the Context API for global state needs.
In my personal experience, I set up an application with Context alone, and later needed to convert everything over to Redux to make it more maintainable and organized.
Learning Redux
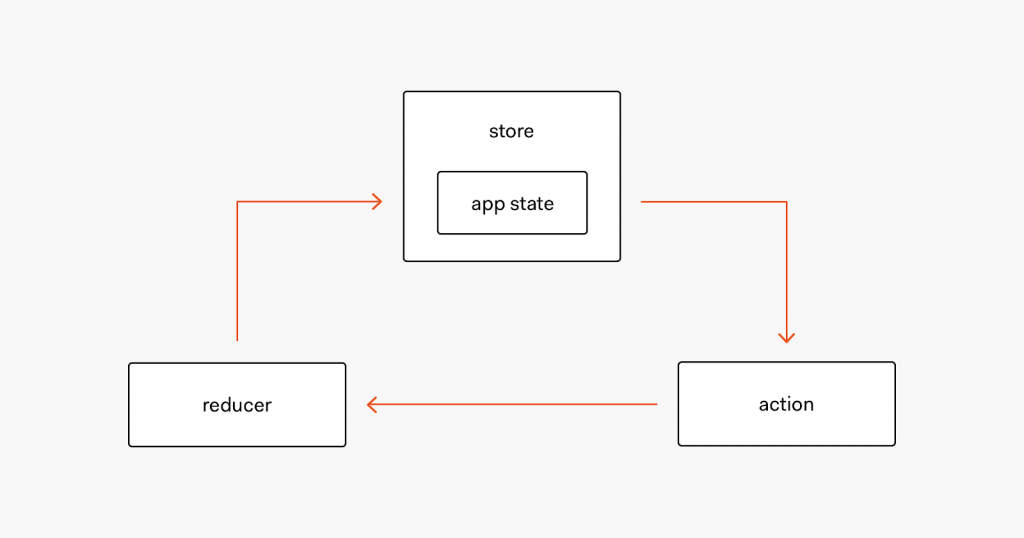
To learn how to properly use Redux, we have to understand three basic concepts of this library. The first one is called store. When using Redux to manage our state, we let it keep an updated version of this state in the store. This is the main purpose of this piece of Redux. The store exists to hold (store) the current state of our data and to become the single source of truth.
The second concept is called reducer. Reducer is nothing but a pure function that gets our app’s current state and generates a new state based on an action. Actions are the third concept that we are interested in. To define an action to be applied to our state, we simply create an object with a type and any arbitrary number ( 0..N) of properties.
For example, we can have as the current state a simple JavaScript object that contains a person’s name. To change this state (object), we use a reducer that, based on an action, updates the person with arbitrary data. The following code snippet illustrates these concepts.
- const BIRTHDAY_UPDATE = ‘BIRTHDAY_UPDATE’;
- const initialState = {name: ‘Bruno Krebs’};
- function reducer(state, action) {
- const { birthday } = action;
- switch (action.type) {
- case BIRTHDAY_UPDATE:
- return {
- …state,
- birthday
- };
- default:
- return state;
- }
- }
- const updateAction = {
- type: BIRTHDAY_UPDATE,
- birthday: new Date(1984, 10, 20)
- };
- const newState = reducer(initialState, updateAction);
- console.assert(initialState.birthday === undefined, ‘Initial state must not be changed’);
- console.assert(
- newState.birthday !== undefined &&
- newState.birthday.getTime() === new Date(1984, 10, 20).getTime(),
- ‘New state must contain 1984/10/20 as the birthday’
- );
Note that the spread operator (…state) used in the example above is a feature recently introduced to JavaScript and might not be available on all environments. For example, it is not available on Node.js prior to version 8.2.1. Therefore, we must have a Node.js newer than 8.2.1 or we need to run this in a browser compatible with this feature.
In the snippet exhibited, we can see that we use the initialState to generate a newState. This new state is the product of calling the reducer function with the updateAction object and the initialState. After passing the state and the action to the reducer, we get a new state where we can still find the name of the person, and the new birthday property correctly applied.
Although simple, the code snippet used above shows another concept that is quite important when using Redux. The state does not change. What happens is that we have to generate a new state (or return the same) when using Redux. One pro of creating new states instead of updating the current one is that, by following this paradigm, we enable traceability in our application’s state. By enabling traceability, we also enable other great features like the possibility to time travel.
After understanding these three concepts (well, four with state immutability), we are ready to start using Redux in practice. In the following sections, we are going to create a small Node.js script that uses Redux to manage state.
Subscribe For Free Demo
Error: Contact form not found.
Using Redux
You might have noticed that we haven’t used Redux in the previous section. A great characteristic of Redux is that it relies on simple concepts and structures. As we will see, introducing Redux to manage states in apps is easy. The Redux library itself is quite small, has great performance, and is really intuitive.
To keep things organized, let’s create a new Node.js project, and add actions and reducers to it. In a terminal, let’s issue the following commands:
- create a dir to our project
- mkdir redux-node
- change working directory to it
- cd redux-node
- initialize the directory as a NPM project
- npm init -y
- create the source folder
- mkdir src
- create files for the main app, actions, and reducers
- touch src/index.js src/actions.js src/reducers.js
These commands will give us a brand new project with the basic structure that we will need. To make our lives easier, and before proceeding with the next steps, let’s open this project on an IDE (like WebStorm or Visual Studio Code).
Creating Redux Actions
Now, let’s open the src/actions.js file and add the following action creators and action types to it:
- // action types
- export const ADD_EXPENSE = ‘ADD_EXPENSE’;
- export const REMOVE_EXPENSE = ‘REMOVE_EXPENSE’;
- // action creators
- export const addExpense = expense => ({
- type: ADD_EXPENSE,
- expense
- });
- export const removeExpense = expense => ({
- type: REMOVE_EXPENSE,
- expense
- });
These action creators are quite simple. They simply return objects that contain type, to indicate if it is a removal or an addition, and an expense as the payload. We won’t invest time creating automated tests to these action creators, as they are trivial.
Creating Redux Reducers
We are going to add the business logic of our tutorial app in the reducer that we are going to create in this section. This reducer will have a switch statement that, based on an action, will trigger the proper function to generate the new state. Let’s open the src/reducers.js file and add the following reducer definition to it:
- import {ADD_EXPENSE, REMOVE_EXPENSE} from “./actions”;
- export default expenses;
- export const initialState = { expenses: [], balance: 0 };
- function expenses(state = initialState, action = {}) {
- switch (action.type) {
- case ADD_EXPENSE:
- return addExpense(state, action.expense);
- case REMOVE_EXPENSE:
- return removeExpense(state, action.expense);
- default: return state;
- }
- }
- function addExpense(state, expense) {
- return {
- …state,
- expenses: […state.expenses, expense],
- balance: state.balance + expense.amount
- }
- }
- function removeExpense(state, expense) {
- const persistedExpense = state.expenses.find(item => item.id === expense.id);
- return {
- …state,
- expenses: state.expenses.filter(item => item.id !== expense.id),
- balance: state.balance – persistedExpense.amount
- }
- }
To decide exactly what function to call ( addExpense or removeExpense), the reducer created by this file ( expenses) compares the action.type with both ADD_EXPENSE and REMOVE_EXPENSE constants. After identifying the correct type, it triggers the proper function passing the current state of the application and the expense in question.
Testing Redux Reducers With Jest
It is easy to create an automated test to validate the behavior of this reducer. As reducers are pure functions, we don’t need to mock anything. We just need to generate some samples of expenses and actions, trigger our reducer with them, and check the generated output. Let’s install the test runner to help us testing the reducer.
- npm i -D jest babel-jest babel-preset-es2015
Also, let’s update the scripts property in the package.json file so we can easily run jest:
- {
- // …
- “scripts”: {
- “test”: “jest”,
- “test:watch”: “npm test — –watch”
- }
- // …
- }
With these scripts in place, we can create the test suite that will validate the expenses reducer. Let’s create a file called reducers.test.js alongside with reducers.js and define two tests in a new test suite, as follows:
- import {addExpense, removeExpense} from ‘./actions’;
- import expenses, {initialState} from ‘./reducers’;
- describe(‘reducers’, () => {
- it(‘should be able to add expenses’, () => {
- const stateStep1 = expenses(initialState, addExpense({
- id: 1,
- amount: 20
- }));
- expect(stateStep1.expenses.length).toEqual(1);
- expect(stateStep1.balance).toEqual(20);
- const stateStep2 = expenses(stateStep1, addExpense({
- id: 2,
- amount: 10
- }));
- expect(stateStep2.expenses.length).toEqual(2);
- expect(stateStep2.balance).toEqual(30);
- });
- it(‘should be able to remove expenses’, () => {
- const stateStep1 = expenses(initialState, addExpense({
- id: 1,
- amount: 55
- }));
- expect(stateStep1.expenses.length).toEqual(1);
- expect(stateStep1.balance).toEqual(55);
- const stateStep2 = expenses(stateStep1, addExpense({
- id: 2,
- amount: 36
- }));
- expect(stateStep2.expenses.length).toEqual(2);
- expect(stateStep2.balance).toEqual(91);
- const stateStep3 = expenses(stateStep2, removeExpense({
- id: 1
- }));
- expect(stateStep3.expenses.length).toEqual(1);
- expect(stateStep3.balance).toEqual(36); });
- it(‘should return the default state’, () => {
- expect(expenses()).toEqual(initialState);
- });
- });
The test suite and its tests are a little bit verbose, but they are easy to understand. We start by importing the addExpense and removeExpense action creators. After that, we import the expenses reducer from its source alongside with the initialState. Lastly, we use the describe function to define the test suite and the it function to create three tests.
The first two tests are pretty similar. Therefore, let’s analyze the first one to understand how they work. The first step executed by this test calls the expenses reducer passing to it the initialState and the addExpense action creator. As the parameter of this action creator, we pass an expense with id = 1 and amount = 20. We then check if the result of the expenses execution, the stateStep1, contains a single expense and if the balance is equal 20. After that, we execute a similar process that validates if the expenses reducer accepts a new expense and updates the balance accordingly. The difference in the second test is that, after adding two expenses, we use the reducer to remove an expense.
Let’s run the npm test command to verify our implementation. If we followed the steps above correctly, we should get an output similar this:
- > redux-node@1.0.0 test /Users/brunokrebs/git/tmp/redux-node
- > jest
- PASS src/reducers.test.js
- reducers
- ✓ should be able to add expenses (3ms)
- ✓ should be able to remove expenses (1ms)
- ✓ should return the default state
- Test Suites: 1 passed, 1 total
- Tests: 3 passed, 3 total
- Snapshots: 0 total
- Time: 0.834s, estimated 1s
- Ran all test suites.
Defining a Redux Store
So far, we haven’t used the central piece of Redux, the Redux Store. We have only defined two functions to create Redux Actions and a Redux Reducer. Now it’s time to create a Redux Store and put our reducer and our action creators to work.
As we want to use modern JavaScript code, let’s install babel-cli and a plugin:
- npm i -D babel-cli babel-plugin-transform-object-rest-spread
The plugin simply guarantees that we can use the spread operator with Babel. After installing both dependencies, let’s open the index.js file and add the following code:
- import {createStore} from ‘redux’;
- import {addExpense, removeExpense} from ‘./actions’;
- import expenses from ‘./reducers’;
- const store = createStore(expenses);
- store.dispatch(addExpense({
- id: 1,
- ;amount: 45
- }));
- store.dispatch(addExpense({
- id: 2,
- amount: 20
- }));
- store.dispatch(addExpense({
- id: 3,
- amount: 30
- }));
- store.dispatch(removeExpense({
- id: 2
- }));
- console.assert(store.getState().balance === 75);
- console.assert(store.getState().expenses.length === 2);
Pretty simple, right? To create a Redux Store, all we had to do was to import the createStore function from Redux and call it passing our reducer. Interacting with the store was not hard either. After importing the action creators, we simply called the dispatch function of the store, passing to it actions created by our action creators (addExpense and removeExpense).
In the end, to verify that the store ended up in the correct state, we added two console.assert calls. The first one showed that the balance is indeed 75, and the second one guaranteed that we finished with two expenses in the last state.
To run our code, we need to use the command provided by Babel. To easily run this command, let’s edit the package.json file and add the following record to the script property:
- {
- // … “scripts”: {
- “start”: “babel-node src/”,
- // ..
- },
- // …
- }
After that, we can simply issue npm start and we will see Babel run our code and assert that we get the expected state.
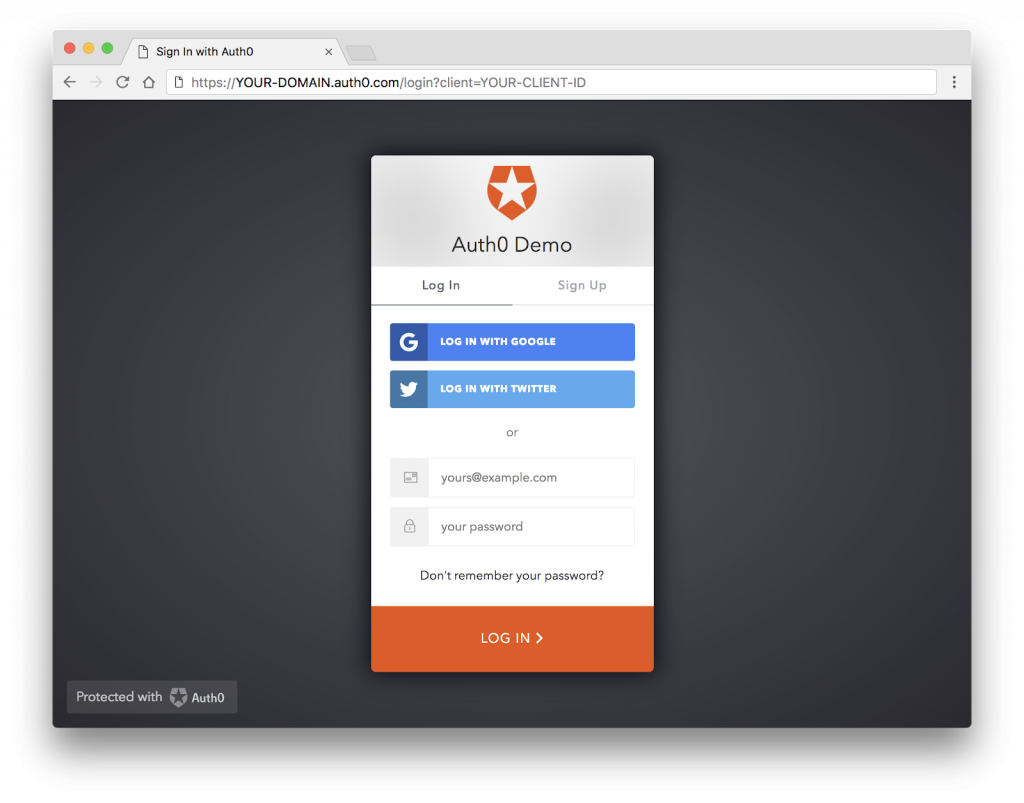
Aside: Auth0 Authentication With JavaScript
Auth0 offers a free tier to get started with modern authentication. Check it out!
It’s as easy as installing the and node modules like so:
- npm install jwt-decode auth0-js –save
- const auth0 = new auth0.WebAuth({
- clientID: “YOUR-AUTH0-CLIENT-ID”,
- domain: “YOUR-AUTH0-DOMAIN”,
- scope: “openid email profile YOUR-ADDITIONAL-SCOPES”,
- audience: “YOUR-API-AUDIENCES”, // See https://auth0.com/docs/api-auth
- responseType: “token id_token”,
- redirectUri: “http://localhost:9000” //YOUR-REDIRECT-URL
- });
- function logout() {
- 11.localStorage.removeItem(‘id_token’);
- localStorage.removeItem(‘access_token’);
- window.location.href = “/”;
- }
- function showProfileInfo(profile) {
- var btnLogin = document.getElementById(‘btn-login’);
- var btnLogout = document.getElementById(‘btn-logout’);
- var avatar = document.getElementById(‘avatar’);
- document.getElementById(‘nickname’).textContent = profile.nickname;
- btnLogin.style.display = “none”;
- avatar.src = profile.picture;
- avatar.style.display = “block”;
- btnLogout.style.display = “block”;
- }
- function retrieveProfile() {
- var idToken = localStorage.getItem(‘id_token’);
- if (idToken) {
- try {
- const profile = jwt_decode(idToken);
- showProfileInfo(profile);
- } catch (err) {
- alert(‘There was an error getting the profile: ‘ + err.message);
- }
- }
- }
- auth0.parseHash(window.location.hash, (err, result) => {
- if(err || !result) {
- // Handle error
- return;
- }
- // You can use the ID token to get user information in the frontend.
- localStorage.setItem(‘id_token’, result.idToken);
- // You can use this token to interact with server-side APIs.
- localStorage.setItem(‘access_token’, result.accessToken);
- retrieveProfile();
- });
- function afterLoad() {
- // buttons
- var btnLogin = document.getElementById(‘btn-login’);
- var btnLogout = document.getElementById(‘btn-logout’);
- btnLogin.addEventListener(‘click’, function () {auth0.authorize();
- });
- btnLogout.addEventListener(‘click’, function () {
- logout();
- });
- retrieveProfile();
- }
- window.addEventListener(‘load’, afterLoad);
Go ahead and check out our quickstarts to learn how to implement authentication using different languages and frameworks in your apps.
Conclusion
As we can see, Redux is an easy technology to reason about. Although not hard, correctly understanding its three main pieces (the store, reducers, and actions) is important before we move to other topics, like integrating with front-end frameworks. However, once we learn Redux’s concepts, we can integrate it with, for example, React to get a great foundation for modern Single Page Apps.
By the way, in our blog, we have an article that shows how to properly secure React and Redux Apps with JWTs. Take a look at it if you are going to use these technologies in your next project.