
- TypeScript Vs JavaScript Tutorial | Learn the Difference
- Web Components in Ionic Framework Tutorial – A Perfect Guide to Refer
- TypeScript Tutorial | A Step-By-Step Guide to Learn
- Creating and Publishing an Android Library | A Concise Tutorial
- How to Link a Style Sheet (CSS) File to Your HTML File | A Defined Tutorial
- HTML Video Tag Tutorial | Learn to Embed Video in Your HTML
- How To Create a Header – HTML Tutorial | The Ultimate Guide
- HTML Lists Tag Tutorial : Step-by-Step Guide for Beginners
- HTML Entity Tutorial | Learn Complete list of HTML Entities
- HTML Input Tutorial | Learn the Forms & Input Tags
- HTML Textbox Tutorial | A Comprehensive Guide
- HTML vs HTML5 Tutorial | Know the Difference
- Know the Difference between HTML vs CSS Tutorial | Complete Guide [STEP-IN]
- Create a Top Navigation Bar using HTML Tutorial | Learning Path – Complete Guide
- HTML – Image Tag Tutorial | The Ultimate Guide for Beginners
- HTML iframe Tutorial | Learn All about Tags and Element
- HTML Semantics – Free Tutorial to learn HTML
- HTML Mailto Attribute Tutorial | A Complete Guide
- Angular Tutorial | A Complete Guide To HTTP & Routing In Angular
- Introduction to HTML Line Breaks Tutorial | Complete Guide
- How to Redirect a Web Page in HTML | Learn in 1 Day FREE Tutorial
- Introduction To HTML Games | Build a Game with HTML Tutorial
- How to Create a Dropdown in Html | The Complete Guide Tutorial For Free
- Creating HTML Table Tutorial | Ultimate Guide to Learn
- How to Create Image Slider in HTML Tutorial | Ultimate Guide
- HTML Symbols Tutorial | For Beginners Learn in 1 Day FREE
- HTML Canvas Tutorial – Learn the Shape, Circle, Gradients
- A Complete Guide | UI Developer (Skills & Resources)
- jQuery Tutorial
- Advanced JavaScript Tutorial
- Angular Js Dom Tutorial
- Angular 7 Tutorial
- AngularJS Installation
- JavaScript Tutorial
- React Redux Tutorial
- AngularJS – Custom Directives Tutorial
- REACT JS Tutorial
- ANGULAR Tutorial
- Augmented Reality And Virtual Reality Tutorial
- Full Stack Development Tutorial
- ANGULAR 8 Tutorial

REACT JS Tutorial
Last updated on 25th Sep 2020, Blog, Tutorials, Website Development
React is a front-end library developed by Facebook. It is used for handling the view layer for web and mobile apps. ReactJS allows us to create reusable UI components. It is currently one of the most popular JavaScript libraries and has a strong foundation and large community behind it.
ReactJS is a JavaScript library used for building reusable UI components. According to React official documentation, following is the definition −
React is a library for building composable user interfaces. It encourages the creation of reusable UI components, which present data that changes over time. Lots of people use React as the V in MVC. React abstracts away the DOM from you, offering a simpler programming model and better performance. React can also render on the server using Node, and it can power native apps using React Native. React implements one-way reactive data flow, which reduces the boilerplate and is easier to reason about than traditional data binding.
What is React JS?
In simple terms, it is a JavaScript library for building user interfaces. Before we deep dive into the rest of the React JS tutorial, let us understand the basic concepts. In this definition, we see two words: javascript library and user interface. Let’s understand what these terms mean.
The library is a pre-written code that is efficient, complex, composed, and readily available. Thus, it makes our life easy, and we can easily use the code written by someone else.
Let’s say we want to calculate the cosine value of 20. Rather than worrying about how this library has been written, we simply use the math library. For example, Math.cos(20).
User Interface refers to what the user sees upfront.
React JS is a very powerful tool that enables efficient front-end development by breaking up the page into several building blocks known as components.
Prerequisites for React JS
Before we dive into the depths of our React JS Tutorial, there are certain prerequisites to keep in mind. We must have basic hands-on knowledge of HTML, CSS, and JavaScript as they are the foundation stones for any frontend development and are indispensable for becoming an expert.
1.HTML
- Stands for Hypertext Markup Language
- It is a markup language for creating web pages/documents
- Basic Tags:
- <div> <span>: used to group elements.
- <form>: to create a form that is responsible for fetching data from users.
- <input>: specifies what and how the input should be taken from users.
- <button>: creates a button and specifies its functionalities that will get executed once it is clicked.
2. CSS
- Stands for Cascading Style Sheet
- It is more responsible for the look and feel of the webpage.
- You can select elements from HTML and apply styling to it.
- General Syntax:
- selector
- property1 : value1;
- property2 : value2;
- property3 : value3;
There are 3 major selectors in CSS:
- Id(#) – unique in a HTML doc
- Class(.) – group of elements
- Tag(tag name) – all tags of the specific tag name
Box Model
- Every element is treated as a rectangular box
- Each box comprises of 4 edges
- Content
- Padding
- Margin
- Border
- You also need a good understanding of other properties like colors, font, backgrounds, etc.
3. JavaScript
- Arrays
- Objects
- Functions
- Control Flow Statements
- DOM Manipulation
- DOM Events
- Closure
- Prototype
- OOPs
With this in mind, you can ensure that you clearly understand the rest of the React JS Tutorial.
Why use React JS?
Now that you understand what React means, we can move to the next step of the React JS tutorial and understand why we use it.
React is a powerful and very popular tool in front-end development.
React is more popular than its competitors such as Vue and Angular. One of the main reasons for its popularity is that React is a Library. Thus, the control over the flow of the application is more when compared to Angular, which is a framework.
We can easily reuse the components which help in the optimization. The learning curve of React is very easy as compared to Angular and Vue. React is trusted by some of the leading companies like Facebook, Netflix, PayPal, Tesla, and more.
We see the real benefits of React when we build a single page application. There are more jobs in the market for React developers compared to Angular and Vue
Subscribe For Free Demo
Error: Contact form not found.
Evolution Of React
React is a JavaScript library used to build the user interface for web applications. React was initially developed and maintained by the folks at Facebook, which was later used in their products (WhatsApp & Instagram). Now it is an open source project with an active developer community. Popular websites like Netflix, Airbnb, Yahoo!Mail, KhanAcademy, Dropbox and many more use React to build their UI. Modern websites are built using MVC (model view controller) architecture. React is the ‘V’ in the MVC which stands for view, whereas the architecture is provided by Redux or Flux. React native is used to develop mobile apps, the Facebook mobile app is built using React native.
Facebook’s annual F8 Developer conference 2017, saw two promising announcements: React Fiber and ReactVR. React Fiber is a complete rewrite of the previous release focusing on incremental rendering and quick responsiveness, React Fiber is backward compatible with all previous versions. ReactVR is built on top of React Native frameworks, it enables developing UI with the addition of 3D models to replicate 360-degree environments resulting in fully immersive VR content.
Why do we use ReactJS?
The main objective of ReactJS is to develop User Interfaces (UI) that improves the speed of the apps. It uses virtual DOM (JavaScript object), which improves the performance of the app. The JavaScript virtual DOM is faster than the regular DOM. We can use ReactJS on the client and server-side as well as with other frameworks. It uses component and data patterns that improve readability and helps to maintain larger apps.
React Components
Earlier, the developers write more than thousands of lines of code for developing a single page application. These applications follow the traditional DOM structure, and making changes in them was a very challenging task. If any mistake is found, it manually searches the entire application and updates accordingly. The component-based approach was introduced to overcome an issue. In this approach, the entire application is divided into a small logical group of code, which is known as components.
A Component is considered as the core building blocks of a React application. It makes the task of building UIs much easier. Each component exists in the same space, but they work independently from one another and merge all in a parent component, which will be the final UI of your application.
Every React component has their own structure, methods as well as APIs. They can be reusable as per your need. For better understanding, consider the entire UI as a tree. Here, the root is the starting component, and each of the other pieces becomes branches, which are further divided into sub-branches.
In ReactJS, we have mainly two types of components. They are
- Functional Components
- Class Components
Functional Components
In React, function components are a way to write components that only contain a render method and don’t have their own state. They are simply JavaScript functions that may or may not receive data as parameters. We can create a function that takes props(properties) as input and returns what should be rendered. A valid functional component can be shown in the below example.
- function WelcomeMessage(props)
- return <h1>Welcome to the , {props.name}</h1>
The functional component is also known as a stateless component because they do not hold or manage state.
Class Components
Class components are more complex than functional components. It requires you to extend from React. Component and create a render function which returns a React element. You can pass data from one class to other class components. You can create a class by defining a class that extends Component and has a render function. Valid class component is shown in the below example.
- class MyComponent extends React.Component {
- render() {
- return (
- <div>This is the main component.</div>
The class component is also known as a stateful component because they can hold or manage local state.
ReactJS | Setting up Development Environment
To run any React application, we must have NodeJS installed in our PC. So, the very first step will be to install NodeJS.
Step 1: Install NodeJS. You may visit the official download link of NodeJS to download and install the latest version of NodeJS. Once we have set up NodeJS on our PC, the next thing we need to do is set up React Boilerplate.
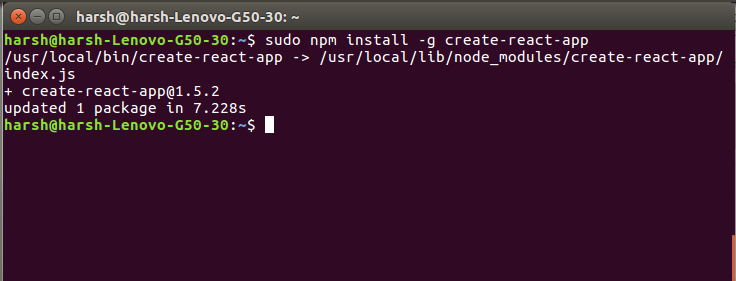
Step 2: Setting up React Boilerplate. We will install the boilerplate globally. Run the below command in your terminal or command prompt to install the React Boilerplate. npm install -g create-react-app
After running the above command and successfully installing the boilerplate your terminal will show some output as shown in below image:
Now after successfully installing the boilerplate the next thing we will do is create our React app. We can use the create-react-app command for creating an app in React.
Step 3: Create a react app. Now to create an app we will use the boilerplate we installed. Below command will create an app named myapp. create-react-app myapp
The above statement will create a new directory named myapp inside your current directory with a bunch of files needed to successfully run a React app.
Let’s have a look at the directory created by the above command:
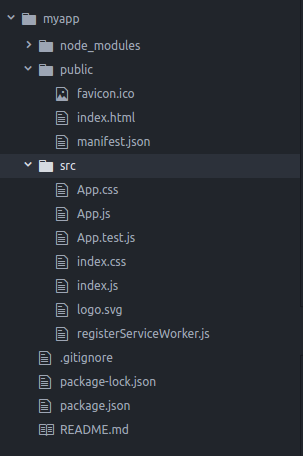
In the above directory, you can see a number of files. The main files we will be working with in the basic course are index.html and index.js. The index.html file will have a div element with id = “root”, inside which everything will be rendered and all of our React code will be inside the index.js file.
Now that we have successfully set up the development environment. The last thing left is to start the development server.
Step 4: Start the development server. To start the development server, go inside your current directory “myapp” and execute the below command: npm start

Get In-Depth Knowledge in React JS Training from Expert Trainers
- Instructor-led Sessions
- Real-life Case Studies
- Assignments
On successfully running the above command your compiler will show the below message:
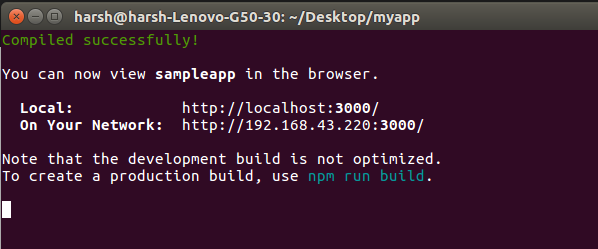
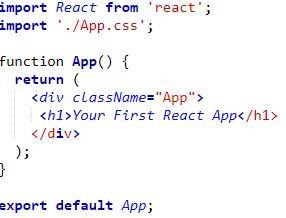
You can go to the URL shown in the above message to see the changes you are making in your App. By Default the above URL will show the below page:

That’s all! We have a development environment set up and ready. Now we will move ahead to start learning ReactJS development to make some use of it.
ReactJS JSX
JSX is basically a syntax extension of regular JavaScript and is used to create React elements. These elements are then rendered to the React DOM.
Why JSX?
- It is faster than normal JavaScript as it performs optimizations while translating to regular JavaScript.
- It makes it easier for us to create templates.
- Instead of separating the markup and logic in separated files, React uses components for this purpose. We will learn about components in detail in further articles.
Using JavaScript expressions in JSX
In React we are allowed to use normal JavaScript expressions with JSX. To embed any javascript expression in a piece of code written in JSX we will have to wrap that expression in curly braces {}.
Attributes in JSX
JSX allows us to use attributes with the HTML elements just like we do with normal HTML. But instead of the normal naming convention of HTML, JSX uses camelcase convention for attributes.
Specifying attribute values
JSX allows us to specify attribute values in two ways:
- As string literals: We can specify the values of attributes as hard-coded strings using quotes:
- var ele = <h1 className = “firstAttribute”>Hello!</h1>;
- As expressions: We can specify attributes as expressions using curly braces {}:
- var ele = <h1 className = {varName}>Hello!</h1>;
Wrapping elements or Children in JSX
Consider a situation where you want to render multiple tags at a time. To do this we need to wrap all of this tag under a parent tag and then render this parent element to the HTML. All of the subtags are called child tags or child of this parent element.
Comments in JSX
JSX allows us to use comments as it allows us to use JavaScript expressions. Comments in JSX begins with /* and ends with */. We can add comments in JSX by wrapping them in curly braces {} just like we did in the case of expressions.
React Features
- JSX − JSX is JavaScript syntax extension. It isn’t necessary to use JSX in React development, but it is recommended.
- Components − React is all about components. You need to think of everything as a component. This will help you maintain the code when working on larger scale projects.
- Unidirectional data flow and Flux − React implements one-way data flow which makes it easy to reason about your app. Flux is a pattern that helps keep your data unidirectional.
- License − React is licensed under Facebook Inc. Documentation is licensed under CC BY 4.0.
React Component
React allows you to divide your pages into independent building blocks that can be created, maintained, manipulated, reused independently, and then merged to construct the entire page.

Say you are visiting the above webpage. This webpage can be broken down into multiple components:
- Top green portion
- Circular image
- Description text under every image
- Location
- Contact
Circular image and Description text are present four times on this page with the same skeleton but different content.
React can use this to its advantage by creating components once and then using it as per the requirement.
Two types of components React deals with:
- Functional Component
- Contains only render function
- No state
- Simple JS functions
- May take props as parameters and return the output to be rendered.
- Example:
- Class-Based Component
- In addition to render(), it also extends from React
- More complex and flexible but deprecated
- Example of Class-Based component is given below:

React Limitations
- Covers only the view layer of the app, hence you still need to choose other technologies to get a complete tooling set for development.
- Uses inline templating and JSX, which might seem awkward to some developers.
React Advantages
- Uses virtual DOM which is a JavaScript object. This will improve apps performance, since JavaScript virtual DOM is faster than the regular DOM.
- Can be used on client and server side as well as with other frameworks.
- Components and data patterns improve readability, which helps to maintain larger apps.
React JS – Best Practices
In this section, we will go through the best practices that one can imbibe to write better code. These techniques will help you stay consistent during your application development phase.
Let us go through these ones after the other to understand them well:
- Usage of state can be avoided to the maximum and good practice is to centralize the state and pass down the tree as props. A container element can be set around the properties which will ensure that the state is held intact. One of the best ways to tackle states in React JS applications is to use Flux pattern.
- Always define PropTypes as they will help you in tracking all the props in your application. This always forms a reference to the other developers working on the same project.
- React JS recommends the usage of the Single Responsibility Principle, meaning, that there should be a single component that handles the responsibility of a functionality. It is suggested to refactor code wherever necessary so as to ensure that there are no more than one functionality per component.
- Earlier React JS versions provided support for reusable functionalities, which is no longer available – hence the usage of Higher-Order Components (HOC) is suggested.
Conclusion
In this tutorial, we have covered a lot of topics ranging from introduction to React JS, advantages, limitations, features, installation procedures, various components, and best practices. React JS is a wonderful JavaScript library that helps in both the server-side and client-side scripting and has got a lot of following in the developers’ community. It has backing from Facebook where there is active development going on to make it a better UI framework altogether. We have put in great amount of effort in putting most of the details here to precision. If you find anything incorrect, please let us know in the comments section for us to correct the same.