- TypeScript Vs JavaScript Tutorial | Learn the Difference
- Web Components in Ionic Framework Tutorial – A Perfect Guide to Refer
- TypeScript Tutorial | A Step-By-Step Guide to Learn
- Creating and Publishing an Android Library | A Concise Tutorial
- How to Link a Style Sheet (CSS) File to Your HTML File | A Defined Tutorial
- HTML Video Tag Tutorial | Learn to Embed Video in Your HTML
- How To Create a Header – HTML Tutorial | The Ultimate Guide
- HTML Lists Tag Tutorial : Step-by-Step Guide for Beginners
- HTML Entity Tutorial | Learn Complete list of HTML Entities
- HTML Input Tutorial | Learn the Forms & Input Tags
- HTML Textbox Tutorial | A Comprehensive Guide
- HTML vs HTML5 Tutorial | Know the Difference
- Know the Difference between HTML vs CSS Tutorial | Complete Guide [STEP-IN]
- Create a Top Navigation Bar using HTML Tutorial | Learning Path – Complete Guide
- HTML – Image Tag Tutorial | The Ultimate Guide for Beginners
- HTML iframe Tutorial | Learn All about Tags and Element
- HTML Semantics – Free Tutorial to learn HTML
- HTML Mailto Attribute Tutorial | A Complete Guide
- Angular Tutorial | A Complete Guide To HTTP & Routing In Angular
- Introduction to HTML Line Breaks Tutorial | Complete Guide
- How to Redirect a Web Page in HTML | Learn in 1 Day FREE Tutorial
- Introduction To HTML Games | Build a Game with HTML Tutorial
- How to Create a Dropdown in Html | The Complete Guide Tutorial For Free
- Creating HTML Table Tutorial | Ultimate Guide to Learn
- How to Create Image Slider in HTML Tutorial | Ultimate Guide
- HTML Symbols Tutorial | For Beginners Learn in 1 Day FREE
- HTML Canvas Tutorial – Learn the Shape, Circle, Gradients
- A Complete Guide | UI Developer (Skills & Resources)
- jQuery Tutorial
- Advanced JavaScript Tutorial
- Angular Js Dom Tutorial
- Angular 7 Tutorial
- AngularJS Installation
- JavaScript Tutorial
- React Redux Tutorial
- AngularJS – Custom Directives Tutorial
- REACT JS Tutorial
- ANGULAR Tutorial
- Augmented Reality And Virtual Reality Tutorial
- Full Stack Development Tutorial
- ANGULAR 8 Tutorial
AngularJS Installation
Last updated on 08th Oct 2020, Blog, Tutorials, Website Development
AngularJS
AngularJS also known as Angular 1 is a framework for developing single page web applications. WebStorm suggests AngularJS-aware completion options for predefined and custom ng directives and for controller and application names, as well as code insights for data bindings inside curly-brace expressions {{}}. You can use built-in AngularJS live templates and navigate between the name of a controller in HTML and its definition in JavaScript or between ngView or &routeProvider and the template. For AngularJS entities, use the Go To Symbol navigation.
Subscribe For Free Demo
Error: Contact form not found.
Before you start
- Make sure you have Node.js on your computer.
- Make sure the Angular and AngularJS bundled plugin is enabled on the Settings/Preferences | Plugins page, see Managing plugins for details.
Creating a new AngularJS application
You can use the AngularJS seed project or create an empty WebStorm project and install AngularJS in it either manually, by downloading the AngularJS framework, or with the Bower package manager.
To create an application using the seed project
- Click Create New Project on the Welcome screen or select File | New | Project from the main menu. The Create New Project Dialog opens.
- In the left-hand pane, choose AngularJS.
- In the right-hand pane, specify the path to the folder where the project-related files will be stored.
- When you click Create, WebStorm generates the AngularJS-specific project structure with all the required configuration files based on the AngularJS seed project
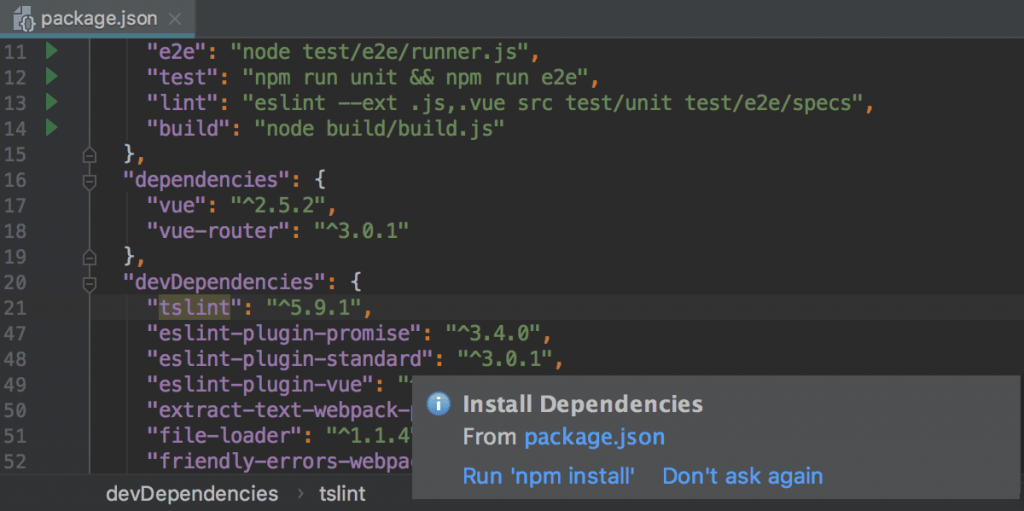
To download AngularJS dependencies, do one of the following:
- In the embedded Terminal (Alt+F12) , type:
npm install - Select Run ‘npm install’ from the context menu of the package.json file in your project root.
AngularJS dependencies contain AngularJS code and the tools that support development and testing.
To create an empty WebStorm project
- Click Create New Project on the Welcome screen or select File | New | Project from the main menu. The Create New Project Dialog opens.
- In the left-hand pane, choose Empty Project.
- Specify the path to the folder where the project-related files will be stored.
- When you click Create, WebStorm creates and opens an empty project.
To install and configure AngularJS in an empty project manually
- Download the AngularJS framework at http://angularjs.org/.
- Open the empty project where you will use AngularJS.
- Configure AngularJS as a WebStorm JavaScript library, to let WebStorm recognize AngularJS-specific structures and provide full coding assistance:
- In the Settings/Preferences dialog Ctrl+Alt+S, go to Languages and Frameworks | JavaScript | Libraries. The Settings: JavaScript Libraries page opens.
- In the Libraries area, click the Add button.
- In the New Library dialog that opens, specify the name of the library.
- Click next to the list of library files and select Attach Files or Attach Directory from the context menu, depending on whether you need separate files or an entire folder.
- Select the Angular.js, or Angular.min.js, or an entire directory in the dialog that opens. WebStorm returns to the New Library dialog where the Name read-only field shows the name of the selected files or folder.
- In the Type field, specify which version you have downloaded and are going to add.
- If you added Angular.js, select Debug. This version is helpful in the development environment, especially for debugging.
- If you added the minified Angular.min.js, select Release. This version is helpful in the production environment because the file size is significantly smaller.
To install AngularJS in an empty project through Bower
- Open the empty project where you will use AngularJS.
- Install Bower as described in Bower.
- In the embedded Terminal (Alt+F12) , type bower install angular to install the package as a project dependency.
You can also install the angular package on the Bower page of the Settings/Preferences dialog as described in Managing Bower packages.
Starting with an existing AngularJS application
If you already have Angular sources in your project (for example, in the bower_components folder), just open your project and start working. If these sources are excluded from the project, then you only need to configure AngularJS as a JavaScript library.
To check out the application sources from your version control
- Click Get from Version Control on the Welcome screen or select VCS | Get from Version Control from the main menu.
- In the invoked dialog, select your version control system from the list and specify the repository to check out the application sources from.
To download the dependencies
Using AngularJS Router state diagrams
You can see a diagram illustrating the relations between views, states, and templates in AngularJS applications that use ui-router.
To generate and view a diagram
- Open the desired file in the editor, and then choose Diagrams | Show AngularJS ui-router State Diagram from the context menu. WebStorm generates a diagram and shows it in a separate editor tab.
To navigate from an element in the diagram to the code that implements this element
- Select it and choose Jump to Source from the context menu.
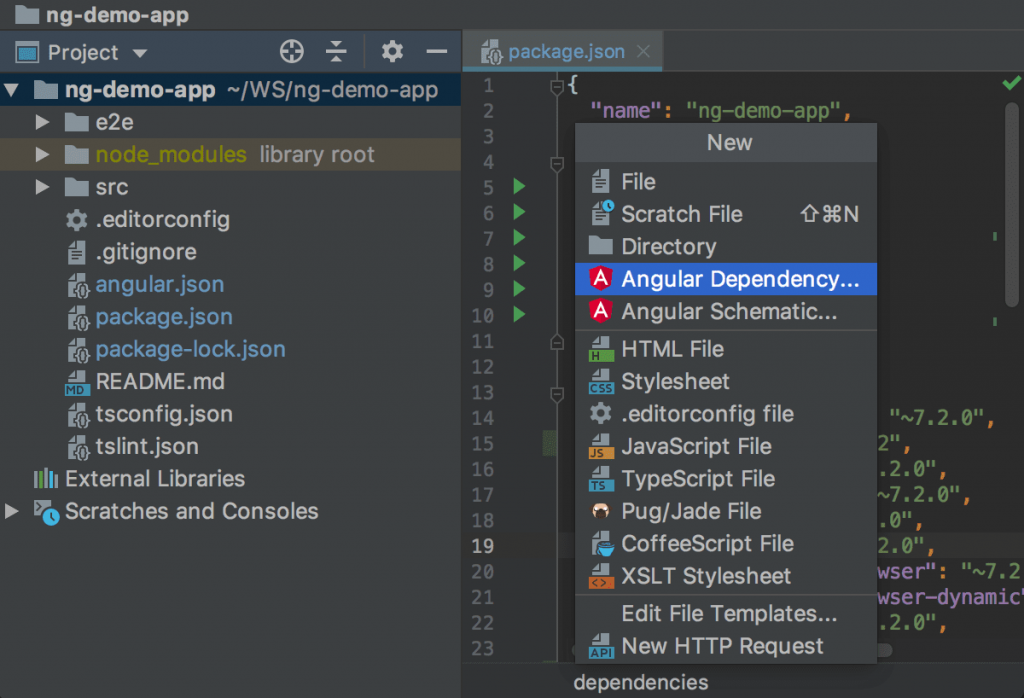
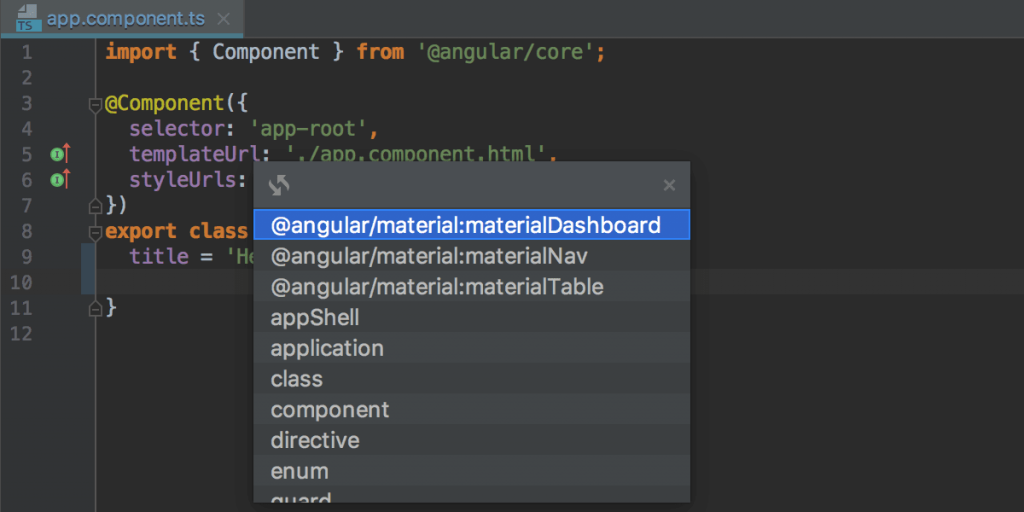
Adding new features to an Angular application using ng add
In projects that use Angular CLI 6 or later, you can use the Angular Dependency action to add new libraries. This action runs the ng add command which installs the dependency and updates the app with a special installation script. Note that not all libraries support installation with ng add.
- Select File | New from the main menu or press Alt+Insert in the Project tool window, and then select Angular Dependency.
- From the list, select the library to add. The list shows the libraries that can be definitely installed with ng add. To install a package that is not on the list, scroll to its end and double-click the Install package not listed above link, then specify the package name in the dialog that opens.
- The list of packages that can be installed with ng add is available on GitHub.
- The example below illustrates adding Angular Material to a project.
- Gif
If you manage dependencies manually through your package.json, WebStorm still recognizes packages that support ng add. When you add such a package to package.json, WebStorm suggests installing it with ng add.
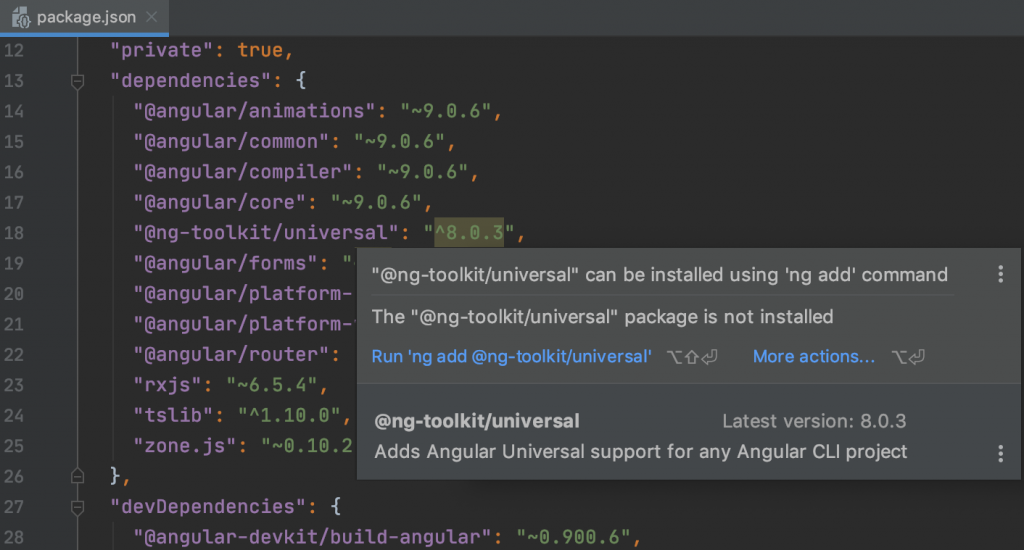
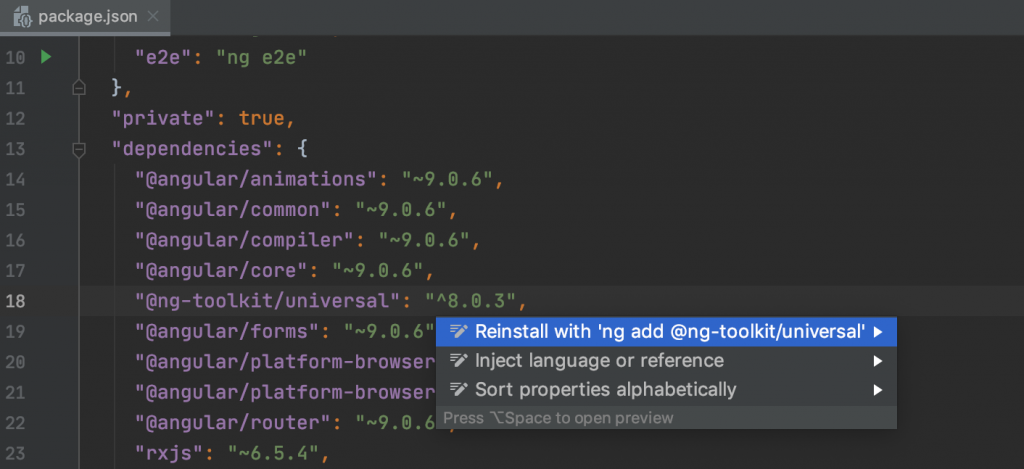
If such dependency is already installed, you may still want to reinstall it with ng add. In the package.json file, select the name of the package, press Alt+Enter, and click Reinstall with ng add.
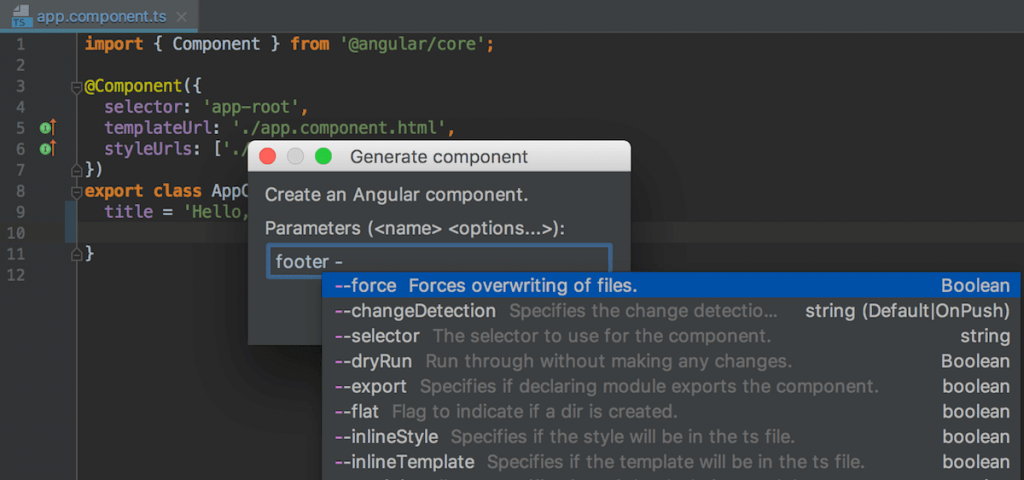
Generating code with Angular Schematics
In Angular CLI 6 projects, WebStorm can generate code using both schematics defined in libraries like @angular/material and those defined in Angular CLI itself. For earlier versions, WebStorm generates only components, services, and other blueprints defined in Angular CLI.
- Select File | New from the main menu or press Alt+Insert in the Project tool window, and then select Angular Schematic.
- From the list, select the relevant schematic.
- In the dialog that opens, specify the name of the schematic to be generated and additional options, if necessary. WebStorm shows the description of the schematic and provides code completion and description for available options.
Inspecting Angular application code
WebStorm brings a number of Angular-specific inspections that help you find errors as you edit your code and suggest quick-fixes for them.
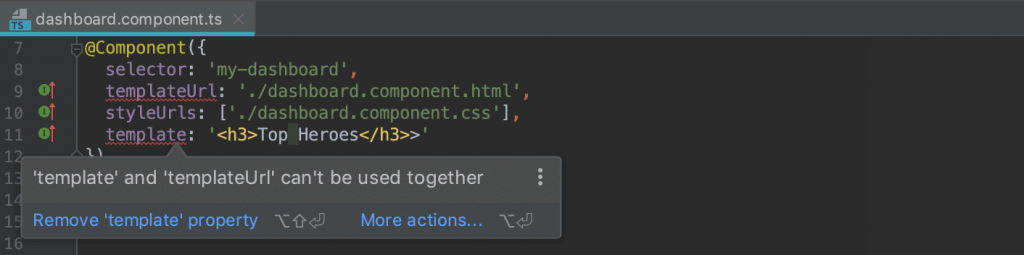
In the example below, both a template and a templateUrl properties are used. WebStorm detects the error, warns you about it, and suggests a quick-fix.
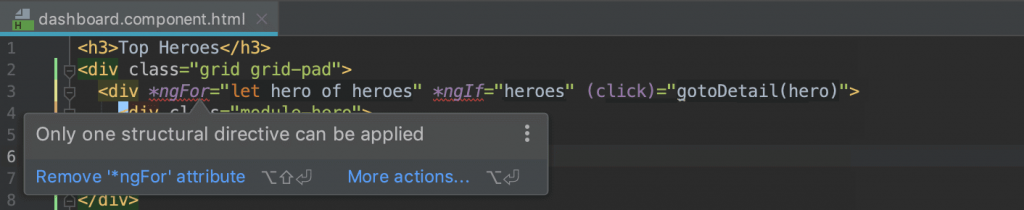
Another example shows how WebStorm warns you about incorrect use of the *ngIf and *ngFor structural directives.
View the list of Angular-specific inspections and configure them
- In the Settings/Preferences dialog Ctrl+Alt+S, go to Editor | Inspections.
- Expand the Angular node.
- Configure inspection profiles and severity, disable and suppress predefined inspections, and create custom ones as described in Code inspections.
Using Angular Material Design components
- Completion for components
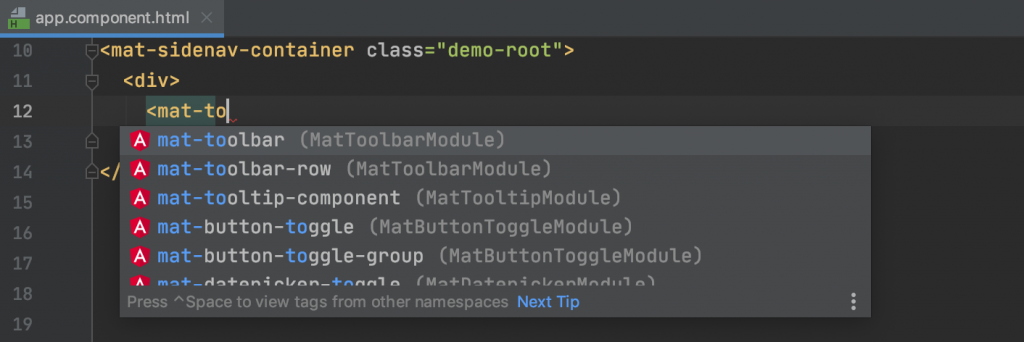
- Completion for attributes
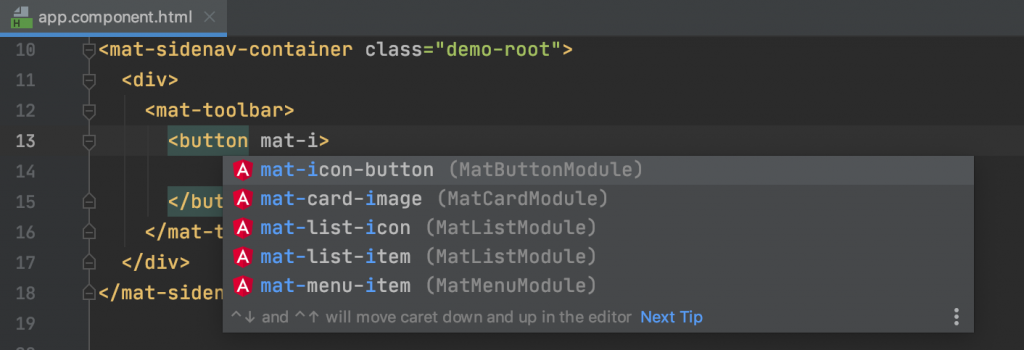
- Navigation between a component or an attribute and its declaration (press Ctrl+B or select Go To | Declaration from the context menu).
Install Angular Material
- In the embedded Terminal (Alt+F12) , type:
- ng add @angular/material for Angular CLI version 6 and later
- npm install –save @angular/material for earlier versions of Angular CLI
- Learn more from Getting Started on the Angular Material official website.
Configuring syntax highlighting
You can configure Angular-aware syntax highlighting according to your preferences and habits.
- In the Settings/Preferences dialog Ctrl+Alt+S, go to Editor | Color Scheme | Angular Template.
- Select the color scheme, accept the highlighting settings inherited from defaults or customize them as described in Configuring colors and fonts.
AngularJS Environment Setup
Follow the instructions to install the AngularJs:
Step 1:
First of all open the link https://angularjs.org/ then it will open a page:
Step 2:
It will give two options –
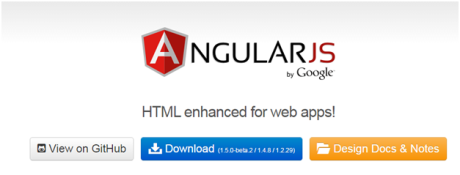
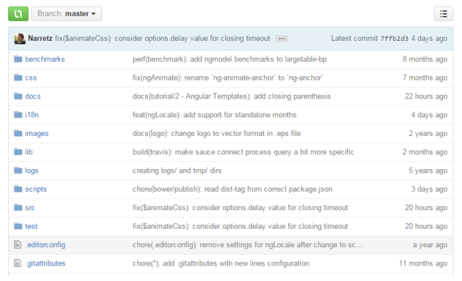
1. View on GitHub – It will give all the latest scripts.
2. Download – When you click on this button then it shows:
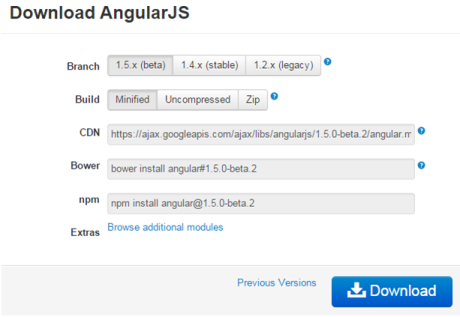
Step 3:
Click on the download button then it will download angular.min.js.
Step 4:
Create a HTML page and in this page include the AngularJS JavaScript file as follows:
- <head>
- <script src=”http://ajax.googleapis.com/ajax/libs/angularjs/1.3.14/angularmin.js”></script>
- </head>
Step 5:
Then run the HtML page in the browser.
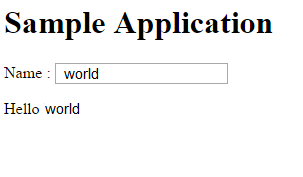
Example
- <!DOCTYPE html>
- <html lang=”en-US”>
- <script src=”http://ajax.googleapis.com/ajax/libs/angularjs/1.4.8/angular.min.js”></script>
- <body>
- <h1>Sample Application</h1>
- <div ng-app=””>
- <p>Name : <input type=”text” ng-model=”msg”></p>
- <p>Hello {{msg}}</p>
- </div>
- </body>
- </html>
Output