
- TypeScript Vs JavaScript Tutorial | Learn the Difference
- Web Components in Ionic Framework Tutorial – A Perfect Guide to Refer
- TypeScript Tutorial | A Step-By-Step Guide to Learn
- Creating and Publishing an Android Library | A Concise Tutorial
- How to Link a Style Sheet (CSS) File to Your HTML File | A Defined Tutorial
- HTML Video Tag Tutorial | Learn to Embed Video in Your HTML
- How To Create a Header – HTML Tutorial | The Ultimate Guide
- HTML Lists Tag Tutorial : Step-by-Step Guide for Beginners
- HTML Entity Tutorial | Learn Complete list of HTML Entities
- HTML Input Tutorial | Learn the Forms & Input Tags
- HTML Textbox Tutorial | A Comprehensive Guide
- HTML vs HTML5 Tutorial | Know the Difference
- Know the Difference between HTML vs CSS Tutorial | Complete Guide [STEP-IN]
- Create a Top Navigation Bar using HTML Tutorial | Learning Path – Complete Guide
- HTML – Image Tag Tutorial | The Ultimate Guide for Beginners
- HTML iframe Tutorial | Learn All about Tags and Element
- HTML Semantics – Free Tutorial to learn HTML
- HTML Mailto Attribute Tutorial | A Complete Guide
- Angular Tutorial | A Complete Guide To HTTP & Routing In Angular
- Introduction to HTML Line Breaks Tutorial | Complete Guide
- How to Redirect a Web Page in HTML | Learn in 1 Day FREE Tutorial
- Introduction To HTML Games | Build a Game with HTML Tutorial
- How to Create a Dropdown in Html | The Complete Guide Tutorial For Free
- Creating HTML Table Tutorial | Ultimate Guide to Learn
- How to Create Image Slider in HTML Tutorial | Ultimate Guide
- HTML Symbols Tutorial | For Beginners Learn in 1 Day FREE
- HTML Canvas Tutorial – Learn the Shape, Circle, Gradients
- A Complete Guide | UI Developer (Skills & Resources)
- jQuery Tutorial
- Advanced JavaScript Tutorial
- Angular Js Dom Tutorial
- Angular 7 Tutorial
- AngularJS Installation
- JavaScript Tutorial
- React Redux Tutorial
- AngularJS – Custom Directives Tutorial
- REACT JS Tutorial
- ANGULAR Tutorial
- Augmented Reality And Virtual Reality Tutorial
- Full Stack Development Tutorial
- ANGULAR 8 Tutorial

AngularJS – Custom Directives Tutorial
Last updated on 26th Sep 2020, Blog, Tutorials, Website Development
What is AngularJS?
AngularJS is one of the most popular JavaScript-based web frameworks used in front end development. It is used in the development of Single Page Applications (SPAs). AngularJS is an open-source framework that is mainly maintained by Google and by a community of individuals involved in resolving problems faced in single page application development. In this topic, we are going to learn about AngularJS Directives.
AngularJS is nothing but it extends the existing HTML; It is added in HTML page with <script> tag. AngularJS makes HTML site more responsive to user actions by adding additional attributes easily. The latest stable version of AngularJS is 1.6.x as of now.
Directives of AngularJS
AngularJS is an efficient framework that supports Model-View-Controller (MVC) based architecture. It provides core features such as two-way data binding, Controller, Services, Directives, Templates, Router, Filters, Dependency Injection, etc. These all are the main features that work collaboratively to make AngularJS efficient.
The directive is one of the very useful features in AngularJS. It extends the existing HTML and allows to develop web pages easily with new behaviour using core JavaScript. It allows to write our own custom tags and map them into existing HTML. This functionality gives more freedom and allows developers great flexibility in creating and using custom elements in web applications accordingly. Also, they can design their own directives too. In this article, we will mainly focus on AngularJS Directives and try to gain knowledge of this core feature.
Directives are nothing but markers on DOM elements in HTML such as attribute name, element name, CSS class or comment. The compiler of AngularJS then attaches the specified behaviour to that element. Each directive has a name and starts with ‘ng-’. Each directive can decide where it can be used in DOM elements. There are some existing directives that are already available in AngularJS and similarly, we can define on our own.
We will have a look at three main in-built directives which divide the AngularJS framework into three major parts.
1. ng-app:This directive tells the compiler that this is the AngularJS application. The directive where it is defined in DOM becomes the root element of the application.
Code:
- <!DOCTYPE html>
- <html>
- <script src=”https://ajax.googleapis.com/ajax/libs/angularjs/1.6.9/angular.min.js”> </script>
- <body>
- <div ng-app = “”>
- <! — main code –>
- </div>
- </body>
- </html>
AngularJS is available as JavaScript file and is added into HTML using <script> tag. The ng-app at <div> element tells AngularJS that div is the root element and owner of the AngularJS application. AngularJS application starts from that element and whatever is AngularJS code, is written inside of it.
2. ng-model:This directive binds the value from the web page, mostly from the input field to the application variable. Basically, this directive allows sending data from input to AngularJS application which can be used somewhere else.
Code:
- <body>
- <div ng-app = “”>
- <p> Enter: <input type=”text” ng-model = “input”> </p>
- </div>
- </body>
Output:

Subscribe For Free Demo
Error: Contact form not found.
The ng-model directive binds the input value to the application variable named “input”. We will then see how we can display the same value on the web page in the next example.
3. ng-bind:This directive binds the value from the AngularJS application to the web page. i.e. It allows forwarding data from the application to HTML tags.
Code:
- <body>
- <div ng-app = “”>
- <p> Enter: <input type=”text” ng-model = “input”> </p>
- <p ng-bind = “input”> </p>
- </div>
- </body>
Output:

The data we captured using the “ng-model” directive in application variable “input” is bound to tag element <p> using “ng-bind”. We can run this application now and see how dynamically AngularJS updates the entered value on the page.
Along with these, there are some other directives available in AngularJS which are important.
4.ng-repeat:This directive repeats an HTML element and is used on an array of objects. This directive is very useful in scenarios like displaying table elements on a web page.
5.ng-init:This directive is used to initialize the values for the AngularJS application before it loads a web page.
Creating New Directives
we can create our own custom directives along with the existing available AngularJS directives. It is very easy to create new directives by using only JavaScript. New directives are created by using “. directive” function. E.g.
- <body ng-app = “appName”>
- <custom-Directive> </custom-Directive>
- <script>
- var app = angular.module(“appName”, []);
- app.directive(“customDirective”, function() {
- return {
- template : “<h1> Welcome to AngularJS Directives..! </h1>”
- };
- });
- </script>
- </body>
Angular.module is an AngularJS function which creates a module. We have created a custom directive named custom directive for which function is written. Whenever we use this directive on our web page, this function will get executed. In this case, it is a returning template that contains HTML code.
While naming directive, we need to use the camel case naming convention and while invoking it, we need to use “-” separated naming convention.
There are 4 ways by which we can invoke directives
1. Element name
As used in the last example:
- <custom-Directive> </custom-Directive>
2. Attribute
- <div custom-Directive> </div>
3. Class
- <div class=”custom-Directive”> </div>
To invoke directive by using the class name we must add restrict property with value ‘C’ while defining it.
- app.directive(“customDirective”, function() {
- return {
- restrict : “C”,
- template : “<h1> Welcome to AngularJS Directives..! </h1>”
- };
- });
4. Comment
- <! — directive: custom-Directive –>
To invoke directive by using comment we must add restrict property with value ‘M’ while defining it.
- app.directive(“customDirective”, function() {
- return {
- restrict : “M”,
- replace: true,
- template : ” <h1> Welcome to AngularJS Directives..! </h1> “
- };
- });
The replace property: true is mandatory and it will replace the original comment with directive otherwise the comment would be invisible.
With the rapid growth of JavaScript as a full stack language, more and more applications are utilizing frameworks that enable the web browser to handle more of the UI processing such as data binding, managing data views, transforming data and many other services. One of the most capable, extensible and popular frameworks is AngularJS, and one of the most useful components of the AngularJS framework is something called a directive. AngularJS provides many useful directives and, even more importantly, it provides a rich framework for creating custom directives.
What is a directive? To put it simply, directives are JavaScript functions that manipulate and add behaviors to HTML DOM elements. Directives can be very simplistic or extremely complicated. Therefore, getting a solid grasp on their many options and functions that manipulate them is critical.
In this tutorial, the four functions that execute as a directive is created and applied to the DOM will be explored and examples will be provided. This post assumes some familiarity with AngularJS and custom directives. If you’re newer to Angular, you might enjoy a tutorial on building your first AngularJS app.
The Four Functions of the AngularJS Directive Life Cycle
There are many options that can be configured and how those options are related to each other is important. Each directive undergoes something similar to a life cycle as AngularJS compiles and links the DOM. The directive lifecycle begins and ends within the AngularJS bootstrapping process, before the page is rendered. In a directive’s life cycle, there are four distinct functions that can execute if they are defined. Each enables the developer to control and customize the directive at different points of the life cycle.
The four functions are: compile, controller, pre-link and post-Link.
The compile function allows the directive to manipulate the DOM before it is compiled and linked thereby allowing it to add/remove/change directives, as well as, add/remove/change other DOM elements.
The controller function facilitates directive communication. Sibling and child directives can request the controller of their siblings and parents to communicate information.
The pre-link function allows for private $scope manipulation before the post-link process begins.
The post-link method is the primary workhorse method of the directive.
In the directive, post-compilation DOM manipulation takes place, event handlers are configured, and so are watches and other things. In the declaration of the directive, the four functions are defined like this.
- .directive(“directiveName”,function () {
- return {
- controller: function() {
- // controller code here…
- },
- compile: {
- // compile code here…
- return {
- pre: function() {
- // pre-link code here…
- },
- post: function() {
- // post-link code here…
- }
- };
- }
- }
- })
Commonly, not all of the functions are needed. In most circumstances, developers will simply create a controller and post-link function following the pattern below.
- .directive(“directiveName”,function () {
- return {
- controller: function() {
- // controller code here…
- },
- link: function() {
- // post-link code here…
- }
- }
- })
In this configuration, link refers to the post-link function.
Whether all or some of the functions are defined, their execution order is important, especially their execution relative to the rest of the AngularJS application.

Get On-Demand AngularJS Training to Become An Expert Web Design
- Instructor-led Sessions
- Real-life Case Studies
- Assignments
AngularJS Directive Function Execution Relative to other Directives
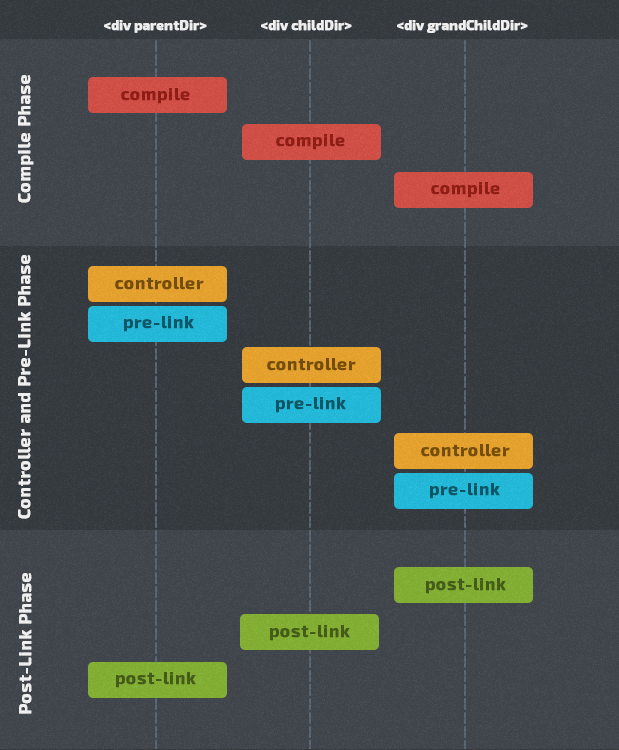
Consider the following HTML snippet with the directives parentDir, childDir and grandChildDir applied to the HTML fragment.
- <div parentDir>
- <div childDir>
- <div grandChildDir>
- </div>
- </div>
- </div>
The execution order of the functions within a directive, and relative to other directives, is as follows:
- Compile Phase
- Compile Function: parentDir
- Compile Function: childDir
- Compile Function: grandChildDir
- Controller Function: parentDir
- Pre-Link Function: parentDir
- Controller Function: childDir
- Pre-Link Function: childDir
- Controller Function: grandChildDir
- Pre-Link Function: grandChildDir
- Post-Link Function: grandChildDir
- Post-Link Function: childDir
- Post-Link Function: parentDir
AngularJS Directive Function Explanation: Deep Dive
The compilation phase occurs first. Essentially, the compile phase attaches event listeners to the DOM elements. For example, if a particular DOM element is bound to a $scope property, the event listener that allows it to be updated with the the value of the $scope property is applied to the DOM element. The process of compilation starts with the root DOM element from which the AngularJS application was bootstrapped and traverses down the branches of the DOM using a depth-first traversal, compiling a parent first then its children all the way down to the leaf nodes.
Once compilation is complete, directives can no longer be added or removed from the DOM (although there is way around this by directly using the compile service. The next phase is the calling of controllers and pre-link functions for all directives. When the controller is called, the $scope is available and can be used. The $element injected into the controller contains the compiled template but does not include the transcluded child content (transcluded content is the content between the start and end HTML tags on which the directive is applied). By definition, controllers in an MVC pattern simply pass the model to the view and define functions for handling events. Therefore, the controller of a directive should not modify the DOM of the directive for two reasons: it violates the purpose of the controller, and the transcluded child content has not been added to the DOM. So what does a controller do beyond modify the $scope? The controller allows for child directives to communicate with parent directives. The controller function itself should be thought of as a controller object that will be passed into the child directive’s post-link function if the child directive requests it. Therefore, the controller is typically used to facilitate directive communication by creating an object with properties and methods that can be used by its sibling and child directives. The parent directive cannot determine whether a child directive can require its controller, so it is best to limit code in this method to functions and properties that can safely be used by child directives.
After the controller function, the pre-link function executes. The pre-link function is mysterious to a lot of people. If you read much of the documentation on the Internet and in books, people write that this function is used only in rare circumstances and people will almost never need it. Those same explanations then fail to give an example of a situation where it could be used.
The pre-link function is really not complicated at all. First, if you review the AngularJS source code you will find an excellent example of the pre-link function: the directive ng-init uses it. Why? It’s simply a great method to execute private code involving the $scope; code that cannot be called by sibling and child directives. Unlike the controller function, the pre-link function is not passed into directives. Therefore, it can be used to execute code that modifies the $scope of its directive. The directive ng-init does exactly this. When the pre-link function for ng-init executes, it simply executes the JavaScript passed into the directive against the directive’s $scope. The result of the execution is available through the $scope’s prototypal inheritance to child directives during their controller, pre-link and post-link function executions but without giving access to those child directives to re-execute the code in the parent’s pre-link function. Also, the directive may need to execute other code not related to the $scope that it wishes to keep private.
Some experienced AngularJS developers would say this private code could still be placed in the controller and then not called by the child directives. That argument would hold true if the directive will only be used by the original developer who coded it but if the directive is going to be distributed and reused by other developers then encapsulating private code in the pre-link function could be very beneficial. Since developers never know how their directive will be re-used over the course of time, protecting private code from being executed by a child directive is a good approach to directive code encapsulation. I consider it to be a good practice to place directive communication public code in the controller function, and private code in the pre-link function. Like the controller, the pre-link should never do DOM manipulation nor execute a transclude function, since the content for child directives has not been linked yet.
For each directive, its controller and pre-link function executes before the controller and pre-link function of its child directives. Once the controller and pre-link phase for all directives is complete then AngularJS begins the linking phase, and executes the post-link functions for each directive. The linking phase runs opposite to the compile, controller and pre-link execution flows by starting with the leaf DOM nodes and working its way up to the root DOM node. The post-link DOM traversal follows a mostly depth-first path. As each child directive is linked, its post-link function is executed.
The post-link function is the function most commonly implemented in custom AngularJS directives. In this function, almost anything reasonable can be done. The DOM can be manipulated (for itself and child elements only), the $scope is available, the controller object for parent directives can be used, transclude functions can be run, etc. However, there are a few limitations. New directives cannot be added to the DOM because they will not be compiled. Additionally, all DOM manipulations must be done using DOM functions. Simply calling the html function on the DOM element and passing in new HTML will remove all of the event handlers added during the compile process. For example, these will not work as expected:
- element.html(element.html());
- or
- element.html(element.html() + “<div>new content</div>”);
The code will not cause the HTML to change, but reassigning the string version of the DOM elements will remove all of the event handlers created during the compile process. Typically, the post-link function is used to wire up event handlers, $watches and $observes.
Once all of the post-link functions are executed, the $scope is applied to the compiled and linked DOM structure, and the AngularJS page comes alive.
Directive Function Chart
Here is chart listing the purpose of each function, what is available when it executes, and best practices on how to use each function appropriately.
| DirectiveFunction | DOM | Transclude | $scope | Callableby Child |
|---|---|---|---|---|
| compile | DOM has not been compiled but template has been loaded into the DOM element content area. Directives can be added and removed. DOM can be manipulated with both DOM functions and HTML string replacement. | Transclude function is available but is deprecated and should not be called. | Not available. | Function cannot be called by child elements. |
| controller | Compiled DOM element is available but should not be modified. Transcluded child content has not been added to the DOM element. No DOM changes should occur because this is a controller and transcluded child content has not been linked in yet. | Transclude function is available but should not be called. | $scope is available and can be used. Function parameters are injected using the $injector service. | Function is passed into child directive linking functions and is callable by them. |
| pre-link | Compiled DOM element is available but should not be modified because child directive DOM elements have not been linked in yet. | Transclude function is available but should not be called. | $scope is available and can be modified. | Function is not callable by child directives. But may call the controllers of parent directives. |
| post-link | Compiled DOM element and child directive DOM elements are available. DOM can be modified with DOM functions only (no HTML replacement) and only content that does not require compilation can be added. No adding/removing of directives is allowed. | Transclude function is available and may be called. | $scope is available and may be used. | Not callable by directive children but may call the controller of parent directives. |
Summary
In this tutorial on AngularJS directives, we have learned about the purpose, execution order and overall capabilities and uses for each of the four directive functions: compile, controller, pre-link and post-link. Of the four functions, controller and post-link are the most commonly used but for more complex directives that need to have greater control of the DOM or need a private scope execution environment the compile and pre-link functions can be utilized.
Conclusion
So, it is a very powerful feature available in AngularJS. The directive allows to introduce new syntax, are like markers and allows us to attach special behaviour to them. There are existing available directives in AngularJS which are very useful, also we can define our own custom directives and use them. Custom directives allow developers great flexibility and freedom. Directives add new functionality into existing HTML with innovative style and features.