
- Different Methodologies in Project Management
- Difference between Soap and Rest | Know more about it
- What is Python array? Learn with examples
- Best Career options after Engineering | Everything You Need to Know [OverView]
- What is list in Python ? All you need to know [ OverView ]
- What is Data Modelling? : All you need to know [ OverView ]
- What are Microservices? : A Complete Guide For Beginners with Best Practices
- What is Python Programming | A Definitive Guide with Best Practices
- All You Need To Know About Python List | A Complete Guide For Beginners with Best Practices
- What Is a Software Developer | Software Developer job description and duties | Everything You Need to Know
- What is Artificial Intelligence Chatbot?
- Kotlin vs Java | Know Their Differences and Which Should You Learn?
- What is Abstraction in Java | Implementations of Abstraction in Java | A Definitive Guide with Best Practices
- What are the Important Data Structures and Algorithms in Python?
- Go vs Python | Know Their Differences and Which Should You Learn?
- Best Python IDEs and Code Editors | Expert’s Top Picks | Everything You Need to Know
- Go Programming Language | Expert’s Top Picks | A Definitive Guide [ OverView ]
- Python Scopes and Their Built-in Functions | Everything You Need to Know | Expert’s Top Picks
- Python String Formatting | A Complete Guide For Beginners [ OverView ]
- Python Serialization | A Complete Guide For Beginners | Learning Guide
- What is .Net FrameWork? Uses and its Benefits | Everything You Need to Know
- What is Quality Assurance ? : A Definitive Guide | Everything You Need to Know [ OverView ]
- What is Spike Testing ? : A Definitive Guide | Expert’s Top Picks | Free Guide Tutorial
- Average Full Stack Developer Salary in India [ For Freshers and Experience ]
- What is WSDL in Web Services ? Expert’s Top Picks | Free Guide Tutorial
- Virtual Instrumentation using Labview | Comprehensive Guide [ Explained ]
- Gradle vs Maven | Know Their Differences and Which Should You Learn?
- Python Sleep Method | Free Guide Tutorial & REAL-TIME Examples
- Kotlin vs Python | A Complete Guide with Best Practices
- Spring Boot vs Spring MVC | Differences and Which Should You Learn?
- IT Engineer Salary in India – How much does one earn?
- What is pip ? and Getting Started with Python pip | All you need to know [ OverView ]
- Node.js Installation on Windows and Ubuntu | Free Guide Tutorial
- Skills Needed for Full Stack Developers | All you need to know [ OverView ]
- What is Axios in React? and Its Uses [ OverView ]
- What is MEAN Stack? All you need to know [ OverView ]
- How to Install Node.JS on Ubuntu | Everything You Need to Know
- Average Annual Salary of a Python Certified Professional – Career Path
- What is Scala Programming? A Complete Guide with Best Practices
- What Is User Input in Python? Expert’s Top Picks
- Interface vs Abstract Class | Difference You Should Know
- Final Year Computer Science Project Ideas | All you need to know [ OverView ]
- Technical Architect | Free Guide Tutorial & REAL-TIME Examples
- Logical Programs in Java | Step-By-Step Process
- C++ vs Java | Difference You Should Know
- What is C Programming? Comprehensive Guide
- What Is a Quality Engineer? ( Everything You Need to Know )
- Python Project Ideas for Beginners | All you need to know
- How to Run Python Scripts? Comprehensive Guide
- Python Operators
- How To Install NumPy in Python?
- Top Software Courses to Get High Paying Jobs
- Loops In Python
- Tips to Avoid Application Rejection
- Top Young App Developers Who Became Millionaires
- Top Technical Courses After Graduation
- Node JS Architecture
- What is PyCharm?
- Resources To Help You Learn Java Programming
- How to Become a Software Engineer?
- Best Programming Languages to Learn in 2020
- Scala vs Python
- How to Become a Full Stack Developer?
- The Most Popular Java Applications Used World-wide
- What is Java String?
- Full Stack Developer vs Front End Developer vs Back End Developer
- Python Collections
- Identifiers in Python
- Dynamic Method Dispatch in Java
- Hadoop Ecosystem
- Method Overloading in Python
- Convert Decimal To Binary In Python
- How To Make A Chatbot In Python?
- How to Input a List in Python?
- Hash Tables and Hashmaps in Python
- Top Python Framework’s
- Python Split Method with Example
- Python Enumerate
- Inheritance in Java
- Init in Python
- Goto Statement in Python
- Literals in Java
- Polymorphism in Oops
- Socket Programming in Python
- Object Class in Java
- Break, Continue, and Pass Statements in Python
- Exception Handling in Java
- Java BASIC Programs

What is Axios in React? and Its Uses [ OverView ]
Last updated on 28th Oct 2022, Artciles, Blog, Software Engineering
- In this article you will learn:
- 1. What is Axios? (A little bit of history).
- 2. Why Do We Need Axios in React?
- 3. Fetching and Consuming Data with a Axios (GET-POST-DELETE).
- 4. Performing POST Request with Axios.
- 5. Sending custom headers with Axios.
- 6. Features of a Axios Library as per the Documentation.
- 7. Conclusion.
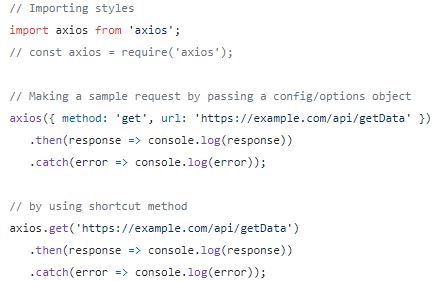
What is Axios?
- Axios is used to communicate with a backend and it also supports a Promise API that is native to a JS ES6.
- It is a library which is used to make a requests to an API, return data from an API, and then do things with that data in a React application.
- Axios is the very popular (over 78k stars on Github) HTTP client, which allows us to make a HTTP requests from a browser.
Why Do Need a Axios in React?
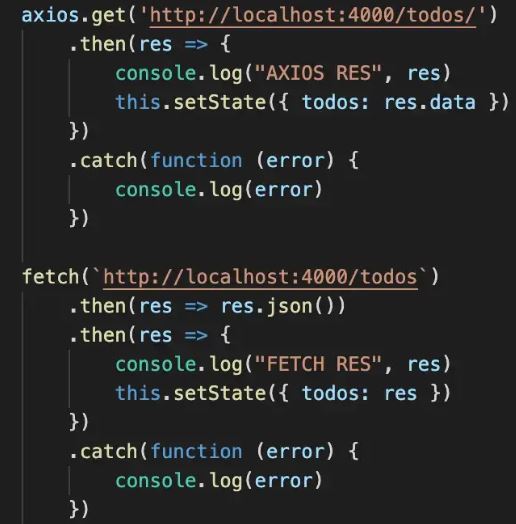
Axios allows us to communicate with an APIs easily in the React apps. Though this can also be achieved by the other methods like fetch or AJAX, Axios can offer a little more functionality that goes a long way with the applications that use React. So, while React doesn’t care about a DOM manipulation at all, why do need jQuery for a React app? Since React is handling each and everything within its own virtual DOM, perhaps and don’t need jQuery at all. And hence, Axios becomes the lighter-weight/optimized solution to play around with the HTTP requests. Using FETCH API:
- const getPostsData = () => {
- fetch(‘https://jsonplaceholder.typicode.com/posts’)
- .then(response => response.json())
- .then(data => console.log(data))
- .catch(error => console.log(error));
- }
- }
- getPostsData();
Using AXIOS:
- const getPostsData = () => {
- axios
- .get(“https://jsonplaceholder.typicode.com/posts”)
- .then(data => console.log(data.data))
- .catch(error => console.log(error));
- };
- getPostsData();
There isn’t a very big difference but if consider a POST or Delete or PUT request can start observing a benefits of using the Axios.
Prerequisites:
In order to use a Axios with React need the following:
- Install Node (v 10.7 or above). And if it is be already installed, check version by using npm -v.
- A React project setup with a Create React App or any React boilerplate .
Installing Axios :
- In order to use an Axios with React, need to install the Axios. It does not come as native JavaScript API, so that’s why have to manually import into the project.
- There are more ways to install Axios.and can pick any of them based on the system environment.
- Open up new terminal window, move to the project’s root directory, and run any of following commands to add Axios to the project.
Using npm:
- $ npm install axios
Using a bower package manager:
- $ bower install axios
Using a yarn:
- $ yarn add axios
Fetching and Consuming Data with Axios (GET-POST-DELETE):
- Web Applications use a HTTP requests, for example, GET, POST and PUT, to communicate with an APIs. Axios makes a life simple as it is simple for us now to perform these commands.
- Performing a GET Request with Axios .
- Let’s create new component named a My List and hook it into a component DidMount lifecycle as shown below. After that will fetch data with Get request by an importing axios. Component named a MyList, have imported a Axios first. axios.get(–URL–) is used to get promise which will return a response object. The received data in a response.data is assigned to user’s object. Can also retrieve the other Information like status code and others received with a response.
Performing a POST Request with Axios:
- Now let’s create the another component named AddUser for using a POST request which will add a user in user list. (a.ka. Adding data into database).
- Have made a HTTP Post request to modify database, which is a user list and added a new user to a database.
- Because initialized state, in handleChange() and have updated state when the API request returns a data successfully.
- Performing a POST Request with Axios .
- Finally, delete method. axios.delete is used to make Delete request to a server.
- Axiox.delete accepts a two parameters: url and optional config.
Sending a custom headers with Axios:
Sending custom headers with an Axios is more simple and straightforward. It is done by passing the object containing the headers as a last argument. Looking at response object:
Data: It is a payload returned from server. By default, Axios expects JSON and will parse this back into the JavaScript object.
Status: It is basically a HTTP code returned from a server.
StatusText: it refers to a HTTP status message returned by a server.
Headers: It contains all headers sent back by a server.
Config: It has original request configuration.
Request: It is an actual XMLHttpRequest object .
Looking at error object:
Message: an error message text.
Response: response object (if received) as described in a previous section.
Request: the actual a XMLHttpRequest object (when running in a browser).
Config: an original request configuration.
Features of a Axios Library as per the Documentation:
- Transform a request and response data .
- Make HTTP requests from a Node.js .
- Make XMLHttpRequests from a browser.
- Client-side support for the protecting against XSRF.
- Supports a Promise API .
- Intercept a request and response.
Conclusion:
- This article has helped understanding about Axios and its usage for a various features like fetching or retrieving a data and handling responses.
- In this article, saw several practical examples to check a power of Axios inside a React application to create a HTTP requests and handle responses.
- Also got an idea about why it is the better approach than normal fetch api.