
- Prometheus Tutorial: A Detailed Guide to Getting Started
- Getting Started with TeamCity Tutorial | Learn in 1 Day with Ease
- Getting Started with TeamCity Tutorial | Learn in 1 Day with Ease
- Azure DevOps Tutorial
- Jenkins Cheat Sheet
- Chef Cheat Sheet Tutorial
- Docker Container Tutorial
- Jenkins Tutorial
- Puppet Tutorial
- DevOps Tutorial
Docker Container Tutorial
Last updated on 26th Sep 2020, Blog, DevOps, Tutorials
Docker is a platform for packaging, deploying, and running applications. Docker applications run in containers that can be used on any system: a developer’s laptop, systems on premises, or in the cloud.
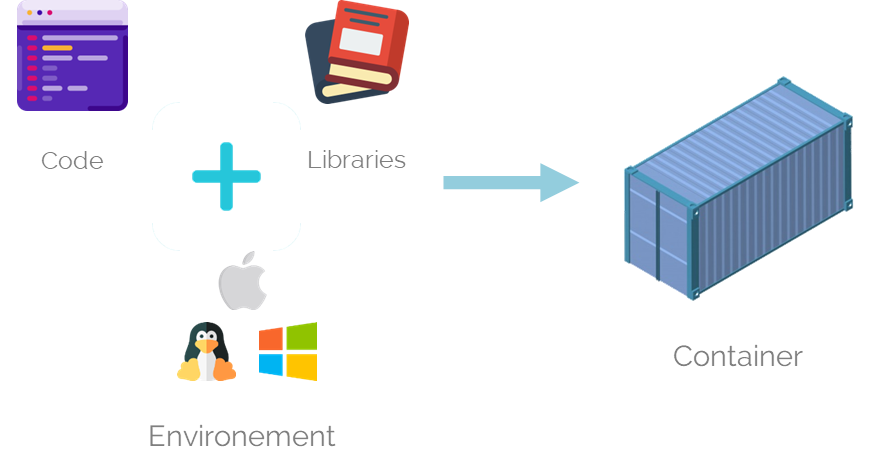
Containerization is a technology that’s been around for a long time, but it’s seen new life with Docker. It packages applications as images that contain everything needed to run them: code, runtime environment, libraries, and configuration. Images run in containers, which are discrete processes that take up only as many resources as any other executable.
It’s important to note that Docker containers don’t run in their own virtual machines, but share a Linux kernel. Compared to virtual machines, containers use less memory and less CPU.
However, a Linux runtime is required for Docker. Implementations on non-Linux platforms such as macOS and Windows 10 use a single Linux virtual machine. The containers share this system.
Containerization has enjoyed widespread adoption because of its
- Consistent test environment for development and QA.
- Cross-platform packages called images.
- Isolation and encapsulation of application dependencies.
- Ability to scale efficiently, easily, and in real time.
- Enhances efficiency via easy reuse of images.
What is a Container?
So once again, containers are software that wraps up the code, the dependencies and the environment that is required to run the code in a single package. These containers are used for development, deployment, testing, and management of software.
To get a better understanding of containers, let’s study it in comparison to VM. I’m sure you guys already know what VM is.
Containers vs. Virtual Machines
When talking about containerization it is very often compared to virtual machines. Let’s take a look at the following image to see the main difference:
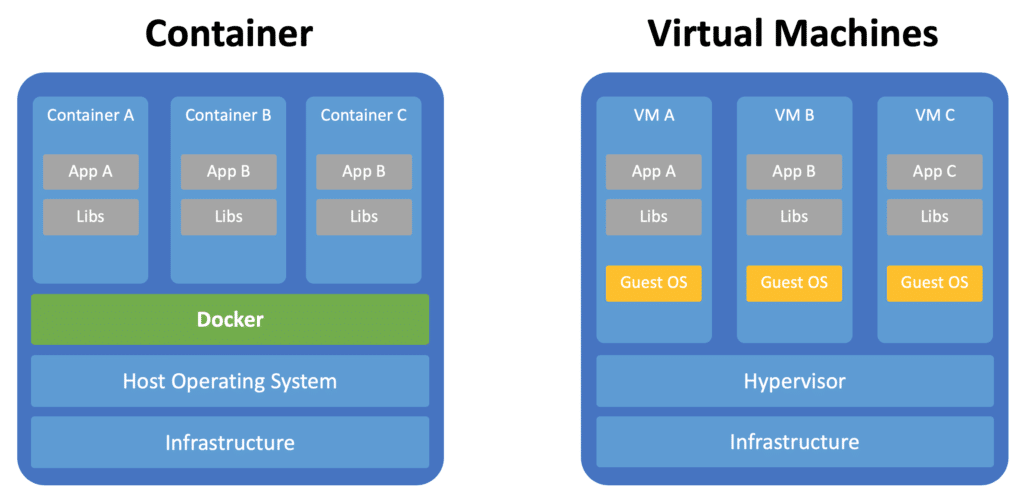
The Docker container platform is always running on top of the host operating system. Containers are containing the binaries, libraries, and the application itself. Containers do not contain a guest operating system which ensures that containers are lightweight.
In contrast virtual machines are running on a hypervisor (responsible for running virtual machines) and include it’s own guest operating system. This increased the size of the virtual machines significantly, makes setting up virtual machines more complex and requires more resources to run each virtual machine.
Concept
This tutorial is about Docker and getting started with this popular container platform. Before actually starting to apply Docker in practice let us first clarify some of the most important concepts and terminologies.
Images
A Docker image is containing everything needed to run an application as a container. This includes:
- code
- runtime
- libraries
- environment variables
- configuration files
The image can then be deployed to any Docker environment and executable as a container.
A Docker container is a runtime instance of an image. From one image you can create multiple containers (all running the sample application) on multiple Docker platform.
A container runs as a discrete process on the host machine. Because the container runs without the need to boot up a guest operating system it is lightweight and limits the resources (e.g. memory) which are needed to let it run.
Architecture:
Containers occupy a part of the host system’s kernel and acquire resources using it.
VMs are completely isolated from the host system and acquire resources through something called the hypervisor.
Subscribe For Free Demo
Error: Contact form not found.
Isolation:
Container’s isolation isn’t as complete as of a VM but is adequate.
VM provides complete isolation from the concerning host system and is also more secure.
Efficiency:
Containers are way more efficient as they only utilise the most necessary parts of the Operating system. They act like any other software on the host system.
VM are less efficient as they have to manage a full-blown guest operating system. VM’s have to access host resources through a hypervisor.
Portability:
Containers are self-contained environments that can easily be used on different Operating systems.
VMs aren’t that easily ported with the same settings from one operating system to another.
Scalability:
Containers are very easy to scale, they can be easily added and removed based on requirements due to their lightweight.
VMs aren’t very easily scalable as they are heavy in nature.
Deployment:
Containers can be deployed easily using the Docker CLI or making use of Cloud services provided by aws or azure.
VMs can be deployed by using the PowerShell by using the VMM or using cloud services such as aws or azure.
Why do we need Containers?
Now that we understand what containers are, let’s see why we need containers.
- 1. It allows us to maintain a consistent development environment. I have already talked about this when we were discussing the issues we faced before containers were a thing.
- 2. It allows us to deploy software as micro-services. I will get into what micro-services in another blog. But right now, understand that software these days are not deployed as single files, but rather a set of smaller files, this is known as micro-services. And Docker helps us launch software in multiple containers as micro-services.
We’ll look at these basic concepts as we install the Docker tools, and create images and containers.
Tip: Find application errors and performance problems instantly with Stackify Retrace
Troubleshooting and optimizing your code is easy with integrated errors, logs and code level performance insights.
Get Started with Docker
We’ll start by installing the Docker desktop tools found here. Download the correct installer for your operating system and run the installation.
Running a container
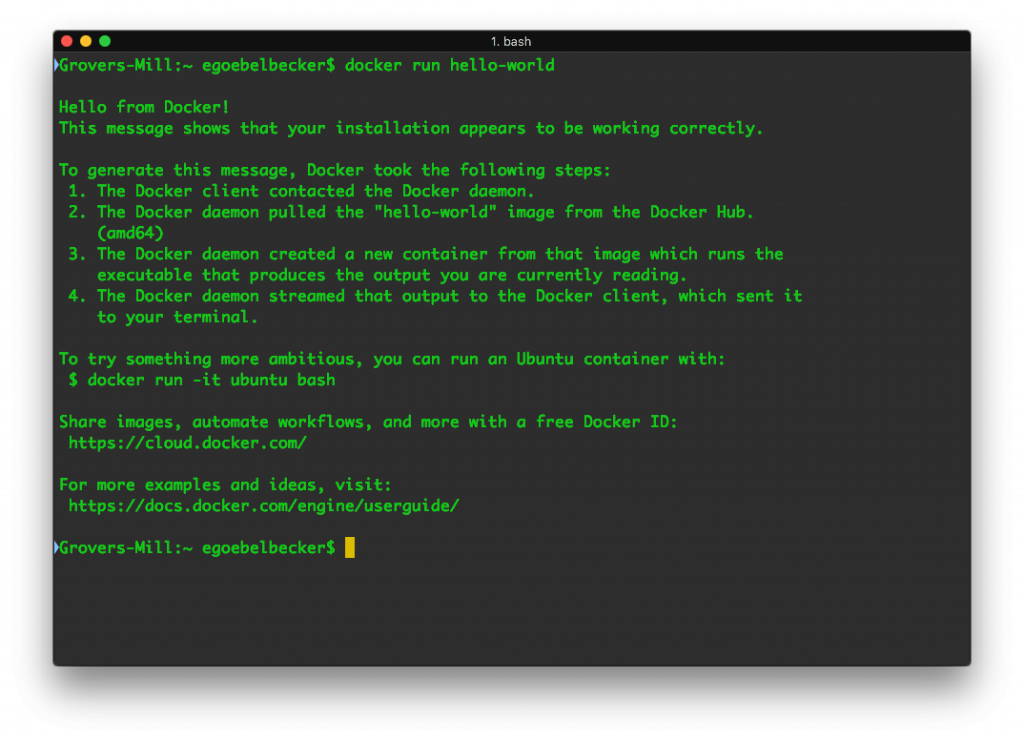
Once we install the tools, we can run a Docker image:
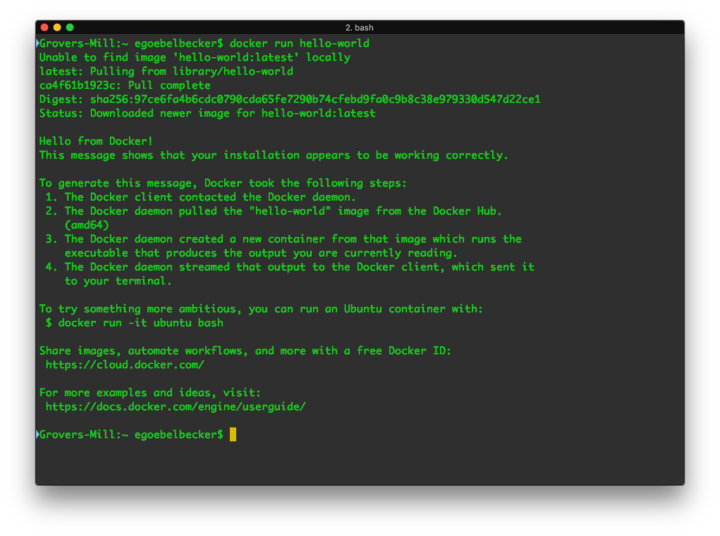
docker run hello-world does exactly what it sounds like. It runs an image named “hello-world.”
Docker looks for this image on our local system. When it can’t find the image, Docker downloads it from Docker Hub for us.
Hello-world displays a message telling us everything’s working. Then it spells out the process for us before recommending some additional steps.
Under the covers
Let’s take a look at a few more Docker commands that tell us more about the environment.
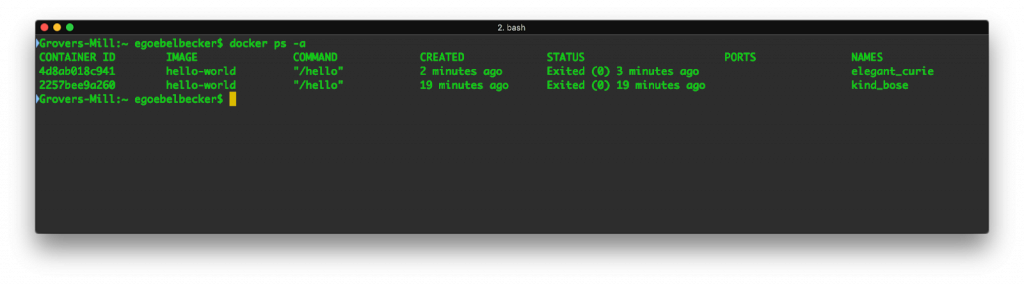
docker ps -a lists the containers on our system:
From this, we can see that the hello-world container is still in memory. The status column tells us that it’s excited. The names column has a name, kind_bose, that Docker assigned to the container for us. We’ll cover container names below.
Let’s run this image again with docker run hello-world. The output is almost the same…
…except this time we don’t see information about downloading the image. It was already available on our system.
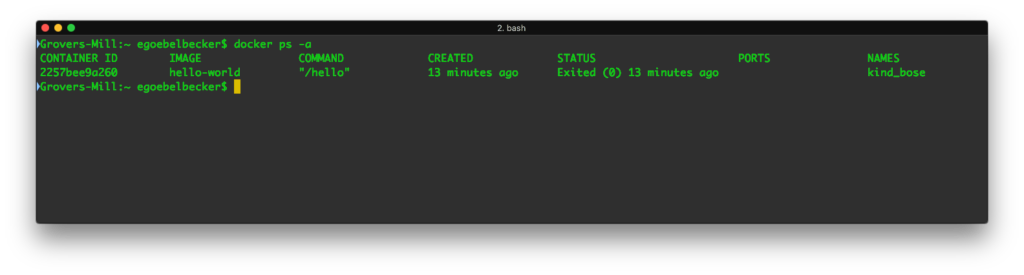
But what does docker ps -a show us now?
We see two stopped instances of hello-world, with two different names. Docker created an additional container. It didn’t reuse the first. When we told Docker to run an image named hello-world, it did exactly that; it ran a new instance of the image. If we want to reuse a container, we refer to it by name.
Reuse a container
Let’s try starting one of the stopped containers:
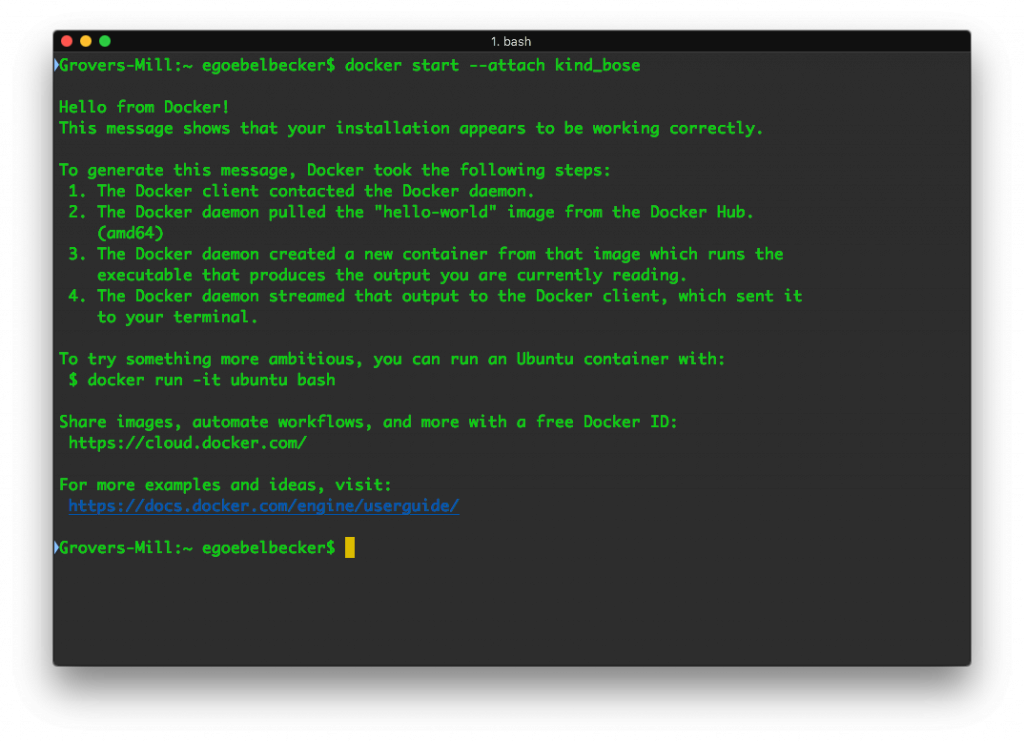
This time, we used docker start –attach <container name> instead of docker run. We use the start command, and rather than naming the image, we specify the name of a container that’s already loaded. The –attach tells Docker to connect to the container output so we can see the results.
We stop containers with docker stop <container name> and remove them with docker rm <container name>. We’ll take a look at that below when we work with applications designed to keep running in the background.
If we check docker ps again, we still see two containers.
Let’s run a container that doesn’t exit immediately. Hello-world’s instructions gave us an interesting example:
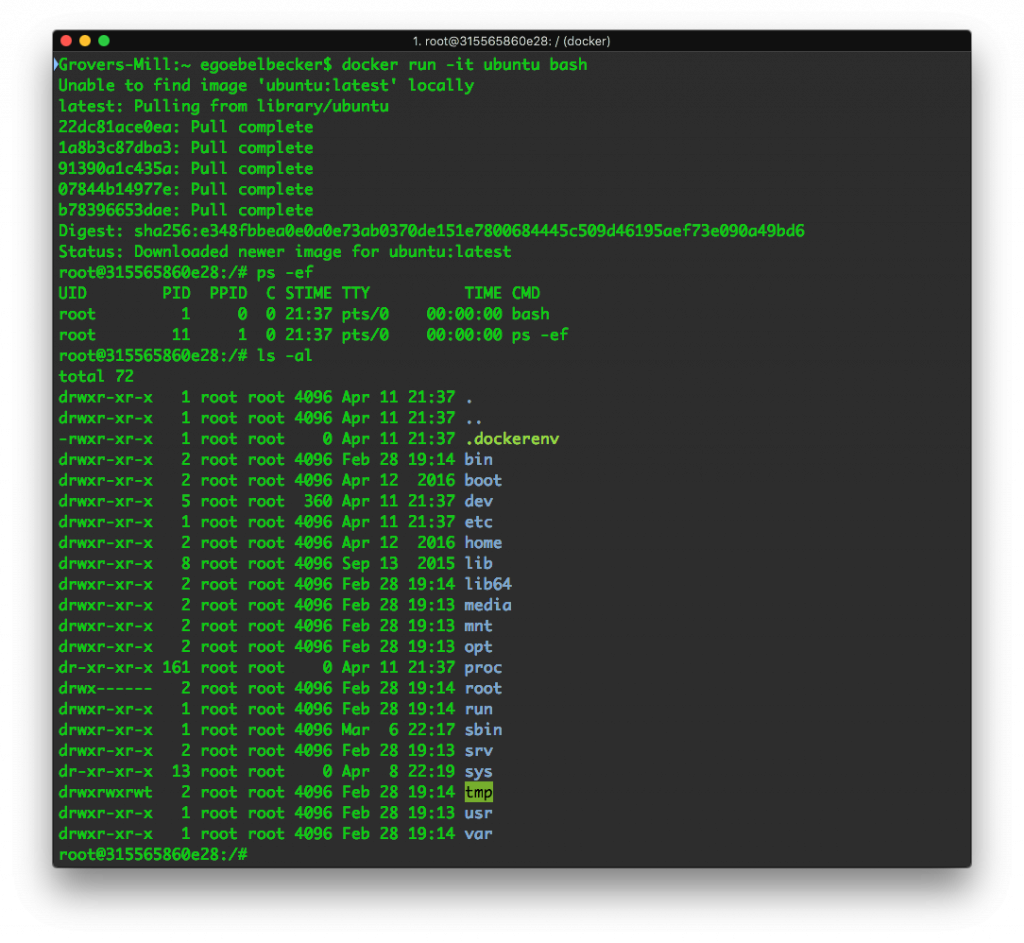
With a single Docker command, docker run -it ubuntu bash, we downloaded an Ubuntu Linux image and started a login shell as root inside it. The -it flags allow us to interact with the shell.
When we open another window and list containers, we see a different picture:

The Ubuntu container’s status is Up. Let’s see what’s going on inside:
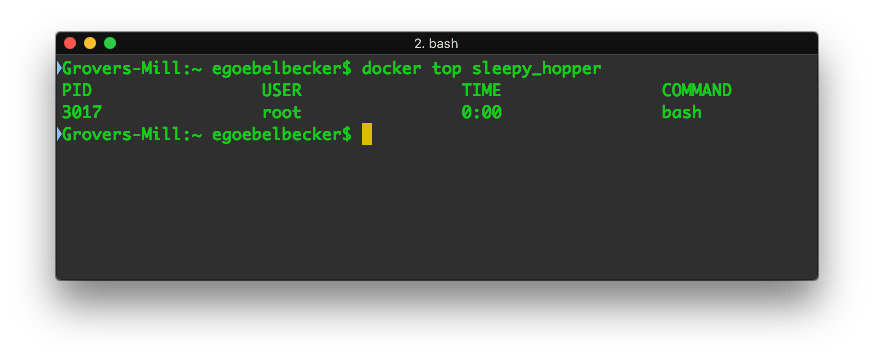
docker top looks inside the container and shows us the running processes. The Ubuntu container is running a single process—the root shell.
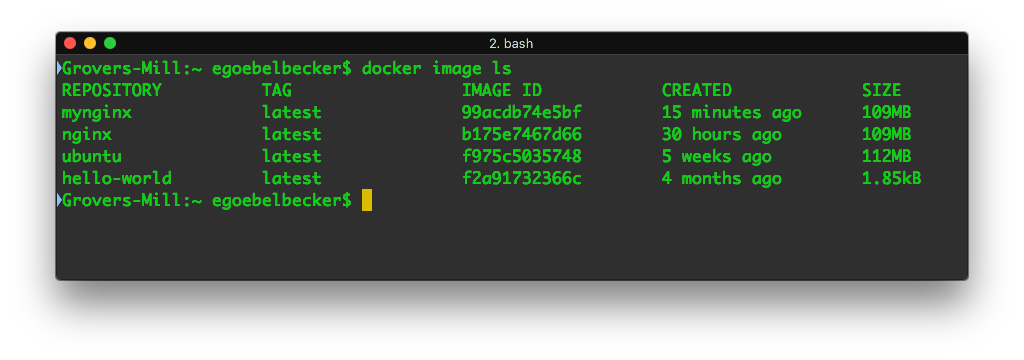
Let’s look at one last Docker command before we create a container of our own:
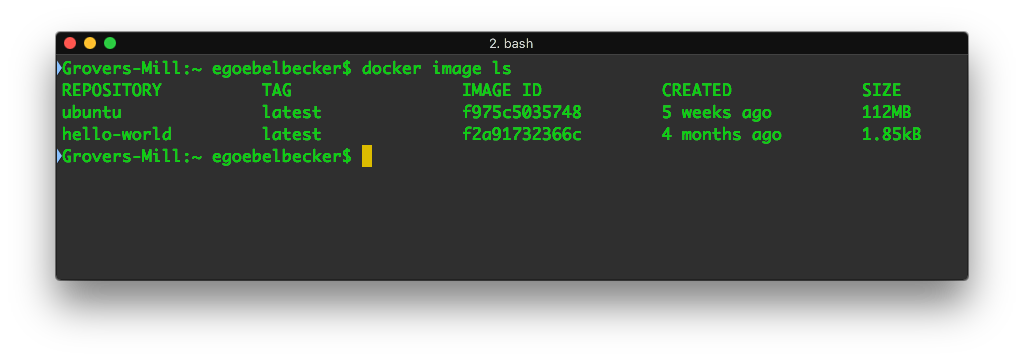
Docker image ls produces a listing of images on our system. We see Ubuntu and the single hello-world image since we only needed that single image to run two containers.
Share system resources with a container
So far, we’ve run a couple of self-contained images. What happens when we want to share local resources from our host system with a container? Docker has the ability to share both the file system and the networking stack with containers.
Let’s create a web server that serves a web page from the local filesystem. We’ll use a public Nginx image.
First, we need an HTML file to display when we connect to the web server. Start in an empty directory that we’ll call my-nginx and create a single subdirectory named html. Inside html, create index.html:
Hello, World!
We’re ready to go. Here’s our command line:
$ docker run -v /full/path/to/html/directory:/usr/share/nginx/html:ro -p 8080:80 -d nginx
When we execute this command line, we see Docker download the Nginx image and then start the container.
We used four command line options to run this container:
- -v/full/path/to/html/directory:/usr/share/nginx/html:ro maps the directory holding our web page to the required location in the image. The ro field instructs Docker to mount it in read-only mode. It’s best to pass Docker the full paths when specifying host directories.
- -p 8080:80 maps network service port 80 in the container to 8080 on our host system.
- -d detaches the container from our command line session. Unlike our previous two examples, we don’t want to interact with this container.
- nginx is the name of the image.
After executing this command, we should be able to reach the web server on port 8080:
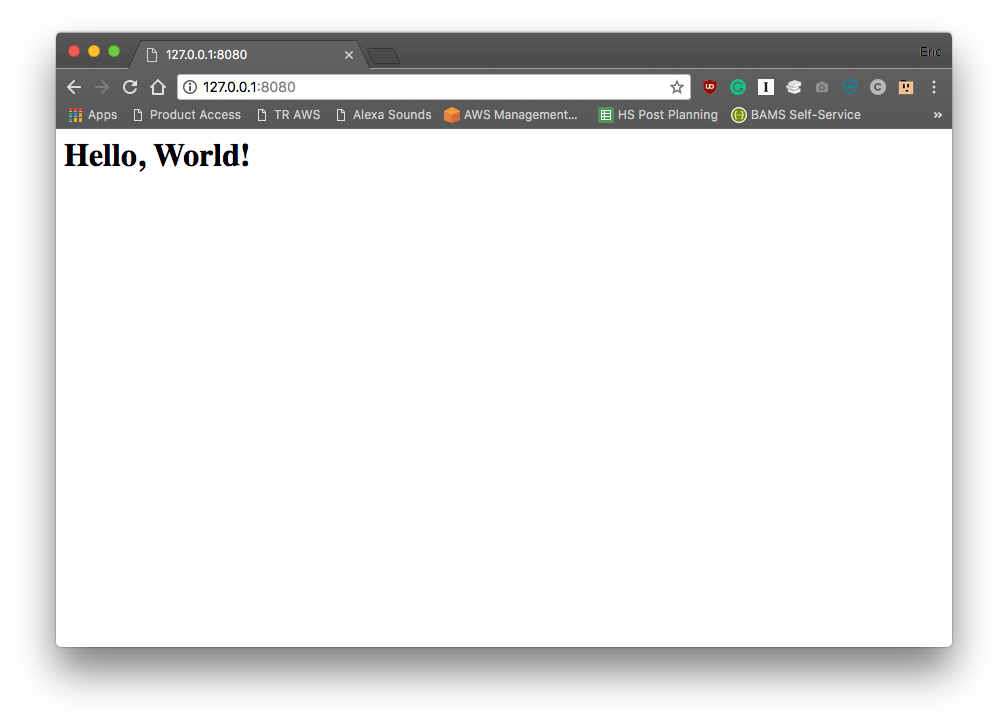
We see our test page! You can also access the page from our devices on your network using your host system’s IP address.
When we ran the Nginx image, we needed to tell it where to get the web files. We did this by mounting a directory on our host system to a directory inside the container, overriding the files that are already inside the image. Docker also supports volumes, which can contain filesystems and be shared between containers.
We also needed to map port 80 in our container to a port on our host system so the web server can communicate with the outside world. Containers don’t automatically have access to the host network. With our port mapping directive, the container can be accessed via the host network. Since we only mapped this port, no other network resources are available to the container.
This exercise illustrates one of Docker’s key advantages: easy reuse of existing resources. We were able to create a web server in minutes with virtually no configuration.
Stop and remove a container
Our web server is still running:

We can stop it with docker stop…
$ docker stop compassionate_ritchie
…and remove the container with docker rm.
$ docker rm compassionate_ritchie
After running these two commands, the container is gone:

Create a Docker image
Now let’s build on this example to create an image of our own. We’ll package the Nginx image with our html file.
Images are created with a Dockerfile, which lists the components and commands that make up an image.
In my-nginx, create a Dockerfile:

Enroll in Best Docker Training from Expert Trainers to Build Your Skills
- Instructor-led Sessions
- Real-life Case Studies
- Assignments
FROM nginx
COPY html /usr/share/nginx/html
This Dockerfile contains two instructions:
- 1.First, create this image from an existing image, which is named nginx. The FROM instruction is a requirement for all Dockerfiles and establishes the base image. Subsequent instructions are executed on the base image.
- 2.The second instruction, COPY, tells Docker to copy our file tree into the base image, overriding the contents of /usr/share/nginx/html in the base image.
Next, build the image:
- $ docker build -t mynginx .
- Sending build context to Docker daemon 3.584kB
- Step 1/2 : FROM nginx
- —> b175e7467d66
- Step 2/2 : COPY html /usr/share/nginx/html
- —> Using cache
- —> a8b02c2e09a4
- Successfully built a8b02c2e09a4
- Successfully tagged mynginx:latest
We passed two arguments to build:
- -t mynginx gave Docker a tag for the image. Since we only supplied a name, we can see that Docker tagged this build as the latest in the last line of the build output. We’ll look more closely at tagging below.
- The final argument, dot (or “.”), told Docker to look for the Dockerfile in the current working directory.
The build output shows Docker using the nginx image and copying the contents of html into the new image.
When we list images, we can see mynginx:
Run a custom image
Next, we run our new image:
$ docker run –name foo -d -p 8080:80 mynginx
Let’s break that command down.
- –name foo gives the container a name, rather than one of the randomly assigned names we’ve seen so far.
- -d detaches from the container, running it in the background, as we did in our previous run of Nginx.
- -p 8080:80 maps network ports, as we did with the first example.
- Finally, the image name is always last.
Now point your browser at http://127.0.0.1:8080 and you can see the test web page again.
While the web server is still running, let’s take a look at docker ps:
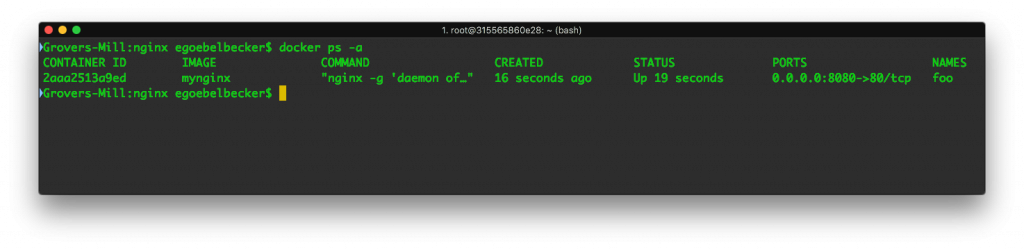
We can see that the ports column has the mapping we used to start the container, and names displays the container name we used.
We’ve created a self-contained web server that could easily contain a complete set of web documents instead of only one. It can be deployed on any platform that supports Docker.
Create a more customized image
Each Docker image executes a command when it’s run. In our Nginx Dockerfile, we didn’t define one, so Docker used the command specified in the base image.
Let’s try a slightly more complicated image that requires more setup and a specific command instruction.
Start in another empty directory. This time, we’ll create two new text files.
First, we’ll create a small Python script named app.py:
- from flask import Flask
- import os
- import socket
- app = Flask(__name__)
- @app.route(“/”)
- def hello():
- html = “<h3>Hello {name}!</h3> <b>Hostname:</b> {hostname}<br/>”
- return html.format(name=os.getenv(“NAME”,”world”), hostname=socket.gethostname())
- if __name__ == “__main__”:
- app.run(host=’0.0.0.0′, port=4000)
This script creates a web server listening on port 4000 and serves a small HTML document with a greeting and the container’s hostname.
Next, we’ll create a Dockerfile:
- #Use an official Python runtime as a parent image
- FROM python:2.7-slim
- WORKDIR /app
- ADD . /app
- RUN pip install –trusted-host pypi.python.org Flask
- ENV NAME World
- CMD [“python”, “app.py”]
This Dockerfile starts with an image that contains a Python runtime. We can see from the name that it provides version 2.7 in a slim configuration that contains a minimal number of Python packages.
Next, it establishes a WORKDIR (working directory) named /app and ADDs the current working directory to it.
After adding the script to the image, we need to install the Flask Python package, the library we use for the web server. The RUN instruction executes pip install for this. Dockerfiles can run commands as part of the image build process.
Next, it sets the environment variable NAME, which is used in the HTML page returned by app.py
And finally, the Dockerfile specifies the command to run when the image is run. CMD accepts a command and a list of arguments to pass to the command. This image executes the Python interpreter, passing it app.py.
Let’s build this image:
- $ docker build -t mypyweb .
- Sending build context to Docker daemon 4.096kB
- Step 1/6 : FROM python:2.7-slim
- —> b16fde09c92c
- Step 2/6 : WORKDIR /app
- —> Using cache
- —> e8cfc6466e29
- Step 3/6 : ADD . /app
- —> Using cache
- —> b0ed613be2d4
- Step 4/6 : RUN pip install –trusted-host pypi.python.org Flask
- —> Using cache
- —> 255f51709816
- Step 5/6 : ENV NAME World
- —> Using cache
- —> d79d78336885
- Step 6/6 : CMD [“python”, “app.py”]
- —> Using cache
- —> 687bc506dd46
- Successfully built 687bc506dd46
- Successfully tagged mypyweb:latest
Run our Python image
$ docker run –name webapp -p 8080:4000 mypyweb
Let’s navigate to 8080 again with a browser:

We see our new web page. We’ve created another portable web server with just a few lines of Python!
Pass environment variables
Our Dockerfile set an environment variable…
ENV NAME World
…which the Python script uses in this greeting:
html = “
Hello {name}!
Hostname: {hostname}
”
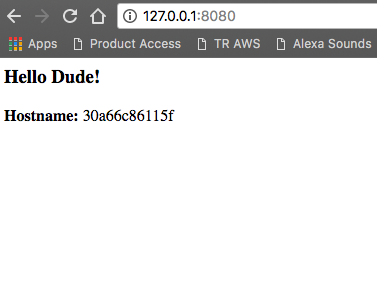
We can override this variable from the command line:
$ docker run –name webapp -p 8080:4000 -e NAME=”Dude” mypyweb
Then look at the web page again:
Share an image
As we’ve been running images and using them as the basis for our own, we’ve seen Docker download them from Docker Hub:
Step 1/6 : FROM python:2.7-slim
2.7-slim: Pulling from library/python
b0568b191983: Pull complete
We can upload our own images to Docker Hub for distribution, too.
The first step is to create an account on Docker Cloud. If you don’t already have an account, go and create one.
Next, we’ll log in to the Docker registry:
$ docker login
Username: ericgoebelbecker
Password:
Login Succeeded
We’ll upload mypyweb to Docker Hub.
Before we do that, we should tag it. The format for Docker tags is username/repository:tag. Tags and repository names are effectively freeform.
$ docker tag mypyweb ericgoebelbecker/stackify-tutorial:1.00
If we list our images now, we see this tag:
| REPOSITORY | TAG | IMAGE ID | CREATED | SIZE |
|---|---|---|---|---|
| ericgoebelbecker/stackify-tutorial 150MB | 1.00 | 0057736e26ce | Less than a second ago | |
| mypyweb 150MB | latest | 0057736e26ce | Less than a second ago | |
| mynginx | latest | a8b02c2e09a4 | 41 hours ago | 109MB |
| nginx | latest | b175e7467d66 | 4 days ago | 109MB |
| python | 2.7-slim | b16fde09c92c | 3 weeks ago | 139MB |
Note that our image tag and mypyweb have the same image ID and size. Tags don’t create new copies of images. They’re pointers.
Now we can push the image to Docker Hub:
$ docker push ericgoebelbecker/stackify-tutorial:1.00
The push refers to repository [docker.io/ericgoebelbecker/stackify-tutorial]
- 7d7bb0289fd8: pushed
- acfa7c4abdbb: pushed
- 8d2f81f035b3: Pushed
- d99e7ab4a34b: Mounted from library/python
- 332873801f89: Mounted from library/python
- 2ec65408eff0:Mounted from library/python
- 43efe85a991c:Mounted from library/python
- 1.00:digest:sha256:e61b45be29f72fb119ec9f10c a660c3c54c6748cb0e02a412119fae3c8364ecd size:1787
docker push accepts a tag name and pushes it to the default repository, which is Docker Hub.
Now, if we visit our account area on hub.docker.com, we can see the new repository, the image, and the tag:
If you look closely, you’ll notice a size discrepancy. This is because the image on Docker Hub only contains the changes from the Python:2.7-slim image it’s based on.
We can pull the image down and run it from any system:
$ docker run -p 8080:4000 –name webapp -e NAME=”Docker Hub” ericgoebelbecker/stackify-tutorial:1.00
Unable to find image ‘ericgoebelbecker/stackify-tutorial:1.00’ locally
- 1.00: Pulling from ericgoebelbecker/stackify-tutorial
- b0568b191983: Pull complete
- 55a7da9473ae: Pull complete
- 422d2e7f1272: Pull complete
- 8fb86f1cff1c: Pull complete
- b622183190d: Pull complete
- cf5af0f3fb51: Pull complete
- 3292695f8261: Pull complete
Digest: sha256:e61b45be29f72fb119ec9f10ca660c3c54c6748cb0e02a412119fae3c8364ecd
Status: Downloaded newer image for ericgoebelbecker/stackify-tutorial:1.00
* Running on http://0.0.0.0:4000/ (Press CTRL+C to quit)
This is the output of run on a different system from the one I built on. Similar to the way we ran hello-world, we passed the image tag to docker run. And since the image was not available locally, Docker pulled it from Docker Hub and Python:2.7-slim, assembled the image, and ran it.
We published the image, and it’s now publicly available from Docker Hub.
Benefits Of Docker Container
Docker container is the most popular form of container technology that allows us to package an application in containers and make it portable for any system running Linux OS or Windows OS. Docker container is a standard unit of software that contains all the codes and dependencies of an application to make it run fast and reliably from one computing environment to another.
It contains all the essential things required to run an application like code, runtime, system tools, system libraries, and settings. In contrast to Virtual Machines, Docker containers take less space, handle more applications at once, and are flexible and tenable.
conclusion
Docker is an advanced software platform that allows building portable software containers that simplify application development and deployment. Docker simplifies modern software development with the help of containers that isolate the application’s execution environment from one another and use fewer resources than conventional VMs. It significantly boosts performance and reduces the size of the application.
Docker tutorials are designed for developers, system administrators, and DevOps teams. It allows testing the application and making necessary changes so that everything works fine in the production environment without affecting the existing systems. It often gets mixed up with VMs, but it is more advanced than VMs and provides added functionality. Docker components such as Docker client and server, Docker image, Docker registry, and Docker container makes it more sophisticated and intelligent.
Docker is a powerful platform for building, managing, and running containerized applications. In this tutorial, we installed the tools, downloaded and ran an off-the-shelf image, and then built images of our own. Then we published an image to Docker Hub, where it can be downloaded and run on any Docker-enabled host.