
- What is BluePrism? Know about the benefits of BluePrism Certification
- What is Silk test Workbench? : Comprehensive Guide
- RPA Developer Salary
- What is Selenium and Why Should You Learn Selenium | Everything You Need to Know
- Robotic Process Automation with Blue Prism | A Definitive Guide with Best Practices [ OverView ]
- An Overview of Patch Workflows | Benefits and Special Features [ For Freshers and Experience ]
- Selenium Commands : Selenese | Everything You Need to Know [ OverView ]
- Robotic Process Automation Developer Salary [ For Freshers and Experience ]
- List of Basic Powershell Commands | Every Developer Should Know [ OverView ]
- Tosca vs Selenium | Differences and Which Should You Learn?
- Chef vs Puppet: Major Differences and Similarities
- what is TestNG Annotations in Selenium Webdriver?
- Blue Prism Certification Guide
- RPA Tools Comparison
- Ansible vs Chef
- How to Download & Install Selenium Ide?
- RPA vs Selenium
- RPA Blue Prism Certification Guide
- Robotic Process Automation Career Scope
- How to Take A Screenshot in Selenium WebDriver?
- Robot Class in Selenium Webdriver
- CSS Selectors in Selenium
- Vector Class in Java
- Page Object Model in Selenium With Page Factory
- How to Handle Alert and Pop-ups in Selenium WebDriver?
- Selenium Webdriver
- What is Selenium?
- How to Handle Actions Class in Selenium WebDriver?
- Waits in Selenium WebDriver
- Select Class in Selenium WebDriver

How to Download & Install Selenium Ide?
Last updated on 30th Sep 2020, Artciles, Automation, Blog
Before moving ahead, let’s take a moment to look at the agenda of this tutorial. In this tutorial, we will learn all about Selenium IDE, starting from its installation to the details about each of its features. At the end of this tutorial, the reader is expected to be able to install Selenium IDE tool and play around with its features.
Introduction to Selenium IDE
Selenium integrated development environment, acronym as Selenium IDE is an automated testing tool that is released as a Firefox plug-in. It is one of the simplest and easiest tools to install, learn and to go ahead with the creation of test scripts. The tool is laid on a record and playback fundamental and also allows editing of the recorded scripts.
The most impressive aspect of using selenium IDE is that the user is not required to possess any prior programming knowledge. The minimum that the user needs is the little acquaintances with HTML, DOMS and JavaScript to create numerous test scripts using this tool.
Being a Firefox plug-in, Selenium IDE supports only Firefox, thus the created test scripts could be executed only on Firefox. A few more loopholes make this tool inappropriate to be used for complex test scripts. Thus, other tools like Selenium RC, WebDriver comes into the picture.
Subscribe For Free Demo
Error: Contact form not found.
So, before gripping on to the details of Selenium IDE, let’s have a look at its installation first.
Selenium IDE Download and Installation
For the ease of understanding, I have bifurcated the entire IDE installation process in the following chunks/steps.
What is System Testing?
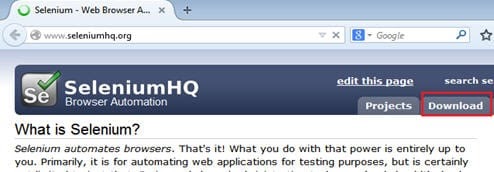
Step 1: Selenium IDE download: Open the browser (Firefox) and enter the URL http://seleniumhq.org/.This would open the official Selenium headquarter website. Navigate to the “Download” page; this page embodies all the latest releases of all the selenium components.
Refer to the following figure.
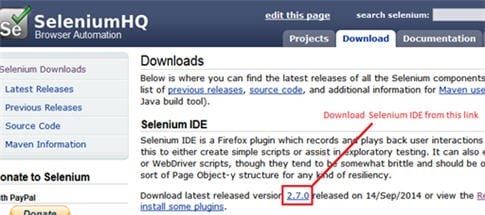
Step 2: Move under the selenium IDE head and click on the link present. This link represents the latest version of the tool in the repository.
Refer to the following figure.
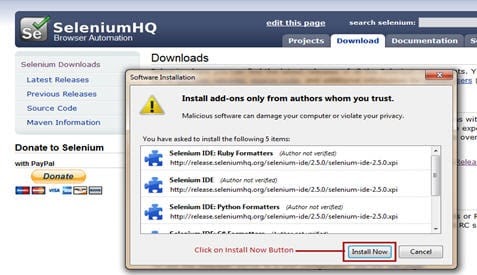
Step 3: As soon as we click on the above link, a security alert box would appear so as to safeguard our system against potential risks. As we are downloading the plug-in from the authentic website, thus click on the “Allow” button.
Step 4: Now Firefox downloads the plug-in in the backdrop. As soon as the process completes, the software installation window appears. Now click on the “Install Now” button.
Step 5: After the installation is completed, a pop-up window appears asking to re-start the Firefox. Click on the “Restart Now” button to reflect the Selenium IDE installation.
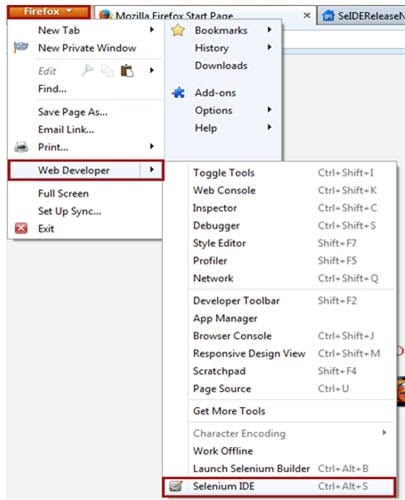
Step 6: Once the Firefox is booted and started again, we can see selenium IDE indexed under menu bar -> Web Developer -> Selenium IDE.
Step 7: As soon as we open Selenium IDE, the Selenium IDE window appears.
Features of Selenium IDE
Let’s have a look at each of the feature in detail.
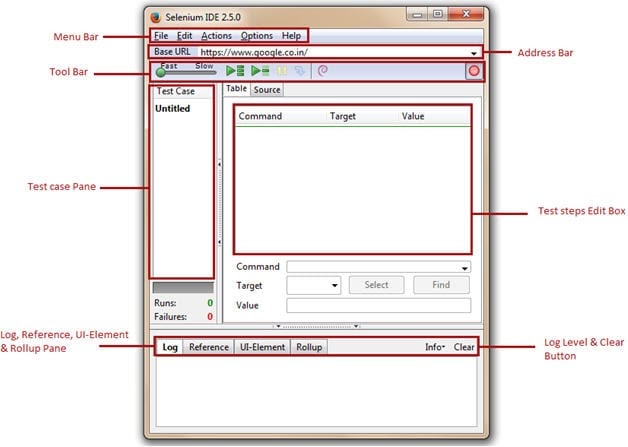
1. Menu Bar
The menu bar is positioned at the uppermost of the Selenium IDE window. The menu bar is typically comprised of five modules.
- File Menu
- Edit Menu
- Actions Menu
- Options Menu
- Help Menu
A) File Menu
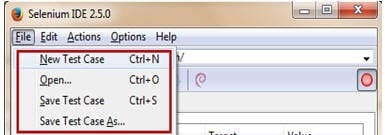
File Menu is very much analogous to the file menu belonging to any other application.
It allows the user to:
- Create a new test case, open existing test case, save the current test case.
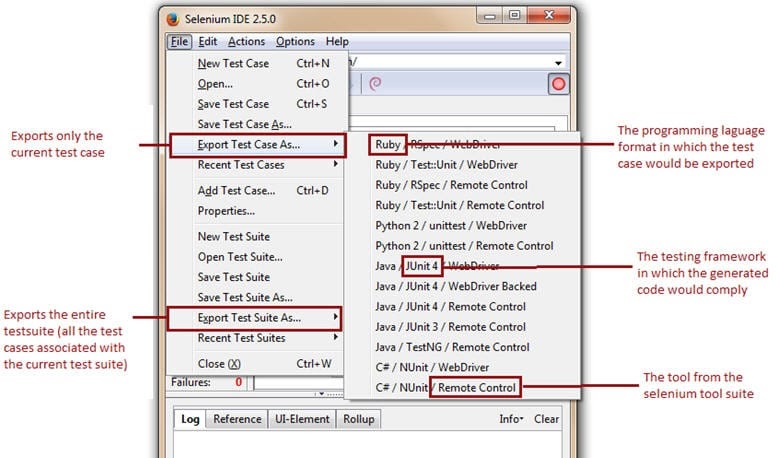
- Export Test Case As and Export Test Suite As in any of the associated programming language compatible with Selenium RC and WebDriver. It also gives the liberty to the user to prefer amid the available unit testing frameworks like jUnit, TestNG etc. Thus an IDE test case can be exported for a chosen union of programming language, unit testing framework and tool from the selenium package.
- Export Test Case As option exports and converts only the currently opened Selenium IDE test case.
- Export Test Suite As option exports and converts all the test cases associated with the currently opened IDE test suite.
- Close the test case.
The Selenium IDE test cases can be saved into the following format:
- HTML format
The Selenium IDE test cases can be exported into the following formats/programming languages.
- java (IDE exported in Java)
- rb (IDE exported in Ruby)
- py (IDE exported in Python)
- cs (IDE exported in C#)

Notice that with the forthcoming newer versions of Selenium IDE, the support to formats may expand.
B) Edit Menu
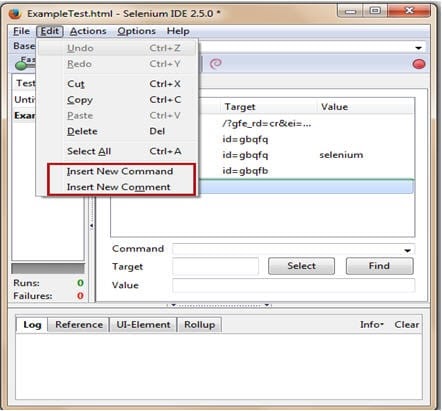
Edit menu provides options like Undo, Redo, Cut, Copy, Paste, Delete and Select All which are routinely present in any other edit menu. Amongst them, noteworthy are:
- Insert New Command – Allows the user to insert the new command/test step anywhere within the current test case.
- Insert New Comment – Allows the user to insert the new comment anywhere within the current test case to describe the subsequent test steps.
Insert New Command
The new command would be inserted above the selected command/test step.
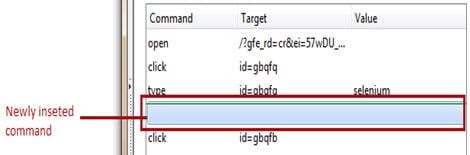
Now the user can insert the actual command action, target and value.

Insert New Comment
In the same way, we can insert comments.
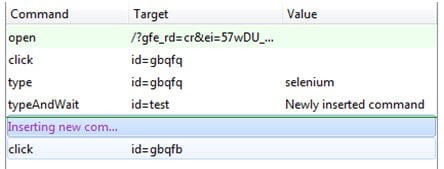
The purple color indicates that the text is representing a comment.
C) Actions Menu
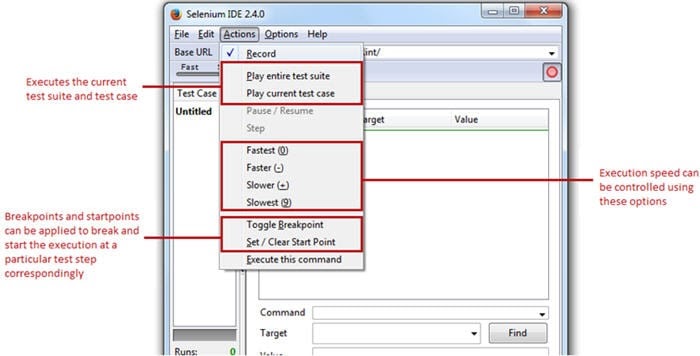
Actions Menu equips the user with the options like:
- Record – Record options fine-tunes the Selenium IDE into the recording mode. Thus, any action made by the user on the Firefox browser would be recorded in IDE.
- Play entire test suite – The option plays all the Selenium IDE test cases associated with the current test suite.
- Play the current test case – The option plays the current Selenium IDE test case that has been recorded/created by the user.
- Pause / Resume – User can Pause/Resume the test case at any point of time while execution.
- Toggle Breakpoint – User can set one or multiple breakpoint(s) to forcefully break the execution at any particular test step during execution.
- Set / Clear Start Point – User can also set start point at any particular test step for execution. This would enable user to execute the test case from the given start point for the subsequent runs.
- To deal with the page/element loads, the user can set the execution speed from fastest to lowest with respect to the responsiveness of the application under test.
D) Options Menu
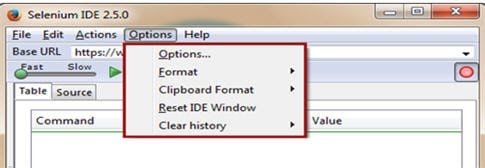
Options menu privileges the user to set and practice various settings provided by the Selenium IDE. The options menu is recommended as one of the most important and advantageous menu of the tool.
Options Menu is primarily comprised of the following four components which can be sub-divided into the following:
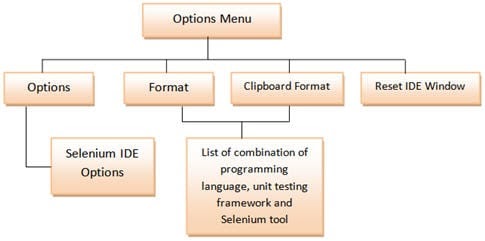
Options
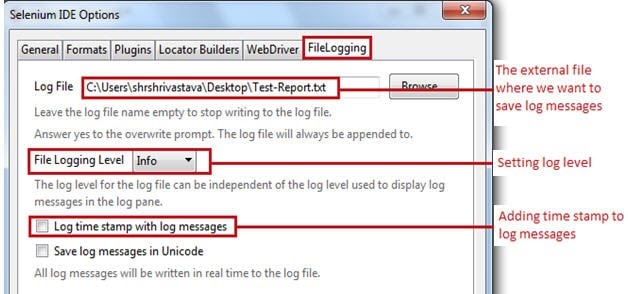
Selenium IDE Options dialog box
To launch the Selenium IDE Options dialog box, follow the steps:
- 1. Click on Options Menu
- 2. Click on the Options
A Selenium IDE Options dialog box appears.
Refer to the following figure.
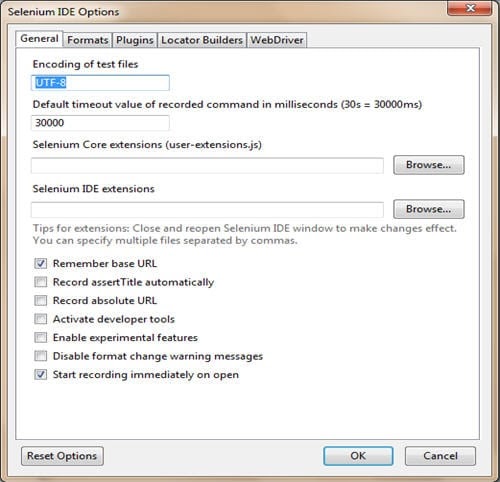
Selenium IDE Options dialog box aids the user to play with the general settings, available formats, available plug-ins and available locators types and their builders.
Let’s have a look at the few important ones.
General Settings
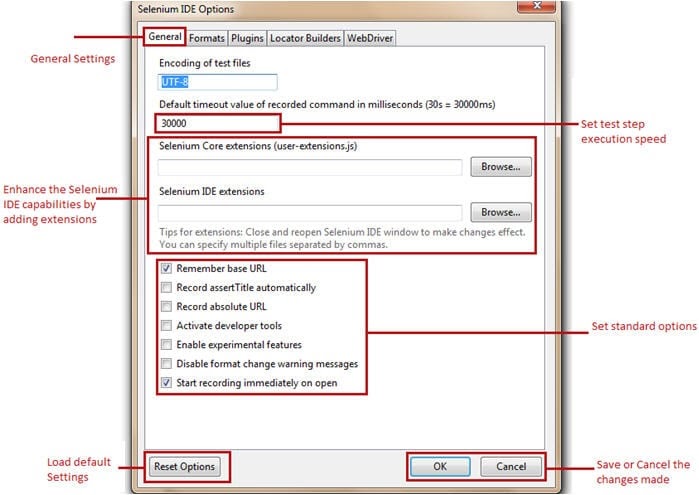
- Default Timeout Value – Default Timeout Value represents the time (in milliseconds) that selenium would wait for a test step to execute before generating an error. The standard timeout value is 30000 milliseconds i.e. 30 seconds. The user can leverage this feature by changing the default time in cases when the web element takes more/less than the specified time to load.
- Extensions – Selenium IDE supports a wide range of extensions to enhance the capabilities of the core tool thereby multiplying its potential. These user extensions are simply the JavaScript files. They can set by mentioning their absolute path in the text boxes representing extensions in the Options dialog box.
- Remember base URL – Checking this option enables the Selenium IDE to remember the URL every time we launch it. Thus it is advisable to mark it checked. Un-checking this option will leave the base URL field as blank and it will be re-filled only when we launch another URL on the browser.
- Record assertTitle automatically – Checking this field inserts the assertTitle command automatically along with the target value for every visited web page.
- Enable experimental features – Checking this field for the first time imports the various available formats into the Selenium IDE.
Formats
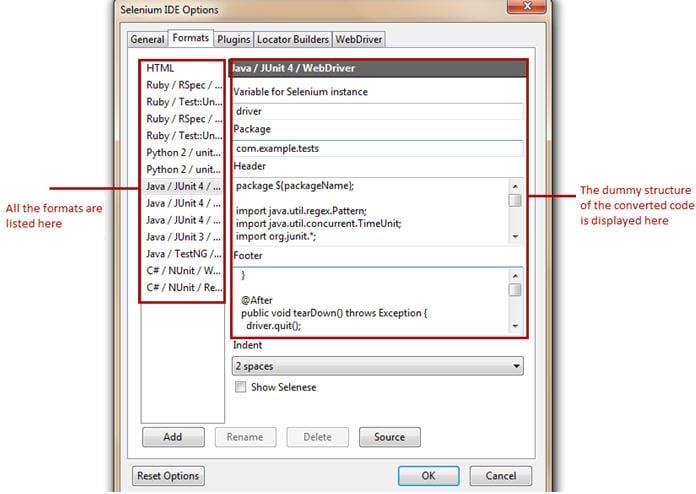
Formats tab displays all the available formats with selenium IDE. The user is levied with the choice to enable and disable any of the formats.
Refer to the following figure.

Get Selenium Training with Industry Oriented Topics From Real-Time Experts
- Instructor-led Sessions
- Real-life Case Studies
- Assignments
Selenium IDE Plugins
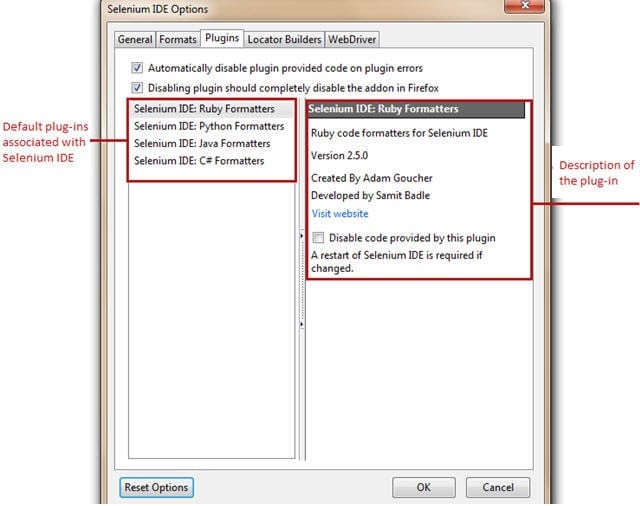
Plug-ins tab displays the supported Firefox plug-ins installed on our instance of Selenium IDE. There are a number of plug-ins available to cater different needs, thus we can install these add-ons like we do other plug-ins. One of the recently introduced plug-ins is “File Logging”. At the end of this tutorial, we will witness how to install and use this plug-in.
With the standard distribution, Selenium IDE comes with a cluster of following plug-ins:
- Selenium IDE: Ruby Formatters
- Selenium IDE: Python Formatters
- Selenium IDE: Java Formatters
- Selenium IDE: C# Formatters
These formatters are responsible to convert the HTML test cases into the desired programming formats.
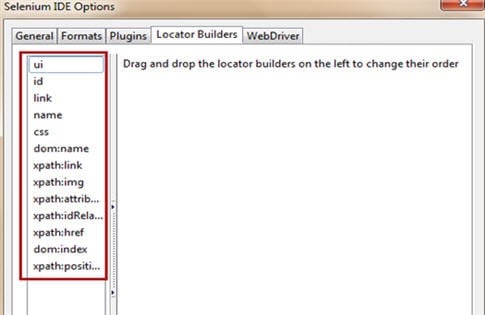
Locator Builders
Locator builders allow us to prioritize the order of locator types that are generated while recording the user actions. Locators are the set of standards by which we uniquely identify a web element on a web page.
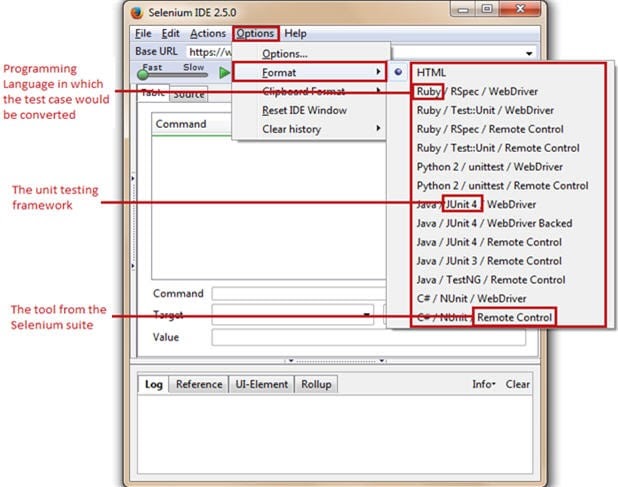
Formats
Formats option allows the user to convert the Selenium IDE test case (selenese commands) into the desired format.
E) Help Menu
As Selenium has a wide community and user base, thus various documentation, release notes, guides etc. are handily available. Thus, the help menu lists down official documentation and release notes to help the user.
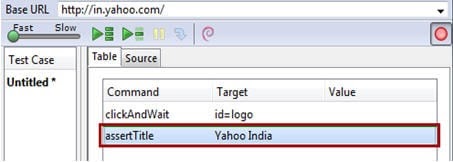
2. Base URL Bar
Base URL bar is principally same as that of an address bar. It remembers the previously visited websites so that the navigation becomes easy later on.
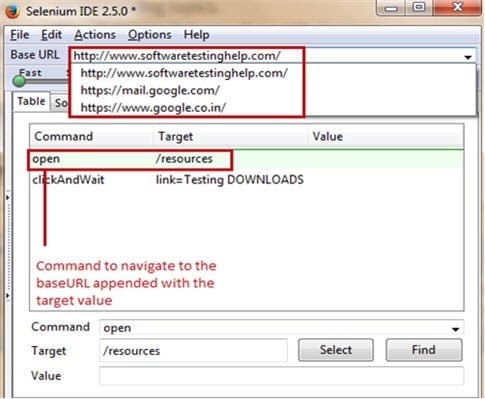
Now, whenever the user uses “open” command of Selenium IDE without a target value, the base URL would be launched on to the browser.
Accessing relative paths
To access relative paths, the user simply needs to enter a target value like “/download” along with the “open” command. Thus, the base URL appended with “/downloads” (http://docs.seleniumhq.org/resources) would be launched on to the browser. The same is evident in the above depiction.
3. Toolbar

Toolbar provides us varied options pertinent to the recording and execution of the test case.
- Playback Speed – This option allows the user to control the test case execution speed from fast to slow.

- Play test suite – This option allows the user to execute all the test cases belonging to the current test suite sequentially.

- Play test case – This option allows the user to execute the currently selected test case.

- Pause – This option allows the user to pause the current execution.
- Step – This option allows the user to step into the test step.
- Rollup – This option allows the user to combine multiple test steps to act as a single command.

- Record – This option allows the user to start/stop the recording of user actions. The hollow red ball indicates the start of the recording session whereas the solid red ball indicates the end of the recording session. By default, the Selenium IDE opens in the recording mode.
4. Editor
The editor is a section where IDE records a test case. Each and every user action is recorded in the editor in the same order in which they are performed.
The editor in IDE has two views, namely:
1) Table View
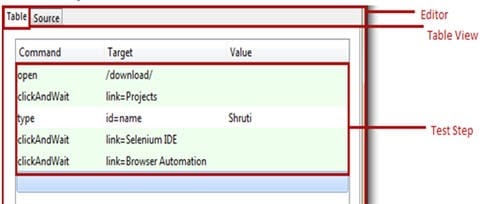
It is the default view provided by Selenium IDE. The test case is represented in the tabular format. Each user action in the table view is a consolidation of “Command”, “Target” and “Value” where command, target and value refer to a user action, web element with the unique identification and test data correspondingly. Besides recording it also allows the user to insert, create and edit new Selenese commands with the help of the editor form present in the bottom.
2) Source View

The test case is represented in the HTML format. Each test step is considered be a row <tr> which is a combination of command, target and value in the separate columns <td>. Like any HTML document, more rows and columns can be added to correspond to each Selenese command.
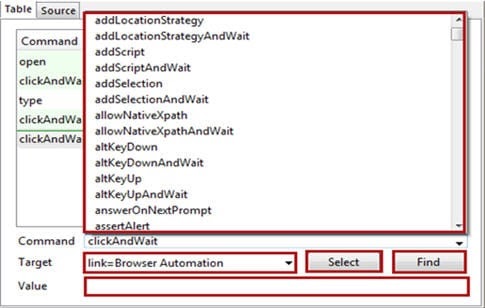
Editor Form lets the user to type any command and the suggestions for the related command would be populated automatically. The select button lets the user to select any web element and its locator would be fetched automatically into the target field. Find button lets the user find the web element on the web page against a defined target. Value is the test input data entered into the targets with which we want to test the scenario.
5. Test case pane
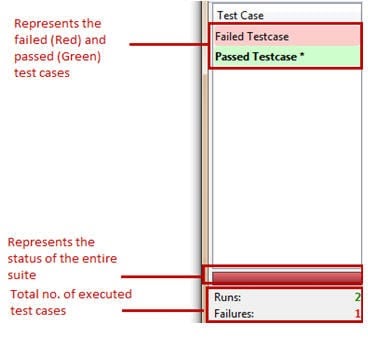
At the instance, we open Selenium IDE interface, we see a left container titled “Test case” containing an untitled test case. Thus, this left container is entitled as Test case pane.
Test case pane contains all the test cases that are recorded by IDE. The tool has a capability of opening more than one test case at the same time under test case pane and the user can easily shuffle between the test cases. The test steps of these test cases are organized in the editor section.
Selenium IDE has a color coding ingredient for reporting purpose. After the execution, the test case in marked either in “red” or “green” color.
- Red color symbolizes the unsuccessful run i.e. failure of the test case.
- Green color symbolizes the successful run of the test case
- It also layouts the summary of the total number of test cases executed with the number of failed test cases.
- If we execute a test suite, all the associated test cases would be listed in the test case pane. Upon execution, the above color codes would be rendered accordingly.
6. Log Pane
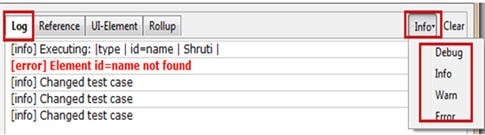
Log pane gives the insight about current execution in the form of messages along with the log level in the real time. Thus, log messages enable a user to debug the issues in case of test case execution failures.
The printing methods/log levels used for generating logs are:
- Error – Error message gives information about the test step failure. It may be generated in the cases when an element is not found, the page is not loaded, verification/assertion fails etc.
- Warn – Warning message gives information about unexpected conditions.
- Info – Info message gives information about the current test step execution.
- Debug – Debug messages give information about the technicalities in the backdrop about the current test step.
Logs can be filtered with the help of a drop-down located at the top-right corner of the footer beside the clear button. Clear button erases all the log messages generated in the current or previous run.
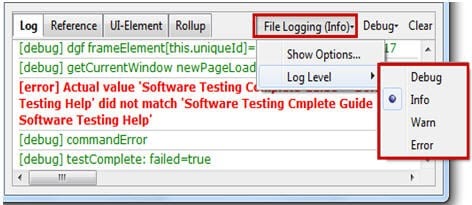
Generating Logs in an external medium
Recently introduced “File Logging” plug-in enables the user to save log messages into an external file. File Logging can be plugged into IDE like any other plug-in. Upon installation, it can be found as a tab named “File Logging” in the footer beside the Clear button.
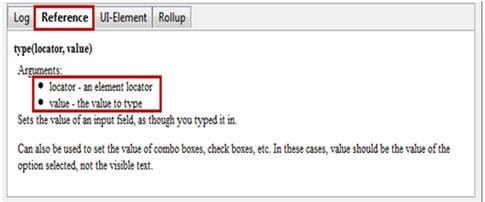
Reference Pane
Reference Pane gives the brief description about the currently selected Selenese command along with its argument details.
UI-Element Pane
UI – Element Pane allows Selenium user to use JavaScript Object Notation acronym as JSON to access the page elements. More on this can be found in UI-Element Documentation under Help Menu.
Rollup Pane

Rollup Pane allows the user to roll up or combine multiple test steps to constitute a single command termed as “rollup”. The rollup, in turn, can be called multiple times across the test case.
Conclusion
Through this tutorial, our objective was to make you familiar and accustomed with the basic terminologies and nomenclatures of Selenium IDE. We also presented a detailed study on all the features of Selenium IDE.
Here are the cruxes of this tutorial:
- Selenium IDE is an automated testing tool which supports record and playback.
- The user is not required to have any prior programming knowledge except for the basic understanding of HTML, JavaScript and DOM.
- The menu bar allows the user to create, save, edit and convert the recorded Selenium IDE test scripts. It also allows the user to set formats and plug-ins.
- The toolbar allows the user to set the test execution speed, to pause and resume test case, to roll up commands etc.
- Roll-ups combine more than one test step and thus the rolled up commands acts and executes as a single command.
- The editor allows the user to record or create test scripts. The editor has two views “table” and “source”.
- In the table view, each test step is comprised of a command, target and a value.
- Source view displays the test case in the HTML format.
- Test case pane shows a comprehensive list of failed and passed test cases with the relevant color-coding.
- Log Pane displays the test execution heath in the form of message.
- Log messages can be saved in a file using “File Logging” plug-in.
- Reference pane shows the description of every selected command.
- UI-Element and Rollup are generally used while creating advance Selenium IDE scripts.