
- Understanding Agile Methodologies and Principles | A Complete Tutorial
- What is a Work Breakdown Structure (WBS)? | Learn Overview, Steps, Benefits
- Traditional Project Management Tutorial | A Comprehensive Guide
- Total Quality Management (TQM): Complete Guide [STEP-IN]
- Total Productive Maintenance Tutorial | Get an Overview
- Virtual Team Tutorial – Learn Origin, Definition and its Scope
- The Rule of Seven in Project Management – Tutorial
- Make or Buy Decision – A Derivative Tutorial for Beginners
- What is Halo Effect? | Learn More through Tutorial
- Balanced Score Card Tutorial | Learn with Definition & Examples
- What is Supply Chain Management? | Tutorial with Examples
- Succession Planning Tutorial | A Complete Guide with Definitions
- What is Structured Brainstorming? | Quickstart & Learn the Tutorial
- Stress Management Tutorial | A Comprehensive Guide for Beginners
- What is a Statement of Work? | Learn with Definition & Examples
- What is Stakeholder Management? – The Ultimate Guide for Beginners
- How to Create a Staffing Management Plan? | Learn from Tutorial
- What is Resource Leveling? | A Comprehensive Tutorial
- Requirements Collection Tutorial: Gather Project Needs
- What Is a RACI Chart? | Learn with Example & Definitions
- Quality Assurance vs Quality Control: Tutorial with Definitions & Differences
- Project Workforce Management Tutorial | A Definitive Guide
- Project Time Management Tutorial: Strategies, Tips & Tools
- Project Management Success Criteria Tutorial | Understand and Know More
- Identify Risk Categories in Project Management | A Comprehensive Tutorial
- Project Records Management Tutorial | Quickstart -MUST READ
- Project Quality Plan (PQP) Tutorial | Ultimate Guide to Learn [BEST & NEW]
- Project Portfolio Management | A Defined Tutorial for Beginners
- Goals of a Project Manager Tutorial | The Ultimate Guide
- Project Management Triangle Tutorial: What It Is and How to Use
- Project Management Tools Tutorial | Learn Tools & Techniques
- What is PMO (project management office)? | A Complete Tutorial from Scratch
- Project Management Lessons | Learn in 1 Day [ STEP-IN ]
- What is a Project Kickoff Meeting? | Learn Now – A Definitve Tutorial
- Project Cost Management Tutorial | Steps, Basics, and Benefits
- Types of Contracts in Project Management | Learn with Examples
- Project Activity Diagram | Ultimate Guide to Learn [BEST & NEW]
- What is Project Procurement Management? | Tutorial Explained
- Procurement Documents Tutorial | The Ultimate Guide
- Process-Based Project Management Tutorial: A Beginner’s Guide
- What Is PRINCE2 Project Management? | A Definitive Tutorial for Beginners
- Effective Presentation Skills – Learn More through Tutorial
- Powerful Leadership Skills Tutorial | The Ultimate Guide
- PERT Estimation Technique Tutorial | Explained with Examples
- Pareto Chart Tool Tutorial | Learn Analysis, Diagram
- Organizational Structure Tutorial: Definition and Types
- Negotiation Skills for Project Management | Learn from the Basics
- Monte Carlo Analysis in Project Management Tutorial | A Perfect Guide to Refer
- Effective Management Styles Tutorial | The Ultimate Guide
- Management by Objectives (MBO) Tutorial | Overview, Steps, Benefits
- Leads, Lags & Float – Understand the Difference through Tutorial
- What is Knowledge Management? – Tutorial Explained
- What is Just-in-Time Manufacturing (JIT)? | Know More through Tutorial
- Gantt Chart Tool Tutorial: The Ultimate Guide
- Extreme Project Management Tutorial – Methodology & Examples
- Introduction for Event Chain Methodology Tutorial | Guide For Beginners
- Enterprise Resource Planning (ERP) | A Complete Tutorial for Beginners
- What Is Design of Experiments (DOE)? | Learn Now – A Definitve Tutorial
- Decision Making Tutorial – Know about Meaning, Nature, Characteristics
- Critical Path Method Tutorial | How to use CPM for project management
- What is Critical Chain Project Management? | A Complete Tutorial
- What is Conflict Management? | Learn the Definition, styles, strategies through Tutorial
- Effective Communication Skills Tutorial – Definitions and Examples
- Communication Models Tutorial – Project Management
- Methods of Communication Tutorial | A Complete Learning Path
- Communication Management Tutorial | Know more about Plans & Process
- What are Communication Channels? | Learn Now Tutorial
- Communication Blocker Tutorial | Explained with Examples
- Cause and Effect Diagrams Tutorial | The Ultimate Guide
- What is Benchmarking? | Technical & Competitive Tutorial
- Seven Processes of Prince2 Tutorial | Everything you Need to Know
- Design Thinking Tutorial – Quick Guide For Beginners
- What is Performance Testing | A Complete Testing Guide With Real-Time Examples Tutorial
- What is Confluence? : Tutorial For Beginners | A Complete Guide
- Lean Six Sigma Tutorial
- Agile Scrum Tutorial
- PMI-RMP Plan Risk Management Tutorial
- Designing the Blueprint Delivery Tutorial
- What is Confluence? : Tutorial For Beginners | A Complete Guide
- Program Benefits Management Tutorial
- Continuous Improvement – Agile Value Stream Mapping
- Program Organization Tutorial
- Risk and Issue Management Tutorial
- Project Integration Management Tutorial
- Planning and Control Tutorial
- Program Management Principles Tutorial
- program strategy Alignment Tutorial
- PMP Tutorial
- Program Governance Tutorial
- Program Life Cycle Management Tutorial
- PMP Exam Preparation Tutorial
- PMI-PgMP Tutorial
- Agile Methodologies and Frameworks- Kanban and Lean Management Tutorial
- JIRA Tutorial
- Primavera P6 Tutorial
JIRA Tutorial
Last updated on 25th Sep 2020, Blog, Project Management, Tutorials
JIRA is a web-based “Issue tracking system” or “Bug tracking system”. It is mainly used for agile project management. JIRA is a proprietary based tool, developed by Atlassian. The product name ‘JIRA’ is shortened from the word ‘Gojira’, which means Godzilla in Japanese
JIRA helps us to manage the project effectively and smoothly. It is a powerful tool to track the issues, bugs, backlogs of the project. JIRA is more customizable than Bugzilla. It helps the team to strive hard towards the common goal. JIRA is widely used by many organizations around the world.
The Benefits of JIRA
1. Built for Agile and Scrum management
Jira Software primarily focuses on Agile project management – offering features that are geared towards Scrum and Kanban methodologies.
Use it for tracking Agile project data such as:
- User stories: Each software product feature that needs to be developed
- Story Points: The effort you’ll need to complete your user stories
- Sprints: The time taken to complete a section of the project. A sprint can last anywhere from 1 – 4 weeks
You can also easily reorder the items in your product backlog, such as bugs, software issues, and user stories through the tool’s intuitive drag and drop function.
2. Great for issue management
Jira was originally intended to be a bug tracking software, and that’s where it excels.
What is a bug tracking tool?
It helps your software teams find, track, and record bugs in their software. A good bug or issue tracking tool like Jira gives your team a view of all the items in your backlog, including bugs and project tasks.
By having a single view – teams can prioritize what features or bugs they should work on during the next release.
3. Highly customizable
Whether you’re talking about a project management software, issue tracking tool, task management tool, Jira can be customized to fit any requirement. You can even customize workflows, reports, Scrum boards, and more.
Jira integrates with tons of popular third-party software to make your work easier.
Steps to Download and Install Jira Software
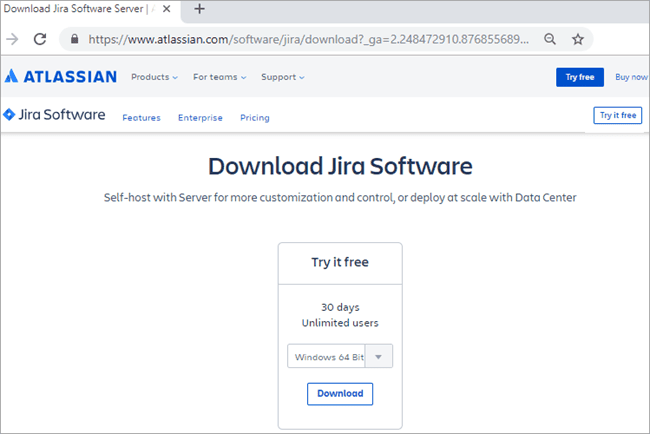
#1) Download ‘Atlassian-Jira-Software’ corresponding to your windows operating system environment.
Select the OS environment type and click the ‘Download’ button. The download page will look as shown below:
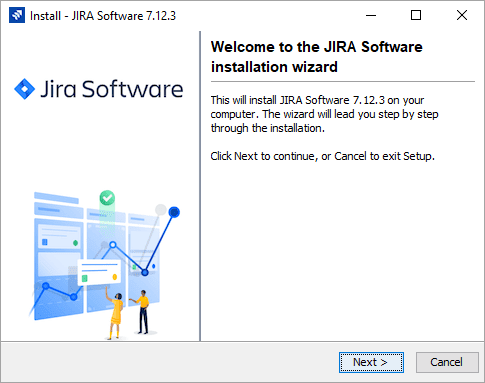
#2) Navigate to the folder on the machine in which the installation exe is downloaded. Run the installer exe, preferably as administrator (right click on the exe and choose ‘Run as administrator’ option).
Subscribe For Free Demo
Error: Contact form not found.
a) The installation wizard will start as shown in below image:
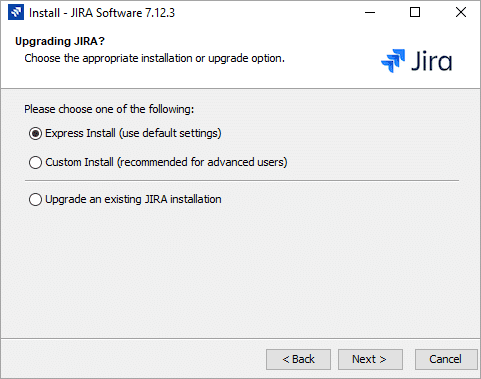
b) Select the appropriate radio button for the type of installation, as shown in the following image and then click the ‘Next’ button.
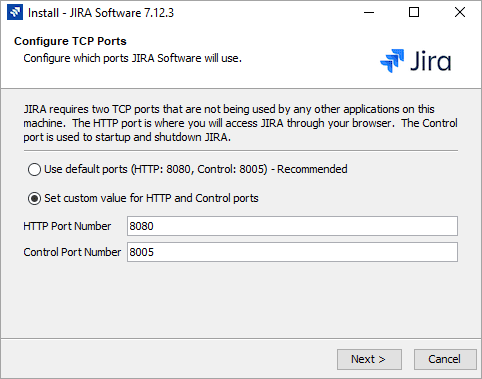
c) Configure the ports that will be used by Jira software as shown in the below image (ports on an individual machine can differ – they might not be exactly the same as shown in the below picture)
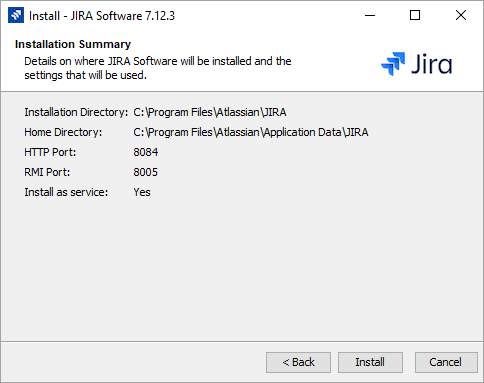
d) Next page will show the summary of choices done. (refer the below image)
e) Click on the ‘Install’ button.
This will start the installation process (copying of files etc.). At the end of the installation, it will show the page as shown in the image below.
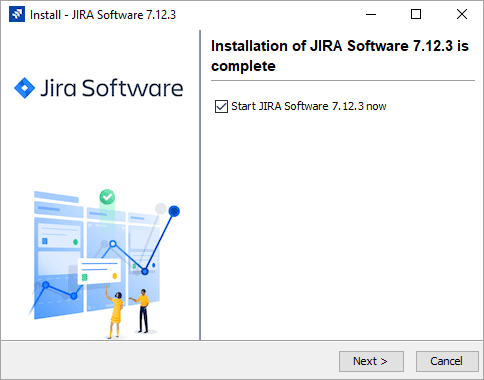
f) Observe ‘Start Jira 7.12.3 now’ checkbox. If this checkbox is checked, then after installation Jira will be started automatically. Click on ‘Next’ button.
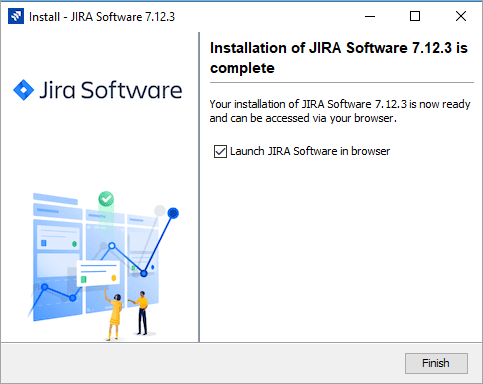
g) Click on ‘Finish’ button.
- Now launch Jira in a web browser.
- Create/Sign-up for Jira account. Once you log in, you need to enter the type of license.
Setting up Jira License
- Select the type of license and your organization name. (Refer the following image)
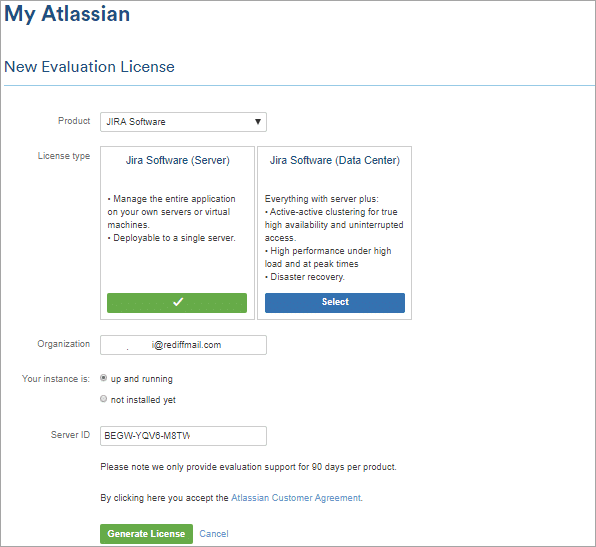
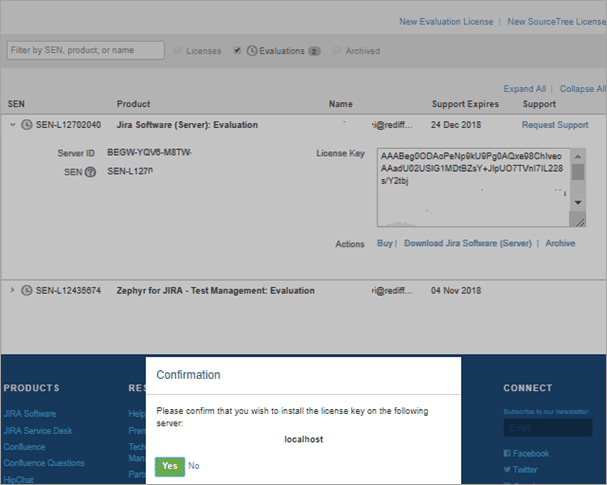
- Click on ‘Generate License’ button. Jira will display a confirmation popup (refer the below image). Click on ‘Yes’ on the confirmation popup. This will display the ‘Administrator account setup’ page.
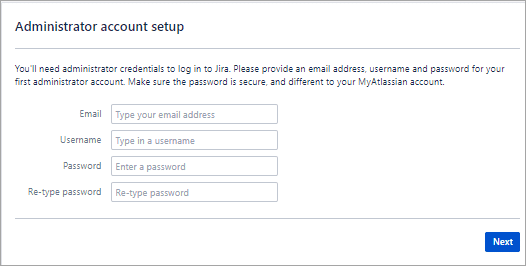
- An administrative account needs to be set up as shown in the below page. Enter the mandatory details and click on the ‘Next’ button.
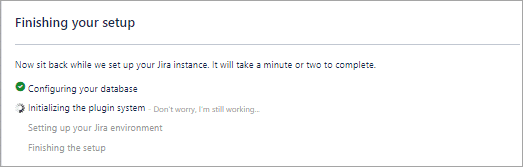
- Jira will automatically finish the setup as shown in the below image.
Once Jira setup is finished, the Jira server starts running, and the end user can launch Jira client instance using a web browser. (Refer the below image)
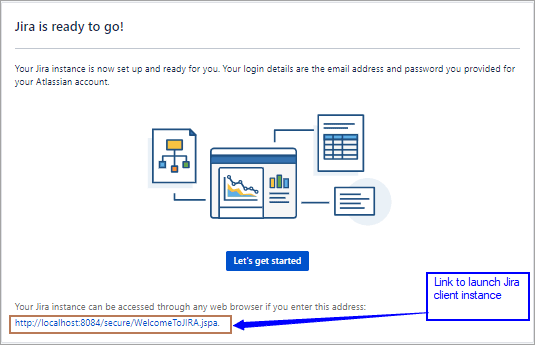
URL could be like: http://localhost:8084/secure/WelcomeToJIRA.jspa
Note: In large organizations, Jira server is set up in one place. Maybe in different geographical location and client, the URL will be created accordingly to use for a large number of users.
The Limitations of JIRA
Here are a few limitations that hold it from being a great management tool:
- The tool is hard to set up and get used to
- It’s complicated user interface can make managing tasks difficult
- No built-in timeline to track your project progress
- No collaboration features to communicate with your team
- It’s mainly built for engineering and software development teams
- No idea management features to keep track of your ideas and plans
- The tool can be expensive
The prerequisites for Jira to run properly in the system.
Step 1 – To access the full functionality of the system, Javascript should be enabled in the browser without the use of any script-blocking tool.
Step 2 – JRE/JDK should be updated to the latest version.
Setting up your JIRA Application
The installer would create the following shortcuts on the start menu −
- Access JIRA
- Start JIRA Server
- Stop JIRA server
- Uninstall JIRA
Step 1 – Click on Access JIRA
Step 2 – Select license type as JIRA SOFTWARE (Server) and organization name as Self.
Step 3 – “Your instance is” field should be up and running
Step 4 – Click on Generate License
Step 5 – A confirmation pop up box would appear. Just click on YES.
Step 6 – You will now have to enter administrator account details and once setup is complete more administrators can be added.
Step 7 – After this enter your mail server details to set email notifications. JIRA will now be able to send notifications when problems differ.
Step 8 – Jira will automatically finish setting up when done!
Once JIRA finishes the setup and starts running on the server, the user can access it from any browser. Your Jira site will be accessible from your base URL or a URL like this: http://<computer_name_or_IP_address>:<port>
Create a new project
Jira products come with many different project templates created to suit your team’s needs and workflow. For example, you can create projects optimized for Scrum or Kanban methodologies.
WHAT IS SCRUM?
Scrum is one of the most popular frameworks for implementing agile. With scrum, the product is built in a series of fixed-length iterations called sprints that give teams a framework for shipping on a regular cadence.

Get Ramped Quickly on JIRA Training from Industry Experts
- Instructor-led Sessions
- Real-life Case Studies
- Assignments
What is kanban?
Kanban is a popular framework used to implement agile software development. It requires real-time communication of capacity and full transparency of work. Work items are represented visually on a kanban board, allowing team members to see the state of every piece of work at any time.
Jira admins can create projects from any template. By default, any user can create their own next-gen project( like the next-gen Scrum or next-gen kanban projects). Jira admins can change this setting in global permissions.
To create a project:
- 1.Select Projects > Create project in the navigation.
- 2.Choose either a classic project or a next-gen project.
- 3.Give your project a name.
- 4.Double check that the project’s template matches your team’s needs. To view a list and choose from other templates, select Change.
- 5.Select Create.
A project key is automatically generated when the project is created. Whoever created the project is set as the project lead by default.
To change these details:
- 1.From your project’s sidebar, select Project settings.
- 2.Select Details.
The template you chose is remembered and used as the default whenever you create a project.
Create a project that shares its configuration with another project
Only Jira admins can create projects with a shared configuration.
Projects that share configuration also share:
- issue types
- workflows
- screens
- fields
- permissions
- notifications
- and more
If a change is made to one of the projects’ configurations, that change affects all the projects that share that configuration.
To create a project with a shared configuration:
- 1.Select Projects > Create project in the navigation.
- 2.Choose Classic project.
- 3.Give your project a name.
- 4.Select Advanced.
- 5.Tick the Share settings with an existing project checkbox.
- 6.Use the Choose project dropdown to select the project from which you want your new project to share its configuration..
- 7.Select Create.
JIRA workflow
A Jira workflow is a set of statuses and transitions that an issue moves through during its lifecycle, and typically represents a process within your organization. Workflows can be associated with particular projects and, optionally, specific issue types by using a workflow scheme.
Jira has built-in workflows that you can use without needing to make any changes, or you can start fresh and create your own. You can’t edit the built-in workflows, but you can copy them and use the copy as a basis to create your own.
Here’s an example of a default workflow:
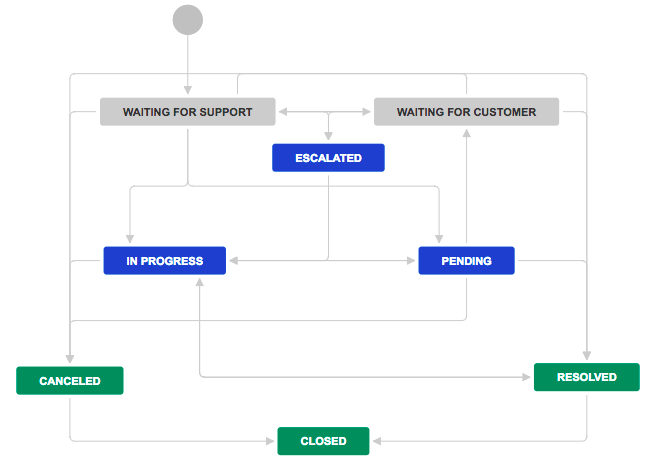
Statuses and transitions
A status represents the state of an issue at a specific point in your workflow. When defining a status, you can optionally specify properties.
A transition is a link between two statuses that enables an issue to move from one status to another. In order for an issue to move between two statuses, a transition must exist.
A transition is a one-way link, so if an issue needs to move back and forth between two statuses, two transitions need to be created. The available workflow transitions for an issue are listed on the View issue screen.
Active and inactive workflows
There are slight differences between editing an inactive and an active workflow. We place restrictions on the modifications you can make to an active workflow, due to the impact the changes will have on projects and/or issue types that use this workflow.
| Workflow status | Description |
|---|---|
| Inactive workflow | An inactive workflow is a workflow that is not currently being used by any projects. Because there are no issues currently transitioning through an inactive workflow, you can edit the workflow’s steps and transitions directly. For details on activating a workflow, see steps below. For more detailed information, see Working in text mode. |
| Active workflow | An active workflow is a workflow that is currently being used by one or more projects. When you edit an active workflow, Jira first creates a draft of it. When you’ve finished, you can publish your draft and, optionally, save your original workflow as an inactive backup. The following limitations apply when editing the draft for an active workflow:It’s not possible to edit the workflow name (only the description) if a workflow is active.You can’t delete statuses in active workflows. see Cannot Add Transitions or Delete Steps in Draft Workflows.If a status has no outgoing transitions (Global transitions are not considered), it can’t have any new outgoing transitions added (regular or global).You can’t change the step ID. See Cannot Add Transitions or Delete Steps in Draft Workflows.To make any of the modifications listed above, you need to copy the workflow, modify the copy, and then activate it. |
Activating a workflow
All workflows are inactive until you associate them with a workflow scheme, which can then be associated with a project. To activate a workflow:
- 1.Select
> Issues.
- 2.Click Workflow schemes.
- 3.Either click Add workflow scheme or edit an active workflow scheme.
- 4.Add your workflow to the scheme. (See Configuring workflow schemes for more detailed information.)
To finish activating your workflow, associate the workflow scheme it’s in with a project (if an issue type is not defined in the project’s issue type scheme, that specific workflow is not used):
- 1.In the sidebar, click Issue type schemes.
- 2.Click Associate to begin the migration process.
Each issue needs to have a valid status, so you may need to assign statuses to a select number of issues after you switch workflow schemes.
A Jira project must always be associated with a workflow scheme, since all issues must move through a workflow. To disassociate a custom workflow scheme from a project, simply associate that project to the default workflow scheme instead.
Adding a transition to a workflow
To add a transition, open your workflow in text mode:
- 1.Select
> Issues.
- 2.Click Workflows > Edit your selected workflow.
- 3.Click the Text tab > Add Transition, then fill in the details.
In the Transition View field, select either:
- No view for transition — choose this if you do not need to prompt the user for input before the transition is executed (i.e. the transition will occur instantly when the user clicks the transition)
- Or, the name of a screen (from the dropdown menu) that will be shown to users, asking for input before the transition is executed. You can choose one of Jira’s default screens or any other screen you have created. If no existing screen is suitable, you may wish to create a new screen for the transition.
You can view workflow statuses and transitions in classic projects. Click the status dropdown when viewing an issue and choose View workflow.
Adding a status to a workflow
- 1.Select
> Issues.
- 2.Click Statuses > Add status.
Setting the resolution field
In Jira, an issue is either open or closed, based on the value of its resolution field (not its status).
- An issue is open if its resolution field isn’t set.
- An issue is closed if its resolution field has a value (fixed or can’t reproduce, for example).
This is true regardless of the issue’s current status (open or in progress, for example). If you need your workflow to force an issue to be open or closed, you will need to set the issue’s resolution field during a transition. There are two ways to do this:
- Set the resolution field automatically via a post function.
- Prompt the user to choose a resolution via a screen.
Renaming workflow transition buttons
If you copied the system workflow and you wish to rename the workflow transition buttons on the View Issue page, you must delete the following properties from all transitions in the copied workflow:
- jira.i18n.title
- jira.i18n.description
Otherwise, the default names (i.e. values of these properties) will persist.
JIRA certifications
Jira Administrator- Manage, customize, and configure Jira Server for any software or business team
Jira Project Administrator- Configure projects and boards, customize workflows and manage project permissions
Agile Team Leader- Build on your agile skills to optimize Jira Software for your development teams
Jira Service Desk Administrator- Manage and configure Jira Service Desk Server for your service management teams
Confluence Administrator- Enable the best team experience for creating and managing content
Jira Cloud User Badges- Configure and use Jira Software to find, organize and report on your work.