
- File formats in Hadoop Tutorial | A Concise Tutorial Just An Hour
- Controlling Hadoop Jobs Using Oozie Tutorial | The Complete Guide
- Apache Spark Streaming Tutorial | Best Guide For Beginners
- What is Elasticsearch | Tutorial for Beginners
- Amazon Kinesis : Process & Analyze Streaming Data | The Ultimate Student Guide
- Apache Camel Tutorial – EIP, Routes, Components | Ultimate Guide to Learn [BEST & NEW]
- Apache NiFi (Cloudera DataFlow) | Become an expert with Free Online Tutorial
- Kafka Tutorial : Learn Kafka Configuration
- Apache Sqoop Tutorial
- Spark And RDD Cheat Sheet Tutorial
- Apache Pig Tutorial
- Talend
- Cassandra Tutorial
- Kafka Tutorial
- HBase Tutorial
- Spark Java Tutorial
- ELK Stack Tutorial
- Netbeans Tutorial
- PySpark MLlib Tutorial
- Spark RDD Optimization Techniques Tutorial
- Apache Spark & Scala Tutorial
- Apache Impala Tutorial
- Apache Oozie: A Concise Tutorial Just An Hour | LearnoVita
- Apache Storm Advanced Concepts Tutorial
- Apache Storm Tutorial
- Hadoop Mapreduce tutorial
- Hive cheat sheet
- Spark Algorithm Tutorial
- Apache Spark Tutorial
- Apache Cassandra Data Model Tutorial
- Big Data Applications Tutorial
- Advanced Hive Concepts and Data File Partitioning Tutorial
- Hadoop Architecture Tutorial
- Big Data and Hadoop Ecosystem Tutorial
- Apache Mahout Tutorial
- Hadoop Tutorial
- BIG DATA Tutorial

Netbeans Tutorial
Last updated on 12th Oct 2020, Big Data, Blog, Tutorials
Scratching your head while thinking what is Netbeans? Well, this is the right place for you. Netbeans is an open-source integrated development environment for developing with Java, PHP, C++, and other programming languages. This NetBeans tutorial will provide you with the basic workflow along with the complete insight on the installation of Netbeans.
Netbeans is an open-source Integrated Development Environment (IDE). It is used to develop applications with Java, PHP, C++, HTML and many other programming languages. The applications are developed using modules in Java. NetBeans can run on any operating system such as Windows, MacOS, Linux etc.
Moving ahead, let’s see how to set up NetBeans.
How to Download and Install NetBeans
Subscribe For Free Demo
Error: Contact form not found.
Let me guide you through the process of installing NetBeans on your system. Just follow the below steps:
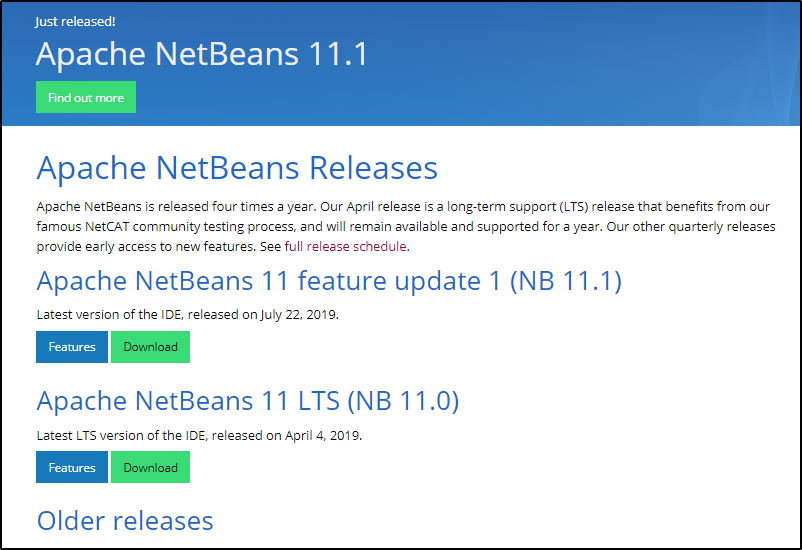
Step1: Go to the link: https://netbeans.apache.org/download/index.html. You can find the various versions of NetBeans with respect to the coming years. Latest version is Apache Netbeans 11.1. You can go ahead and download any version as per your choice.
Refer to the below screenshot to get a better understanding.;
Click on the download link against your matching system configurations. Once you are done with the download, you have to select the Accept License Agreement radio button and you will be guided through the steps to install IDE.
By following these steps, you are done with the installation part. Moving ahead in this NetBeans tutorial, its time we build our own Java application.
Java, J2EE & SOA Certification Training
- Instructor-led Sessions
- Real-life Case Studies
- Assignments
- Lifetime Access
Excited? Let’s get started!
NetBeans Tutorial: Create your First Project
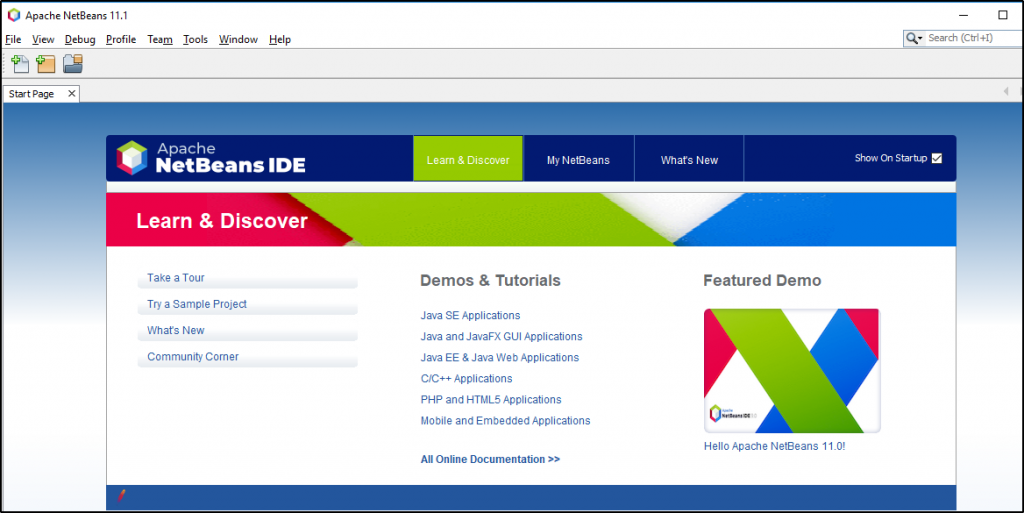
Netbeans IDE has an easy layout structure with limited numbers of buttons.
Let’s see how NetBeans UI looks like:
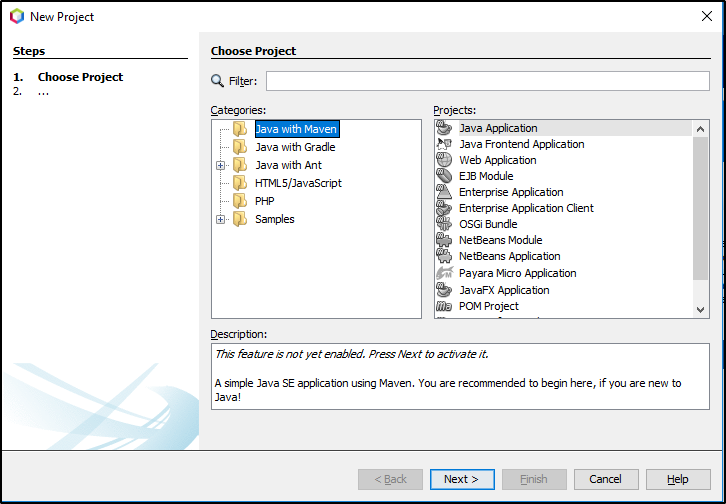
Noe, let’s create our first Project.
Just go to File -> New Project. Select the “Java” category and “Java Application” projects. Refer the below screenshot for more understanding:
Select Next and Name your first project. You can also change the project location as per your convenience.
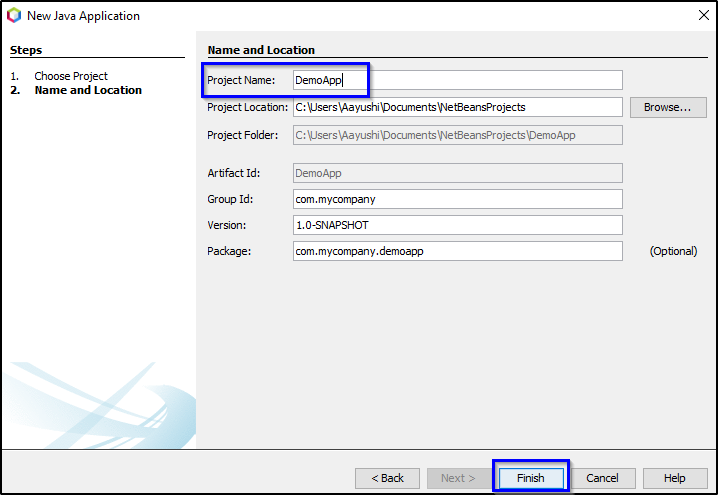
Click on “Finish” and you are set to go, your project is ready!
After the project has been created the next step is to create a Java source file.
Features of NetBeans IDE
Here are the features of NetBeans IDE:
Open Source
NetBeans is free to use and open source Integrate Development Environment (IDE).
Develop Applications
Develop desktop, web, and mobile application in languages such as Java, HTML5, JavaScript, PHP, C, C++, etc.
Modules
NetBeans platform provides easy to use tested modules to extend the features of your application. If you’re a developer, then easily integrate third-party modules or develop your own and contribute. Install NetBeans modules easily, uninstall, activate, and deactivate anytime.
Templates
NetBeans ID also has a lot of templates and tools, such as the Matisse GUI Builder, which enables to design your application’s layout easily.
Supports Latest Java Technologies
The official IDE for Java 8 is NetBeans IDE. Create Java applications to work with new features introduced with Java 8 i.e. lambdas, functional operations, etc.
Easier and faster code editing
The NetBeans IDE also has an editor to manage code efficiently. The editor formats code, indents lines, highlights source code, refactors code, provides coding tips, etc.
Extending Editor
The Editor supports a lot of features for languages like Java, C, C++ etc. Extend it easily with plugins for other programming languages.
Support Multiple Languages
NetBeans IDE supports application development in multiple languages such as C, C++, PHP etc. It provides tools and editors for XML, HTML, Groovy , PHP, JavaScript, etc.
Efficient Project Management
To manage the project, its files, code, and other related files could become difficult. But, with NetBeans IDE, easily manager project with different views of your project, with multiple project windows, to manage efficiently. The need of today, versioning has in-built support for Subversion, Git integration.
Cross Platform
Install NetBeans IDE on all Java supporting platforms i.e. Windows to Linux to Mac OS X. NetBeans IDE is written in Java, so “Write Once, Run Anywhere” is valid here too.
A Step-by-step Guide to Creating NetBeans Web Apps
Web application refers to a software solution that is deployed in a server and can be accessed online through a Web browser. These types of applications typically intertwine more than one technology; creating one from scratch has numerous approaches. The basic idea is that one must have a good understanding of the technologies involved and programming practices like MVC. NetBeans as an IDE provides a lot of features to ease the development process. This article shows how to create a Web application in NetBeans using the bare minimum of tools and technologies.
Web or Enterprise Application Project in NetBeans
Web applications basically run in a Web Server such as Tomcat (which also is a Servlet container) whereas an Enterprise Application comprises EJB components and needs an Application Server like GlassFish, Wildfly, and so forth, as the enterprise container. This is the basic difference between Web and enterprise application projects from the perspective of the NetBeans IDE.
In NetBeans, when we create a Web application project using a web server like Tomcat, the choice is to use non-EJB techs for server-side scripting. (One such technology, called Spring, has become a widely used and popular choice among developers.) However, if we opt to use an Application Server like Glassfish or Wildfly, we are open to use both Servlet/JSP and EJBs etc. Therefore, if we use one of such application servers to create a pure Web application, we are actually using more than we need. No harm there, but it is a misuse of resources because application servers are clearly “heavier” that Web servers.
Another distinctive trait between them is that the final archive file created by a Web Application Project is called WAR file and the final archive file create by Enterprise Application Project is an EAR archive. Therefore, they have their relevant file extension, .WAR and .EAR, respectively.
Parts of a Web Application
- Email Article
- Print Article
A typical Web application has three parts to it, called Front tier, Middle tier, and the End tier or Back end database tier.
The front tier typically uses HTML, CSS, JavaScript, and so on, for client-side processing and rendering. There are many other JavaScript-enabled, client-side toolkits like Jquery, Flex, Vaadin, GWT, and the like, that may be used to fetch data from the server side, or we can intertwine more than one technology.
The middle tier contains the business logic of the application and does all the server-side processing with the Web Server such as session management, data persistence, transaction management, request/response processing, and so forth. In Java, we may use a Servlet, JavaBeans, or EJB to implement the middle tier business logic.
The database tier interfaces with the database with JDBC. It typically creates a bridge to interact with the middle tier for further processing.
This is grossly how a Web application project is designed. Apart from this simplified view, there are many other technologies may be interleaved to enhance the responsiveness and functionalities of a Web application. But here, in the following project, we’ll stick to using minimal technologies. The idea, however, may be used to include other techs such as JPA, AJAX, JavaScript, Web Services, and EJBs.
Tomcat is a open source Web Server developed by Apache Software Foundation (ASF). It is a bit more than just a Web Server because it implements some of the Java EE specifications such as Java Servlet, Java Server Pages (JSP), Java EL, and WebSocket apart from being a pure HTTP Web server. Because it does not implement the EJB specification, it cannot be called a complete Java EE compliant application server. However, there is an enterprise version of this Web Server called Apache TomEE; at the time this article was written, it is still not Java EE 7 compliant, but is Java EE 6 compliant.
Problem Statement
With the emphasis on the steps to create a Web application in NetBeans, the problem we try to implement is rudimentary. We’ll use JSF and HTML to send a number to the Server, which would respond back with an appropriate number converted to binary, hexadecimal, or octal. The result will be rendered in the browser along with the user input interface.

Step 1: Create a Web Application Project
- Open NetBeans. File → New Project…
Figure 1: Starting a new project - Select Java Web from the Project categories and Web Application from the list of Projects. Click Next.
- Give a Project Name, for example WebProject1. Click Next.

Figure 2: Naming the project
Select the Server, for example Apache Tomcat, leave the other values as default. Click Next.
Sponsored Content
The Best ERP Software Vendors
By TechnologyAdvice
Enterprise resource planning (ERP) software isn’t just for multinational corporations anymore.
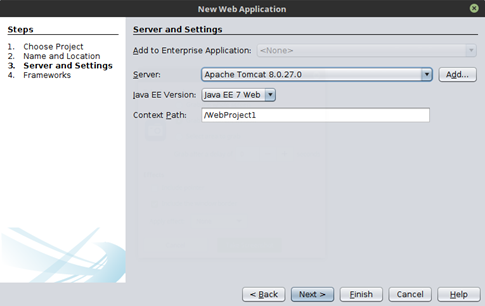
Figure 3: Selecting the server
Select the Web Application Framework JavaServer Faces from the list of frameworks. Leave the configuration as its default. Click Finish.
This will create the Project structure as follows.

Figure 4: Selecting the Project structure
Step 2: Create the Model Class
Right-click the Source Package in the project tree structure and select New… → Java Class.
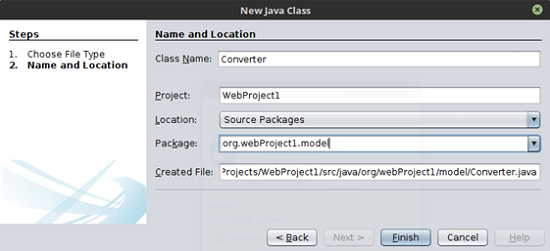
Figure 5: Selecting a new Java class
Enter the class name, for example Converter. Provide the package name, such as org.webproject1.model and click Finish. This will create a Java class file with the given name. The content of this file is given below.
- package org.webproject1.model;
- public class Converter {
- private int number;
- private String result;
- public int getNumber() {
- return number;
- }
- public void setNumber(int number) {
- this.number = number;
- }
- public String getResult() {
- return result;
- }
- public void setResult(String result) {
- this.result = result;
- }
- public void toBinary() {
- result = Integer.toBinaryString(number);
- }
- public void toHex() {
- result = Integer.toHexString(number);
- }
- public void toOctal() {
- result = Integer.toOctalString(number);
- }
- public void clear(){
- result = “”;
- }
- }
Step 3: Create the Controller Class
In a similar manner as mentioned above, create another Java class called ConverterController in another package named org.webproject1.controller. The contents of the file are listed below.
- package org.webproject1.controller;
- import javax.faces.application.FacesMessage;
- import javax.faces.bean.ManagedBean;
- import javax.faces.component.UIInput;
- import javax.faces.component.UIPanel;
- import javax.faces.context.FacesContext;
- import org.example.model.Converter;
- @ManagedBean(name = “converterController”)
- public class ConverterController {
- private Converter converter = new Converter();
- private UIPanel resultPanel;
- private UIInput numberInput;
- public Converter getConverter() {
- return converter;
- }
- public void setConverter(Converter converter) {
- this.converter = converter;
- }
- public UIPanel getResultPanel() {
- return resultPanel;
- }
- public void setResultPanel(UIPanel resultPanel) {
- this.resultPanel = resultPanel;
- }
- public UIInput getNumberInput() {
- return numberInput;
- }
- public void setNumberInput(UIInput numberInput) {
- this.numberInput = numberInput;
- }
- public String toBinary() {
- FacesContext ctx = FacesContext.getCurrentInstance();
- try {
- converter.toBinary();
- resultPanel.setRendered(true);
- ctx.addMessage(null, new
- FacesMessage(FacesMessage.SEVERITY_INFO,
- “Decimal number converted to binary”, null));
- } catch (Exception ex) {
- resultPanel.setRendered(false);
- ctx.addMessage(null, new
- FacesMessage(FacesMessage.SEVERITY_ERROR,
- ex.getMessage(), null));
- }
- return null;
- }
- public String toHex() {
- FacesContext ctx = FacesContext.getCurrentInstance();
- try {
- converter.toHex();
- resultPanel.setRendered(true);
- ctx.addMessage(null, new
- FacesMessage(FacesMessage.SEVERITY_INFO,
- “Decimal number converted to Hexadecimal”,
- null));
- } catch (Exception ex) {
- resultPanel.setRendered(false);
- ctx.addMessage(null, new
- FacesMessage(FacesMessage.SEVERITY_ERROR,
- ex.getMessage(), null));
- }
- return null;
- }
- public String toOct() {
- FacesContext ctx = FacesContext.getCurrentInstance();
- try {
- converter.toOctal();
- resultPanel.setRendered(true);
- ctx.addMessage(null,
- new FacesMessage(FacesMessage.SEVERITY_INFO,
- “Decimal number converted to Octal”,
- null));
- } catch (Exception ex) {
- resultPanel.setRendered(false);
- ctx.addMessage(null, new
- FacesMessage(FacesMessage.SEVERITY_ERROR,
- ex.getMessage(), null));
- }
- return null;
- }
- public String clear() {
- FacesContext ctx = FacesContext.getCurrentInstance();
- try {
- converter.clear();
- resultPanel.setRendered(false);
- ctx.addMessage(null, new
- FacesMessage(FacesMessage.SEVERITY_INFO,
- “Results Cleared”, null));
- } catch (Exception ex) {
- resultPanel.setRendered(false);
- ctx.addMessage(null, new
- FacesMessage(FacesMessage.SEVERITY_ERROR,
- ex.getMessage(), null));
- }
- return null;
- }
- }
Step 4: Create the View
Observe that the index.xhtml file is automatically created when we have created the project. Open the file and add the following changes.
- <?xml version=’1.0′ encoding=’UTF-8′ ?>
- <!DOCTYPE html PUBLIC “-//W3C//DTD XHTML 1.0 Transitional//EN”
- “http://www.w3.org/TR/xhtml1/DTD/xhtml1-transitional.dtd”>
- <html xmlns=”http://www.w3.org/1999/xhtml”
- xmlns:h=”http://xmlns.jcp.org/jsf/html”
- xmlns:f=”http://xmlns.jcp.org/jsf/core”>
- <h:head>
- <title>Facelet Title</title>
- </h:head>
- <h:body>
- <f:view>
- <h:form id=”convForm”>
- <h4>Converter</h4>
- <h:panelGrid columns=”3″>
- <h:outputLabel value = “Enter Base 10 Number “
- for = “number”/>
- <h:inputText id = “number”
- value=”#{converterController.converter
- .number}”
- required=”true”
- binding=”#{converterController.numberInput}”/>
- <h:message for=”number”/>
- </h:panelGrid>
- <div>
- <h:commandButton
- action=”#{converterController.toBinary()}”
- value=”Binary”/>
- <h:commandButton
- action=”#{converterController.toHex()}”
- value=”Hexa”/>
- <h:commandButton
- action=”#{converterController.toOct()}”
- value=”Octal”/>
- <h:commandButton
- action=”#{converterController.clear()}”
- value=”clear” immediate=”true”/>
- </div>
- </h:form>
- <h:panelGroup
- binding=”#{converterController.resultPanel}”
- rendered=”false”>
- <h4>Result</h4>
- <h:panelGrid columns=”1″>
- <h:outputText value=”Number
- #{converterController.converter.number}”/>
- <h:outputText value=”Result
- #{converterController.converter.result}”/>
- </h:panelGrid>
- </h:panelGroup>
- </f:view>
- </h:body>
- </html>
Step 4: Deploy and Run the Project
Select Run → Run Project from the NetBeans menu. This will automatically compile the Java classes, start up the Tomcat Server, deploy the project in the Server and finally will open the project in a browser. Here is the output we get from the above code.
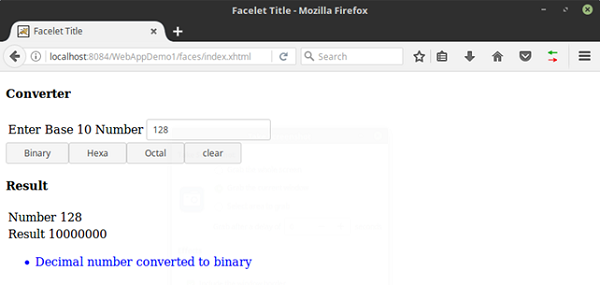
Figure 6: The project is running
Conclusion
If we delve into technologies used in a Web project, there are too many and a lot to understand about using them. Here, we emphasize implementing one from scratch. We also could have used JSP and Servlet, but, JSF seems to be the de facto tech of Java’s official Web application development. It seems JSF may take over JSP/Servlet in the future. JSP/Servlet will be deprecated or they will continue as a legacy tech with focused improvement on JSF.